The Image element allows you to overlay an additional image onto any step in a Step-by-Step Guide or at any timestamp in interactive demos and videos. This is useful for inserting supplementary visuals such as annotations or branded assets directly onto a step without re-recording.
Adding the Image Element
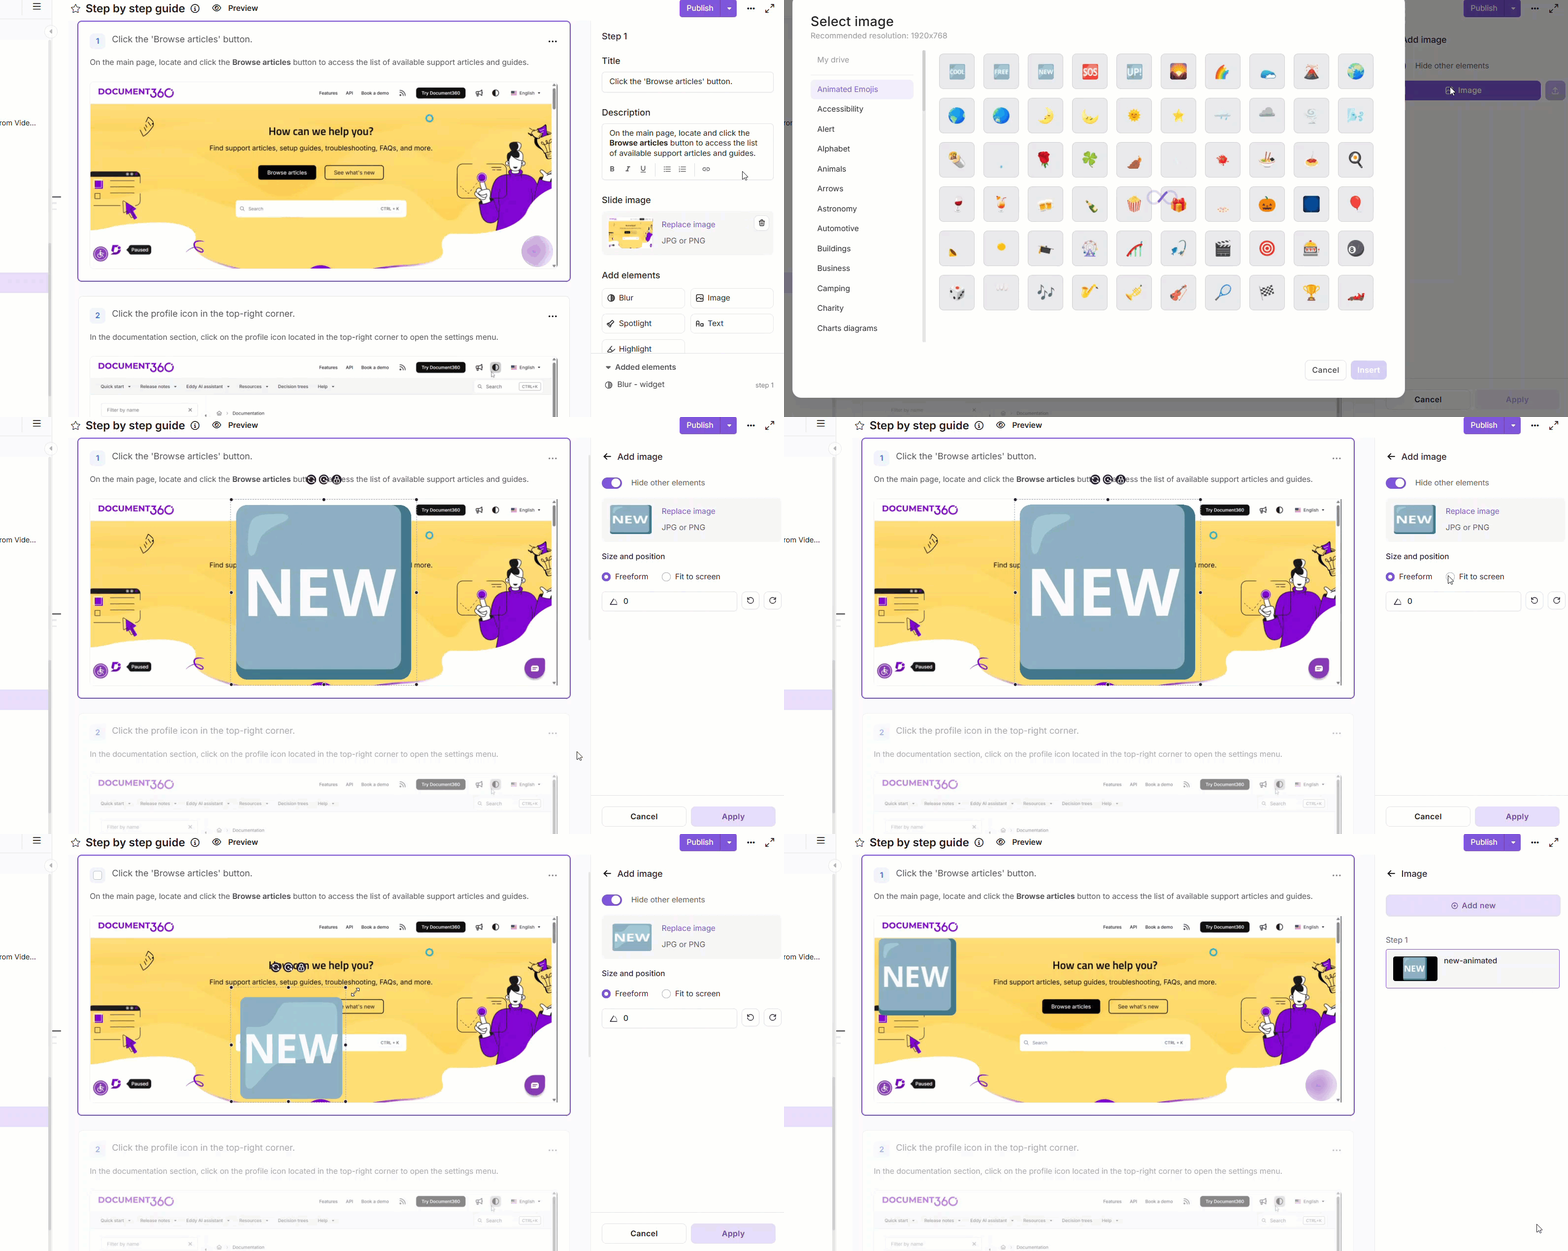
Adding an image to a Step by step guide
- Navigate to Add elements in the right pane.
- Click Image. If one or more image elements have already been added, click Add new to insert another.
- Enable the Hide other elements toggle to temporarily hide all other elements on the current step while configuring the image. Other elements are hidden temporarily and are not deleted.
- To add an image, click Image. In the Select image panel, choose from one of these sources:
- Recently used - Pick an image you have recently used in a Step by step guide, recorded video, or interactive demo. Images are listed from the most recent to the oldest.
- My drive - Browse or search your Document360 Drive folders and select an image. To add a new image, open the desired folder and click Upload to choose a file from your local explorer. Click Go back to return to the Select image panel.
- Predefined image assets - Pick from the available categories, such as Animated Emojis, Accessibility, and Alert.
The supported formats are JPG, JPEG, and PNG, with a maximum file size of 10 MB, a recommended resolution of 1526×870, and a minimum of 100×100. In My drive, images that don't meet these requirements appear grayed out and can't be selected. Hover over the image to see the File not supported message with the required specifications.
- Click Insert to add the selected image.
- Under Size and position, choose a placement mode:
- Freeform - Adjust size and position freely. Enter an exact value in the Angle field or use Rotate left or Rotate right to adjust manually.
- Fit to screen - The image fills the step's image area by default.
- Alternatively, drag the edges of the image to resize it.
- Click the Reset to original size and position icon above the image to return to the original size and position in one click.
- Click the rotate icon and drag to rotate the image.
- Use Lock aspect ratio to maintain proportions and prevent the image from appearing stretched or distorted. Lock proportions before resizing to ensure the image scales uniformly.
- Click Apply to save the image element.
Adding an image to a video or interactive demo
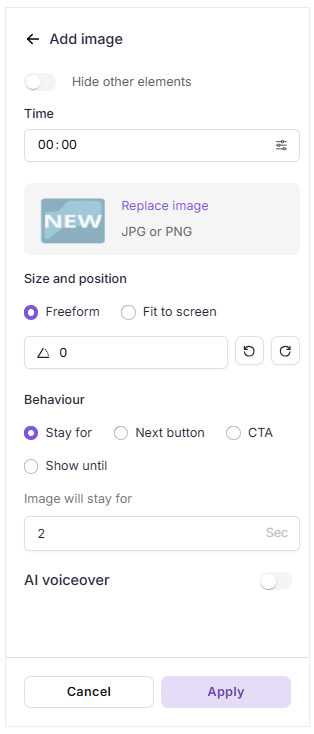
- Navigate to Add elements in the right pane.
- Click Image. If an image already exists, click Add new.
- Enable Hide other elements to hide every other element while you configure the image.
- Set the timestamp using the Time field or drag the video slider.
- To add an image, click Select image. In the Select image panel, choose from one of these sources:
- Recently used - Pick an image you have recently used in a Step by step guide, recorded video, or interactive demo. Images are listed from the most recent to the oldest.
- My drive - Browse or search your Document360 Drive folders and select an image. To add a new image, open the desired folder and click Upload to choose a file from your local explorer. Click Go back to return to the Select image panel.
- Predefined image assets - Pick from the available categories, such as Animated Emojis, Accessibility, and Alert.
The supported formats are PNG, JPG, JPEG, and GIF, with a maximum file size of 10 MB, a recommended resolution of 3420×2214, and a minimum of 100×100. In My drive, images that don't meet these requirements appear grayed out and can't be selected. Hover over the image to see the File not supported message with the required specifications.
- Click Insert to add the selected image.
- Under Size and position, choose a placement mode:
- Freeform - Adjust size and position freely. Enter an exact value in the Angle field or use Rotate left or Rotate right to adjust manually.
- Fit to screen - The image fills the video frame.
- Alternatively, drag the edges of the image to resize it.
- Click the Reset to original size and position icon above the image to return to the original size and position in one click.
- To rotate, click the rotate icon and drag.
- Use Lock aspect ratio to maintain proportions and prevent the image from appearing stretched or distorted.
- Under Behaviour, configure how the image is displayed:
- Stay for - Visible for a set duration.
- Next button - Visible until the user clicks Next.
- CTA - Tied to a call-to-action.
- Show until - The image is displayed until a specified time is reached.
- To add voice narration, turn on the AI voice over toggle.
- Select the desired voice and enter the content in the text field.
- Click the Play button next to the content to preview it in the selected voice.
- Click Apply to save the image element.
Managing image elements
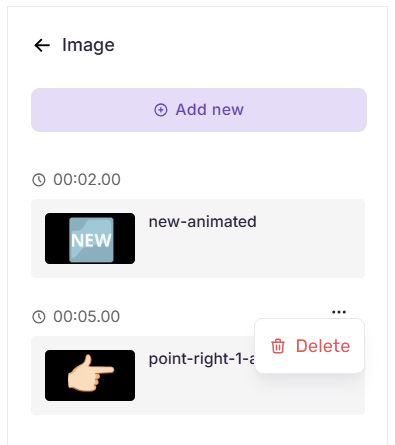
All images added appear in the Image panel, with a thumbnail preview and name.
- Add another image - Click Add new at the top of the panel.
- Edit an image - Click any image in the list to edit it. Modify as needed, then click Apply to save or Cancel to go back. Use the Delete icon to remove it.
- Delete an image - Hover over an image, click the three-dot menu, and select Delete.
An image selected from My drive stays linked to its Drive file. If the Drive file is replaced, republish the guide, video, or demo to show the updated image on the Knowledge base site. If the Drive file is deleted, the image element shows as a broken link.
Best practices
- Lock proportions before resizing - In Freeform mode, enabling aspect ratio lock prevents distortion.
- Use the Angle field for exact alignment - When an overlay needs to sit at a specific angle, such as a diagonal banner or rotated badge, enter the value directly instead of rotating manually.
- Reserve Fit to screen for background replacements - For most overlay use cases, Freeform offers more control. Fit to screen works best only when replacing the full step background.
- Keep overlays relevant to the step - Unrelated or excessive visuals can distract viewers and reduce clarity.
- Preview before publishing - After applying, check positioning and sizing to confirm the image appears as intended for end users.