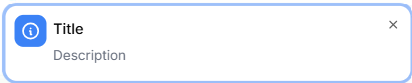
The Annotation element allows you to add a card with an icon, a title, and a description to a step in a Step by step guide, or at a specific point in time in a video or interactive demo. Use it to carry the information that surrounds an action, such as a caveat, a shortcut, a warning about something that cannot be undone, or a detail that is easy to miss.
Annotation types
Each annotation is set to one of four types, and every type has a distinct icon, so viewers can tell what kind of information they are looking at before they read it.
| Type | Use it for |
|---|---|
| Quick note | A small piece of context or clarification that helps the step make sense. |
| Key insight | A detail worth pointing out, such as the reason behind a step or a tip that saves time. |
| Announcement | Something new or changed that the viewer should know about, such as an updated setting or feature. |
| Alert | A caution, such as an action that cannot be undone or a step that is easy to get wrong. |
Annotation for real-world scenarios
| Scenario | Recommended configuration |
|---|---|
| Warning that a deletion is permanent | Alert type, positioned away from the delete button |
| Explaining why a setting is configured a certain way | Key insight type, positioned in a blank area of the screen |
| Flagging a field that has moved in a recent release | Announcement type, positioned near the top of the screen |
| Clarifying a label or term used in the UI | Quick note type, positioned close to the term |
| Calling out a keyboard shortcut for a repeated action | Key insight type, timed to the moment the action occurs |
Adding an annotation
Add annotation to a step by step guide
- Navigate to the step where you want to add an annotation.
- In the right pane, scroll to the Add elements section.
- Click Annotation. The Add annotation panel appears on the right.
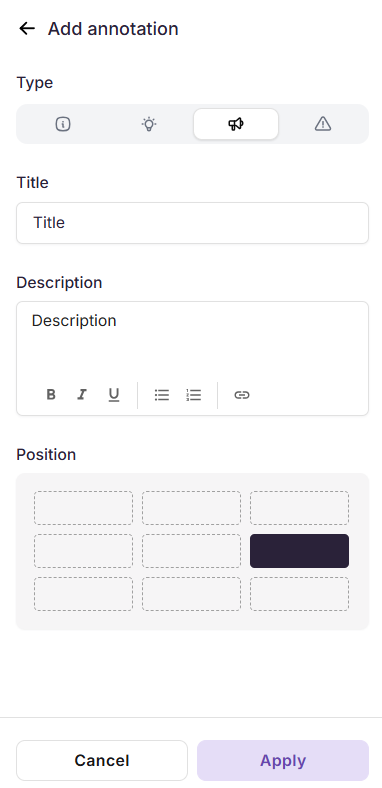
- Under Type, select Quick note, Key insight, Announcement, or Alert.
- In the Title field, enter a short heading. This is the first line viewers read.
- In the Description field, enter the supporting detail.
Select the content in the Description field to access the basic formatting tools: Bold (), Italics (), Underline (), Ordered list (), Unordered list (), and Hyperlink ().
- Under Position, click a cell in the grid to set where the annotation sits on the step image.
- Click Apply to save the annotation. The annotation appears on the step.
You can add only one annotation per step in a Step by step guide.
Add annotation to video / interactive demo
- In the right pane, scroll to the Add elements section.
- Click Annotation. The Add annotation panel appears on the right.
- Enable the Hide other elements toggle to temporarily hide elements placed at the same timestamp, such as a call to action or a spotlight. Other elements are hidden for editing only and are not deleted.
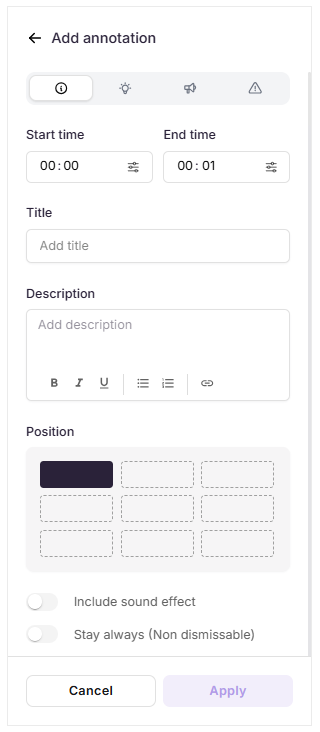
- Under Type, select Quick note, Key insight, Announcement, or Alert.
- In the Start time field, enter the timestamp at which the annotation should appear.
- In the End time field, enter the timestamp at which the annotation should disappear.
- In the Title field, enter a short heading.
- In the Description field, enter the supporting detail.
Select the content in the Description field to access the basic formatting tools: Bold (), Italics (), Underline (), Ordered list (), Unordered list (), and Hyperlink ().
- Under Position, click a cell in the grid to set where the annotation sits on screen.
- Enable the Include sound effect toggle to play a sound when the annotation appears.
- Enable the Stay always toggle to keep the annotation on screen for its full duration. Viewers cannot dismiss it early, as no close button is shown.
- Click Apply to save the annotation.
The annotation appears at its set time, and the Annotation panel opens with the list of annotations added so far.
You can add multiple annotations to the same video or interactive demo. However, the timing between each annotation must not overlap.
Managing annotations
Manage annotation in a step by step guide
As a step holds a single annotation, it is managed directly on the step image rather than from a list.
- Edit an annotation - Hover over the annotation on the step image and click the Edit icon (). The Edit annotation panel opens with the existing details filled in. Change any field, then click Apply to save.
- Delete an annotation - Open the Edit annotation panel, click the Delete icon () at the bottom of the panel, and confirm.
Manage annotation in video / interactive demo
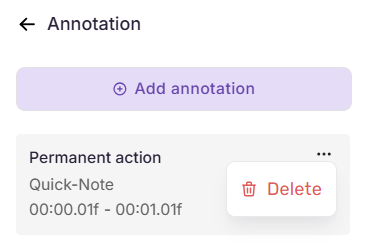
Once added, annotations are listed in the Annotation panel, each displaying the title, type, and timing.
- Add another annotation - Click Add annotation at the top of the panel and configure it the same way.
- Edit an annotation - Click any annotation in the list to open its configuration panel with the existing details filled in. Change any field, then click Apply to save.
- Delete an annotation - Hover over an annotation in the list to reveal the More icon (). Click it, select Delete, and confirm.
Best practices
- Position away from the subject - Place the annotation clear of the part of the screen the step is about. An annotation that covers the button you are pointing to defeats its purpose.
- Plan the timeline before adding - Because time ranges cannot overlap, map your annotations against the video or demo timeline first to avoid reworking them.
- Reserve Stay always for critical information - Enable it only when viewers genuinely should not be able to skip past the message, as it removes their ability to dismiss it.
- Use sound effects sparingly - Include sound effect works best when applied to the single annotation that matters most in a video or demo.
FAQ
Can I add more than one annotation to a step in a Step by step guide?
No. A Step by step guide supports one annotation per step.
What happens if two annotations have overlapping time ranges?
The annotation is not saved. The Overlapping annotation dialog appears, prompting you to adjust the start or end time. Click OK, then change the Start time or End time so that the ranges do not intersect.
Does Hide other elements affect what viewers see?
No. Hide other elements applies only to the editing view. All elements remain visible in the published version.
Can viewers close an annotation before its end time?
Yes, unless Stay always is enabled. When Stay always is turned on, no close button is shown and the annotation remains on screen for its full duration.