Once the Salesforce integration is set up, your support agents can access your Document360 knowledge base directly from the Salesforce console. Agents can search for articles, browse by category, view article recommendations based on open cases, and create new knowledge base articles without leaving Salesforce. This article covers how to add Document360 to your Cases page and how to use each feature from within Salesforce.
Before following the steps in this article, make sure you have completed the Salesforce integration setup. See Setting up the Salesforce integration.
Before you begin
- The Salesforce integration must be fully set up and authorized. See Setting up the Salesforce integration.
- You must have admin access in Salesforce to add Document360 to the Cases page.
- The Visualforce page must already be created in your Salesforce developer console. Make note of the height value you used — you will need it in the steps below.
Add Document360 to your Cases page
In Salesforce, a Case is a record of a customer query, feedback, or concern. Customers can reach out through phone, email, web, or social media, and support agents use Cases as reference points when resolving issues. Adding Document360 to the Cases page gives agents instant access to your knowledge base while they are working on a case.
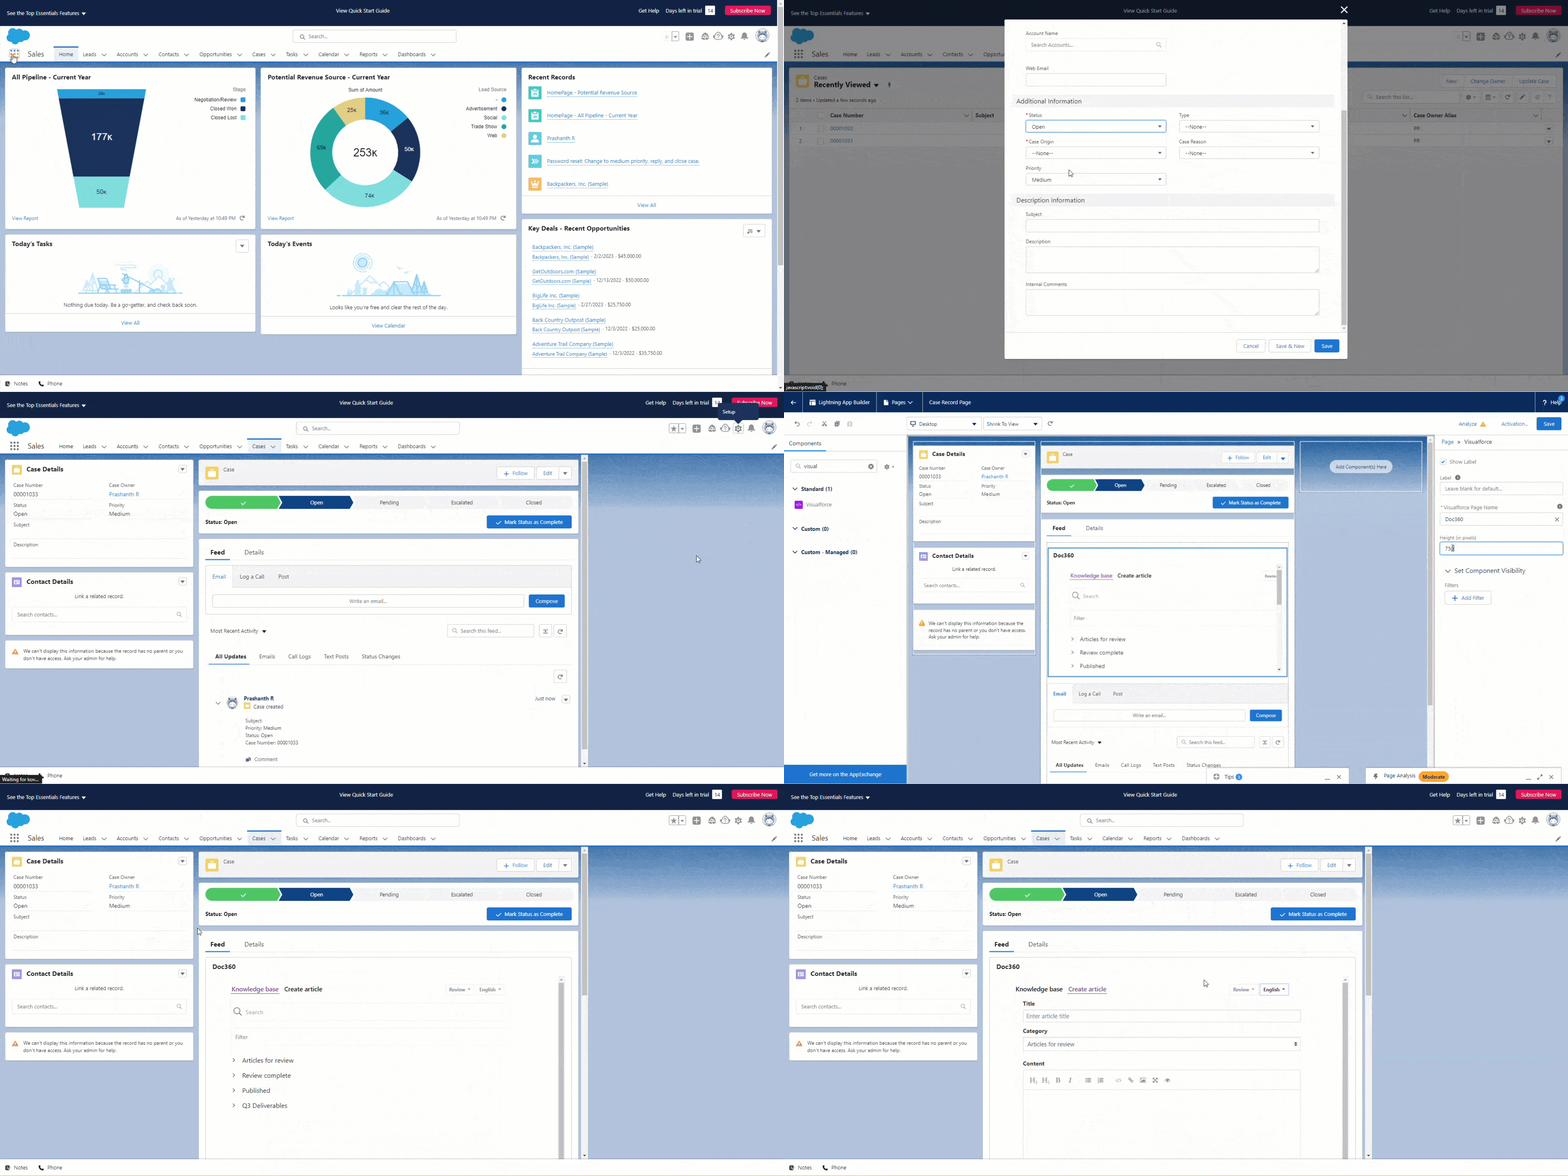
- From the Salesforce home page, navigate to Service, then select Cases.
- Your recent Cases are displayed on the Cases home page. If you don't have any active cases, click New at the top right to create one.
- In the New Case panel, enter the case details, such as its nature, customer information, case origin, and priority, then click Save. The case overview page appears.
- Open the case you want to work with. On the case overview page, click the quick settings icon at the top right and select Edit Page.
- In the Quick Find search bar, type Lightning App Builder to open the Lightning App Builder, where you can customize your Cases page using drag-and-drop components.
- Search for Visualforce in the Lightning App Builder. Drag the Visualforce component onto the page layout and adjust its height in pixels in the right panel.
Use the same height value — or a larger one — that you specified when creating the Document360 Visualforce page. Using a smaller value will clip the Document360 interface. See Setting up the Salesforce integration for reference.
- The Document360 app is added to the page. You can add, remove, or reposition other components on the page as needed.
- Click Save.
- When the activation prompt appears, click Activate.
- Navigate back to the Cases page. The Document360 knowledge base section is now visible on the page.
Use Document360 in Salesforce
Once Document360 is added to your Cases page, agents can use three tabs: Knowledge base, Recommendations, and Create article.
Knowledge base tab
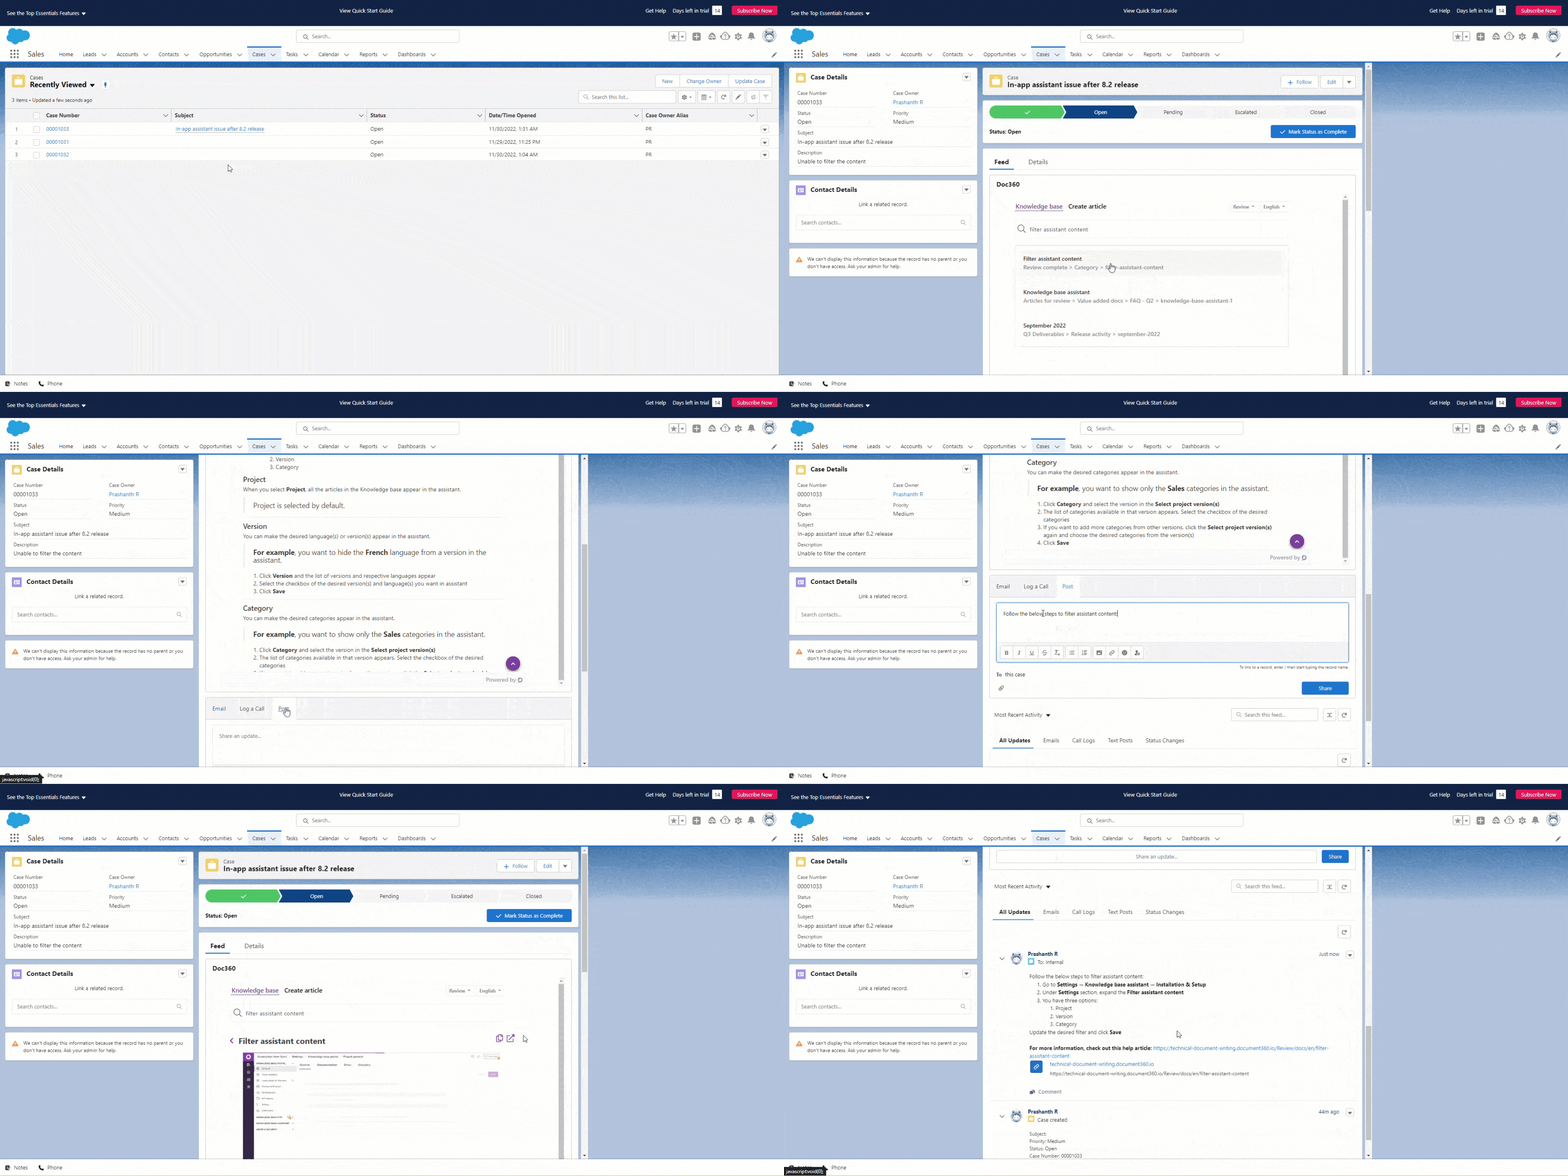
The Knowledge base tab lets agents search and browse your entire knowledge base from within Salesforce.
- Use the search field to find articles and categories by name, content, tag, or slug. Matching results appear as you search.
- Use the Filter field to refine results by name only.
- Click any result to open it in the reader view. This works for all articles and categories, excluding folder categories.
- Use the workspace and language dropdowns at the top right of the tab to switch between workspaces or languages.
- For each article and category (excluding folder categories), you have two quick actions:
- Copy link
<span class="fa-regular fa-link"></span>— copies the link to the article or category page, which you can paste directly into a case response or anywhere in the Salesforce environment. - Open site
<span class="fa-regular fa-arrow-up-right-from-square"></span>— opens the article or category on your knowledge base site in a new tab.
- Copy link
Recommendations tab
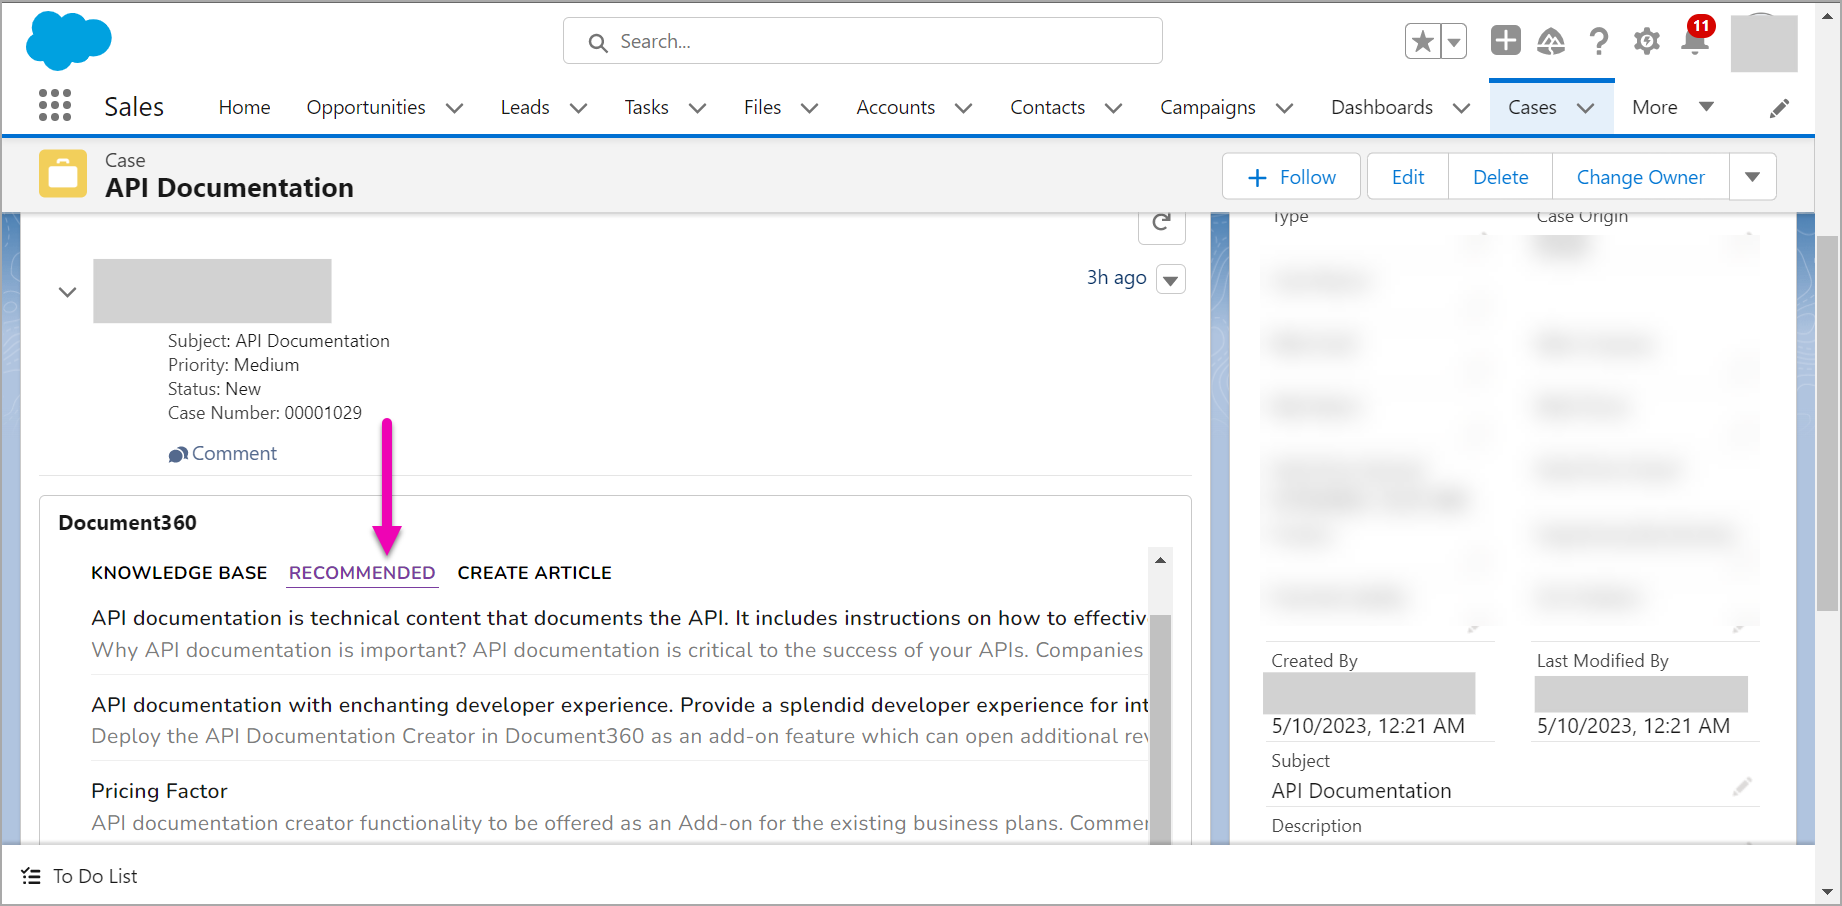
The Recommendations tab automatically surfaces articles from your knowledge base that are relevant to the open case.
- Articles are suggested based on keywords found in the Subject field of the case. No manual search is needed.
- By default, recommendations come from the main workspace in the default language. Use the dropdown at the top of the widget to switch workspaces or languages.
- Up to five articles are shown. Each entry displays the article title, a brief content excerpt, a copy option, and a link to open the article in a new tab.
Create article tab
The Create article tab lets agents create a new knowledge base article without leaving Salesforce.
- Click the Create article tab.
- Enter the title of the article.
- Select the category where you want the article to be placed.
- Enter the article content in the Content section. You can use Markdown syntax here.
- Click Create article.
Newly created articles are saved as drafts. An admin, owner, or editor must review and publish the article from the Document360 portal before it becomes visible on your knowledge base site.
Best practices
- Keep case Subject fields descriptive. The Recommendations tab pulls suggestions based on keywords in the Subject field. The more specific the subject, the more relevant the recommendations will be.
- Use Copy link to share articles with customers. Rather than summarizing an article in your reply, copy the link from the Knowledge base tab and paste it directly into your case response.
- Create articles when you resolve an undocumented case. If a case reveals a gap in your knowledge base, use the Create article tab to draft content while the details are fresh. An editor can review and publish it from Document360.
- Switch workspaces when handling multilingual cases. If your knowledge base has multiple workspaces or languages, use the dropdown in the Knowledge base or Recommendations tab to find content that matches the customer's language.
- Check the Recommendations tab before searching. For most cases, the Recommendations tab will surface the most relevant articles instantly, saving time over a manual search.