Custom connectors let you establish a secure connection between your knowledge base and MCP-compatible AI assistants such as Cursor IDE and Copilot. Once connected, the AI assistant can interact with documentation content in your Document360 project through MCP.
Depending on your AI assistant, use one of the following:
- MCP server URL - Use this when your AI assistant accepts a direct URL for connector setup (for example, Copilot).
- JSON configuration - Use this when your AI assistant requires a structured config file (for example, Cursor IDE).
To connect ChatGPT or Claude, use the one-click connectors instead. Refer to ChatGPT and Claude article that helps you connect them to Document360 MCP
If you are on a US-region project and the Claude one-click connector is unavailable, you can connect Claude with a custom connector. Use the MCP server URL for the US region (https://mcp.us.document360.io/mcp) and follow the steps under Other MCP-compatible platforms on this page.
Before you begin
- Ensure MCP is enabled in your Document360 project. For the steps to enable MCP, refer to the Connect MCP to your AI assistant page.
- You have access to an AI assistant that supports MCP or custom connector configurations.
Get the JSON configuration
To get the configuration details,
-
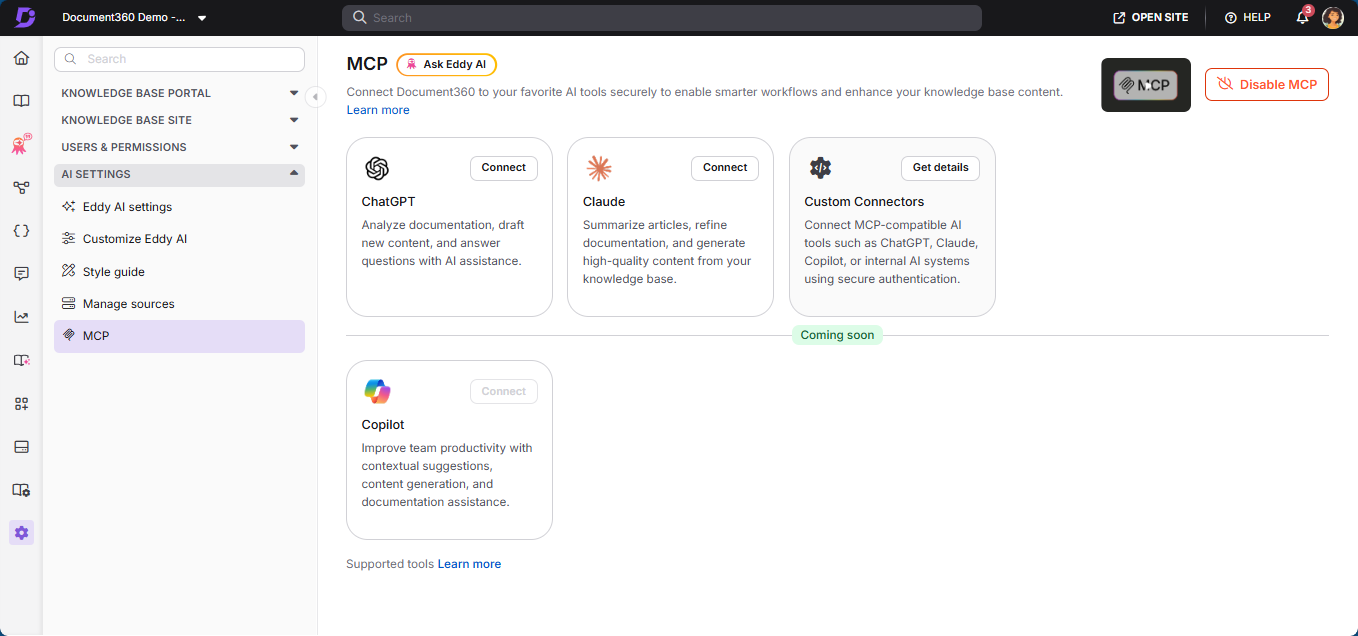
Navigate to Settings () in the left navigation bar.
-
Go to AI Settings > MCP.
-
Under Custom Connectors, click Get details.
-
The MCP configuration will be displayed.
-
You can either copy the full JSON configuration or use the URL provided within it, depending on your AI assistant's requirements.
This configuration is required to establish the MCP connection in your AI assistant.
.png)
MCP server URLs
Use the following MCP server URLs when configuring connectors in your AI assistant. Select the appropriate URL based on your project's region or environment. Paste the URL into the MCP custom connector configuration field in your AI assistant.
| Region | MCP configuration URL |
|---|---|
| EU region | https://mcp.document360.io/mcp |
| US region | https://mcp.us.document360.io/mcp |
| Canada region | https://mcp.ca.document360.io/mcp |
Cursor IDE
To connect MCP in Cursor IDE:
- Open Cursor IDE.
- Navigate to Settings.
- Go to Tools & MCP.
- Click Add new MCP server.
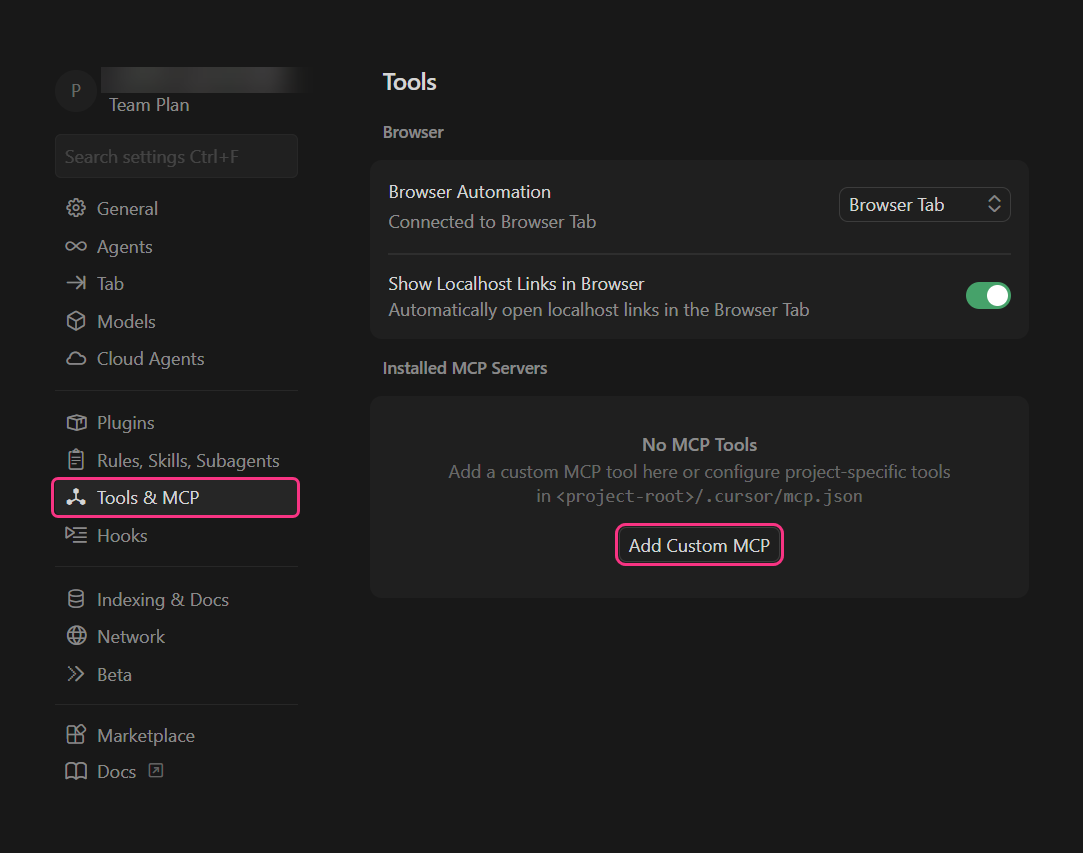
You will be redirected to the MCP configuration screen.
- Paste the MCP JSON configuration copied from Document360.
- Save it.
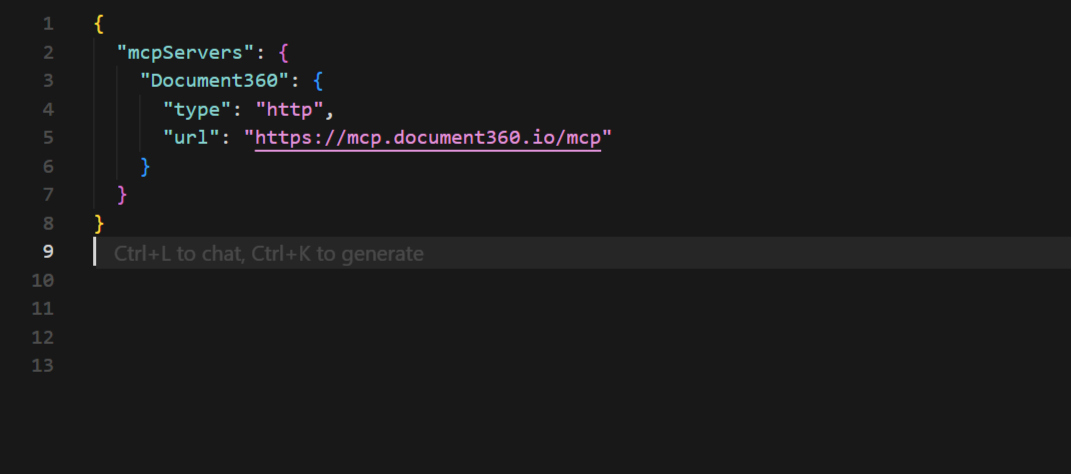
After saving:
- Return to Cursor IDE Settings > Tools & MCP.
- Locate the configured MCP server.
- Once authentication is enabled, click Connect.
After creating the connection:
- You will be redirected to Document360.
- Review the connection request and choose the required project.
- Select the confirmation checkbox (I understand and trust this URL).
- Click Continue.
The connection is now established. You can use MCP capabilities directly within the Cursor IDE to search, retrieve, and update documentation while coding.
Copilot
To connect MCP in Copilot agents:
Create a new agent
- Log in to your Copilot environment.
- Navigate to Agents.
- Click Create blank agent.
- Enter a name for the agent.
- Click Create.
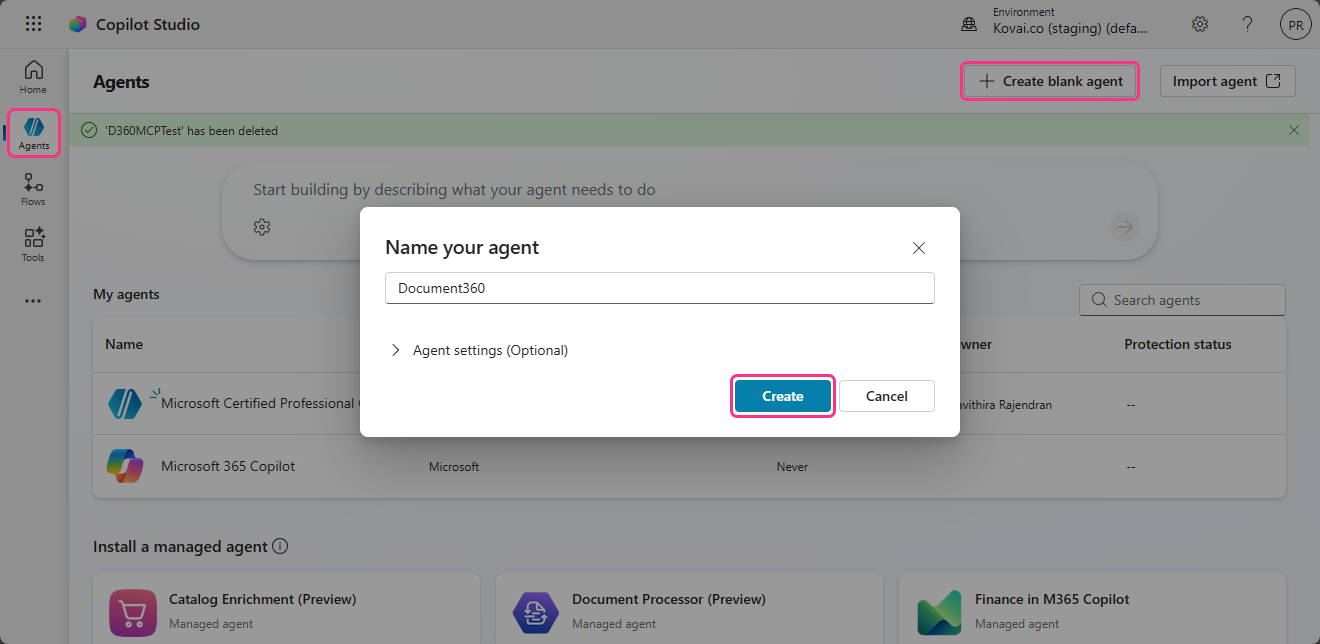
You will be redirected to the newly created agent.
Add MCP as a tool
- In the agent page, navigate to the Tools tab in the top navigation bar.
- Click Add a tool.
- Select Model Context Protocol.
Configure MCP settings
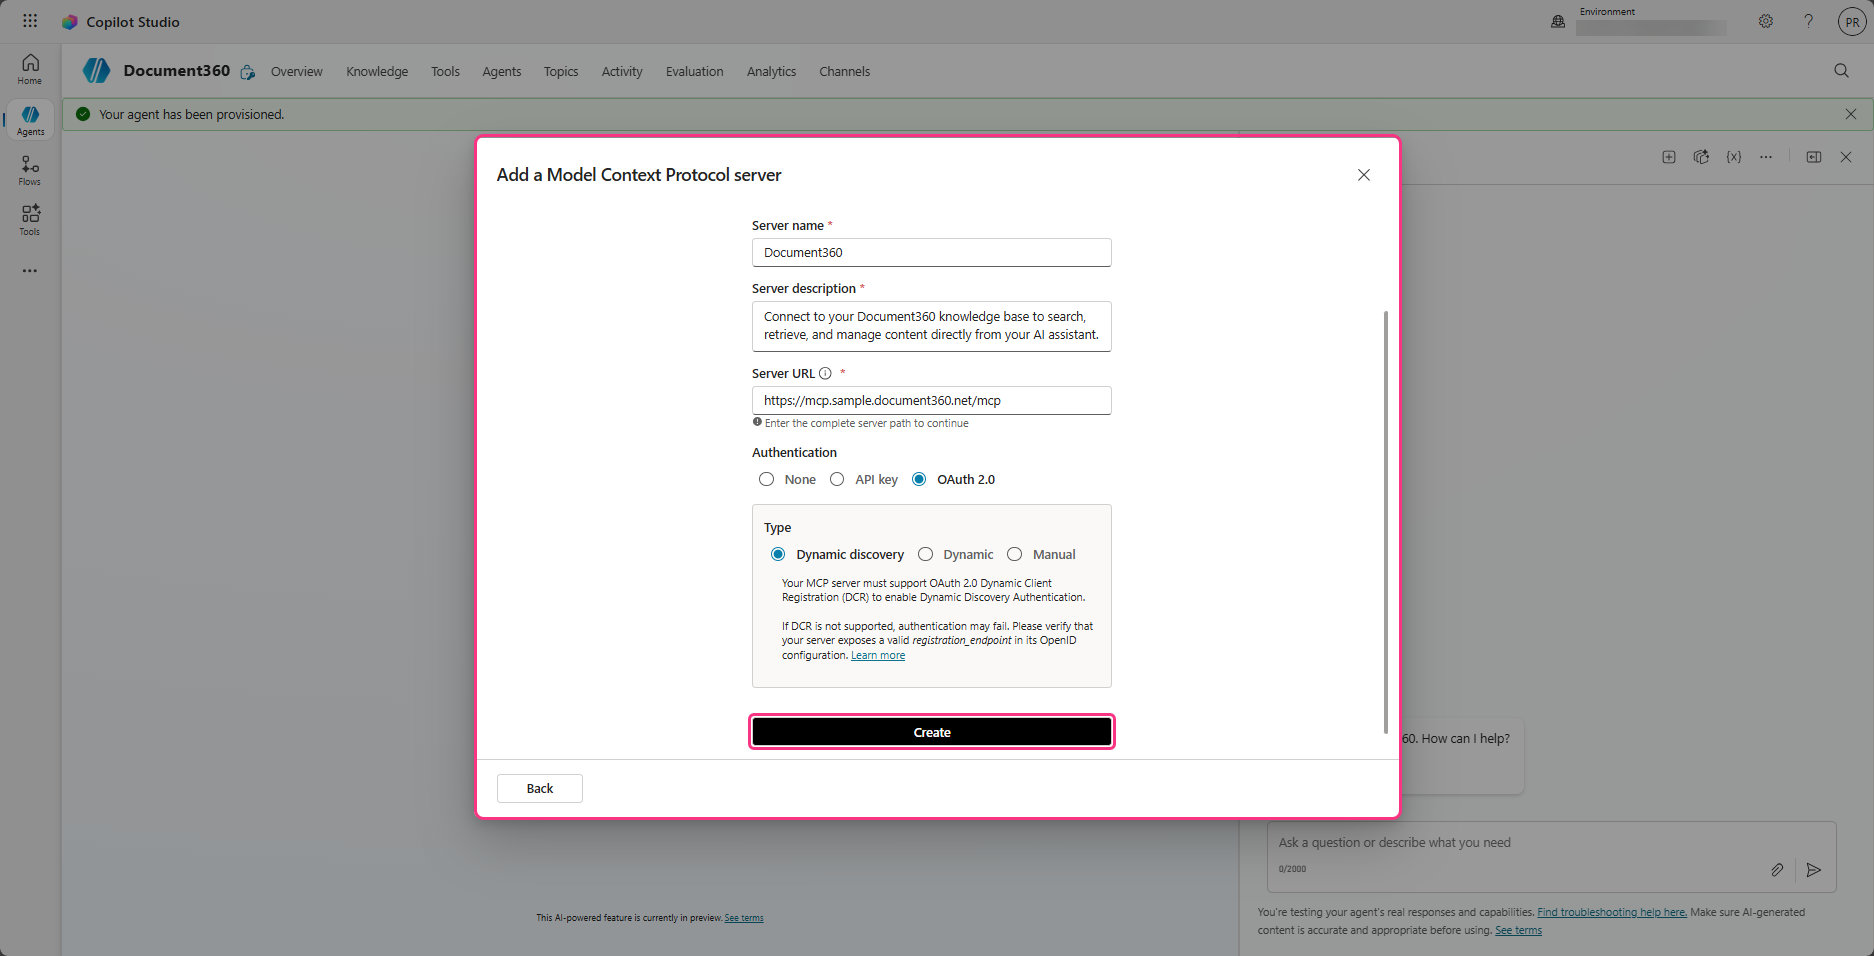
- Enter the following details:
- Name – Provide a name for the MCP connector
- Description – Enter a description (minimum 30 characters)
- URL – Paste the appropriate MCP server URL
- Under Authentication method, select OAuth 2.0.
- Ensure Dynamic discovery is selected by default.
- Click Create.
Establish connection
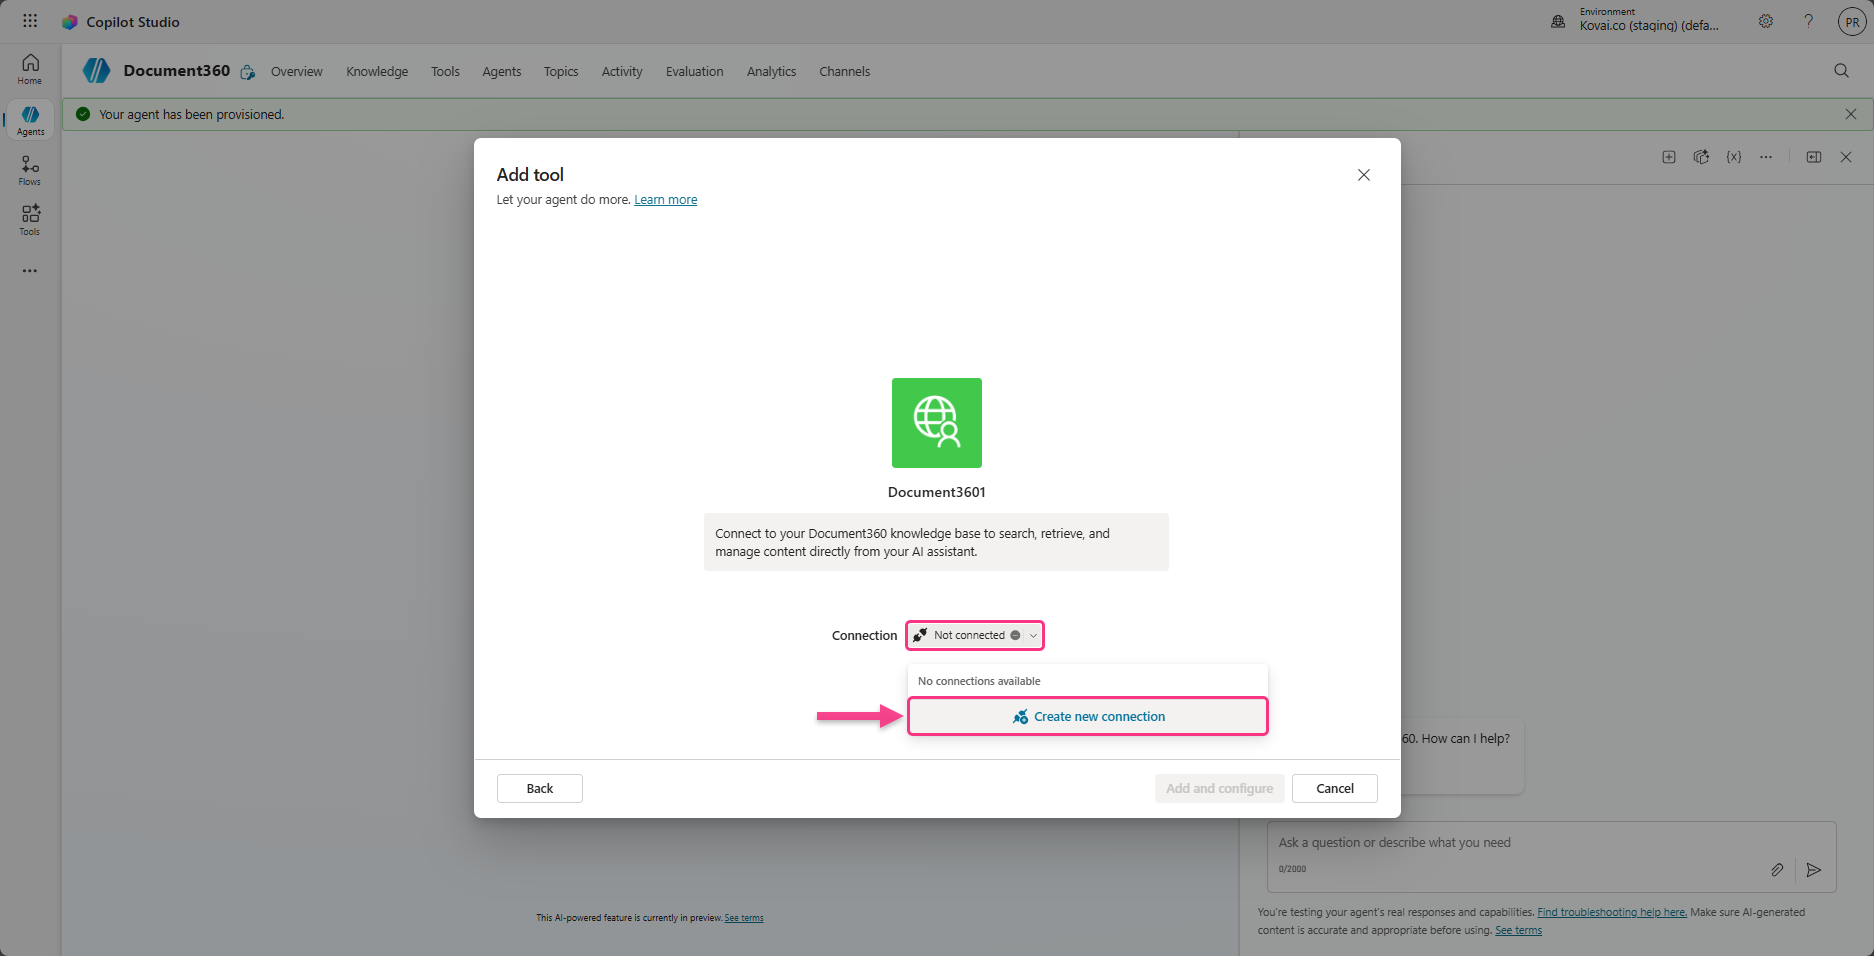
- After creating the tool, a Connection screen will appear showing Not connected.
- Click Not connected.
- Select Create new connection.
- Click Create.
After creating the connection:
- You will be redirected to Document360.
- Review the connection request and choose the required project.
- Select the confirmation checkbox (I understand and trust this URL).
- Click Continue.
The connection is now established. Copilot agent can interact with your knowledge base using the MCP capabilities enabled in your project.
MCP support may vary depending on the AI assistant or client being used (such as IDE-based assistants or experimental tools). Some platforms may have limited or evolving support for MCP capabilities. The available fields and interface may vary slightly depending on the AI assistant. Refer to your AI assistant's documentation for compatibility details.
Other MCP-compatible platforms
You can connect any other AI assistant that supports MCP or custom connectors using the same configuration details:
- In your AI assistant, locate the option to add an MCP server or custom connector.
- Provide the MCP server URL or the JSON configuration from Document360, depending on what the platform requires.
- Complete the OAuth authentication when redirected to Document360: choose the required project, select the I understand and trust this URL checkbox, and click Continue.
Verify the connection
To confirm that your AI assistant can access your knowledge base:
- Start a new conversation in your AI assistant.
- Enter a prompt that asks it to fetch or search your documentation. For example, ask it to find an article by title or update a section of it and then publish it in your knowledge base.
If the connection is successful, the AI assistant returns results sourced from your Document360 knowledge base. For more prompts you can try, refer to the MCP use cases article.
If no results are returned or an error appears, verify:
- MCP is enabled in Document360.
- The JSON configuration or server URL was copied correctly.
- The connector is active in your AI assistant.
If the issue persists, re-authenticate by disconnecting and reconnecting the MCP connector, or contact Document360 support.