Once your workspaces are set up, you can edit their settings, control how they appear on your Knowledge base site, and manage them as your documentation evolves. This article covers editing names and status, customizing the workspace label, and controlling how readers navigate between workspaces.
Why manage your workspaces?
Your documentation needs will change over time. Products get renamed, new versions are released, and your audience may evolve. Workspace management lets you keep your knowledge base accurate, well-organized, and consistent without disrupting readers.
Common reasons to manage a workspace:
- Rename or rebrand: When a product or version name changes, update the workspace name and label to stay consistent with your current terminology.
- Adjust visibility: Move a workspace from Beta to Public when it's ready to go live, or set it to Deprecated when content is outdated but still worth retaining.
- Customize for your team: Rename the "Workspace" label to "Version," "Release," or "Edition" so the portal UI matches your team's internal language.
- Control reader navigation: Configure how readers are redirected when switching between workspaces to give them the most relevant experience.
- Keep structure tidy: Reorder workspaces so the most relevant one appears first in the site dropdown, and delete workspaces that are no longer needed.
Edit a workspace
You can update a workspace's name, URL, status, and languages at any time.
- Navigate to Settings () > Knowledge base portal in the left navigation bar.
- In the left navigation pane, select Workspace & localization ().
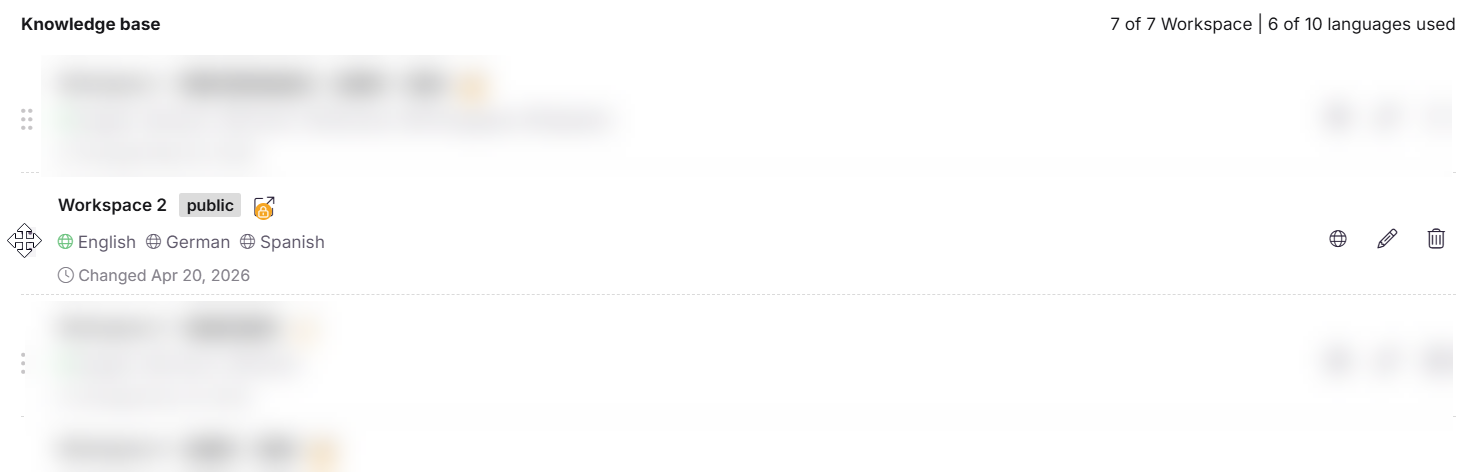
- Hover over the workspace you want to edit. Three icons appear on the right:
- Languages () — Opens the language settings for the workspace directly. Use this to quickly add or remove languages without opening the full edit panel.
- Edit () — Opens the full edit panel where you can update the workspace name, URL, status, and languages.
- Delete () — Deletes the workspace.
- To edit workspace details, click the Edit () icon. In the Edit workspace panel, update any of the following:
- Workspace name
- Workspace URL
- Workspace status
- Languages, add or remove languages as needed
- Click Update to save your changes.
Reorder workspaces
The order of workspaces on the Workspace & localization page controls how they appear in the workspace dropdown on your Knowledge base site.
To reorder workspaces, hold and drag the Reorder () handle next to the workspace name and move it to the desired position.
Delete a workspace
- On the Workspace & localization page, hover over the workspace you want to delete.
- Click the Delete () icon on the right.
The Delete () option is inactive for the Main workspace. To delete it, first assign another workspace as the Main workspace, then delete the original.
Articles from a deleted workspace will appear as broken links across your knowledge base. Review all internal links before deleting a workspace.
Switch between workspaces in the portal
When working in the Knowledge base portal, you can switch between workspaces directly from the Documentation section.
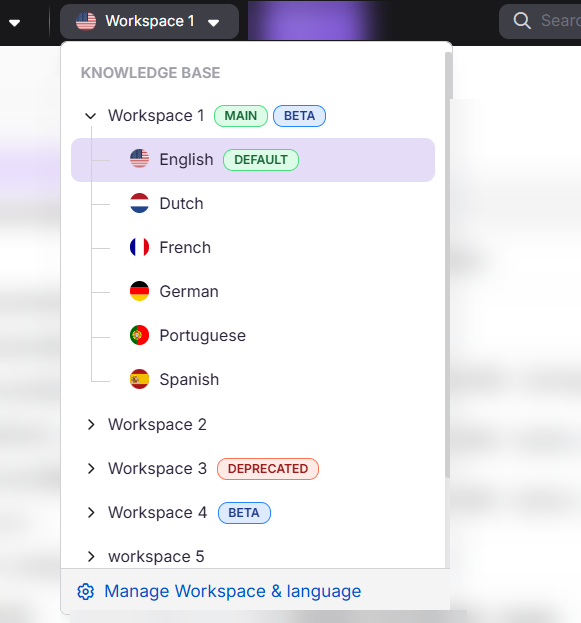
- In the Documentation () section of the Knowledge base portal, click the Workspace dropdown in the top navigation bar.
- The dropdown shows all available workspaces and their associated languages.
- Expand the desired workspace and select the preferred language.
- A Main badge indicates the primary workspace displayed on the Knowledge base site.
- Beta and Deprecated tags are shown next to their respective workspaces.
- A Default badge next to a language indicates the default language for that workspace.
Customize the workspace label
By default, the word Workspace appears throughout the Knowledge base portal UI. You can rename it to match your internal terminology, for example Version, Release, or Edition.
This feature is available only for projects created after 31st August 2024, or for users who upgraded from a Legacy plan to the new pricing plan after that date.
To customize the workspace label:
- Navigate to Settings () > Knowledge base portal > General.
- In the Project settings page, locate the Customize workspace label field.
- Enter your preferred term. Maximum 30 characters, no special characters allowed.
- Click Save.

- This change updates all instances of the term Workspace across the portal UI.
- The default label is Workspace.
- To update the workspace label on the Knowledge base site (reader-facing), use the Localization variables page. Learn more
Configure workspace switching behavior
When readers switch between workspaces on the Knowledge base site, you can control where they land. This setting is configured alongside the workspace label.
- Navigate to Settings () > Knowledge base portal > General.
- Below the Customize workspace label field, select one of the following options:
| Option | Behavior | When to use |
|---|---|---|
| Redirect to root article (default) | Readers always land on the root article of the selected workspace, regardless of which article they were on. | Use when workspaces have different content structures and you don't want readers landing on a missing or unrelated article. |
| Redirect to same article | Readers land on the same article in the target workspace if it exists. If it doesn't, they are redirected to the root article. | Use for versioned documentation where the same articles exist across workspaces and you want readers to stay in context when switching. |
- Click Save to apply.
Example:
You have two workspaces: Workspace A (articles: A1, A2, A3) and Workspace B (articles: A1, A2, A4). Workspace B is your main workspace.
| Scenario | Configuration | Outcome |
|---|---|---|
| You switch workspaces | Redirect to root article | Always redirects to the root article of the selected workspace |
| You are on article A2 in Workspace B and switch to Workspace A | Redirect to same article | Redirects to article A2 in Workspace A |
| You are on article A4 in Workspace B and switch to Workspace A | Redirect to same article | Redirects to the root article of Workspace A (A4 doesn't exist there) |
Best practices
- Rename the workspace label before your team starts working: Changing "Workspace" to "Version" after content is already built can cause momentary confusion. Do it early.
- Use "Redirect to same article" for versioned docs: If you maintain the same article structure across workspaces, this keeps readers in context when switching versions.
- Deprecate before you delete: Set a workspace to Deprecated first so your team knows it's being retired, then delete it once you've confirmed there are no critical inbound links.
- Keep the workspace order intentional: The order on the Workspace & localization page reflects the order in the site dropdown. Put the most relevant workspace first.
Troubleshooting
404 error when navigating to a secondary workspace
A 404 error on a secondary workspace is usually caused by one of the following:
- The workspace is not set to Public: Navigate to Settings () > Knowledge base portal > Workspace & localization, hover over the workspace, click the Edit () icon, select Public under Workspace status, and click Update.
- No articles are published in the workspace: Publish at least one article to make the workspace accessible.
- All articles in the workspace are hidden: Ensure at least one article is visible on the Knowledge base site.
FAQ
How do I enable notifications when the workspace label is changed?
- Navigate to Settings () > Knowledge base portal > Notifications.
- Go to the Notification mapping tab and expand the Knowledge base portal settings section.
- Turn on the Workspace label updated toggle to receive notifications when a workspace label changes.
- Turn on the Workspace redirection setting updated toggle to be notified when switching behavior is modified.
How do I track who changed the workspace label?
- Navigate to Settings () > Knowledge base portal > Team auditing.
- Use the Event filter and select Workspace label updated or Workspace redirection setting updated to see a log of changes and who made them.
Can I delete the Main workspace?
No. The Delete () option is inactive for the Main workspace. To delete it, first assign another workspace as the Main workspace, then delete the original.
Why don't I see the workspace label customization option in my project?
This feature is available only for projects created after 31st August 2024, or for users who upgraded from a Legacy plan to the new pricing plan after that date. If your project was created before this date and you have not upgraded, this option will not be visible.
Why can't I see the Localization and Workspace settings in the admin portal even though I have the required portal permissions?
Access to the Localization and Workspace settings depends on two levels of permission working together — portal-level settings access and content-level access to the workspace.
If your Content Access for a workspace is set to None, you will not have access to the Documentation section of that workspace. As a result, the Localization and Workspace settings associated with it will also remain inaccessible, regardless of your portal-level permissions.
To resolve this, ensure that your user account has:
- The required portal permission to access Settings, and
- A Content Access level of at least the minimum required permission (other than None) for the relevant workspace.
Contact your project Owner or Administrator to review and update your workspace content access settings accordingly.