Chapters are dividers that split a Step by step guide into named sections. Each chapter has its own cover with a title, description, and background image, and sits in the guide ahead of the steps it introduces. Use chapters when a guide is long enough that a single run of steps is hard to scan, so that viewers can see how the guide is structured and move to the section they need.

Chapters for real-world scenarios
| Scenario | Recommended configuration |
|---|---|
| Onboarding guide covering several standalone tasks | One chapter per task, with Reset step numbering enabled |
| Long installation walkthrough with a single continuous sequence | Chapters at each stage, with Reset step numbering left off |
| Guide that splits into an admin path and an end user path | One chapter per audience, named after the role |
| Release walkthrough covering multiple new features | One chapter per feature, with Show total steps in chapter enabled |
| Short guide of fewer than ten steps | No chapters; the guide reads better as one sequence |
Adding a chapter
- Open the Step by step guide you want to organize into sections.
- Scroll to the step before which the new section should begin.
- Hover between two steps, the Add () button appears.
- Click the Add () button and select New chapter. The Add new step confirmation appears, noting that the addition also applies to the corresponding step in the guide's other languages.
- Click Add to confirm. The chapter is added at that position and the Chapter panel opens on the right.
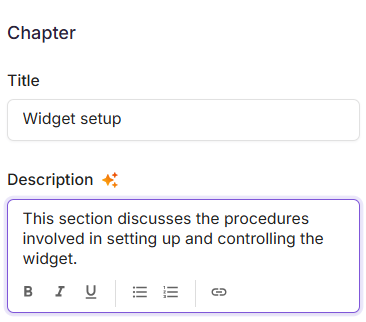
- In the Title field, enter a name for the section.
- In the Description field, enter a short summary of what the section covers.
Select the content in the Description field to access the basic formatting tools: Bold (), Italics (), Underline (), Ordered list (), Unordered list (), and Hyperlink ().
- Click the Rephrase with AI icon () next to the Title or Description label to refine the wording of either field.
Repeat these steps wherever you want a new section to begin.
Changing the chapter background
Every chapter is created with a default background image.
- In the Chapter panel, click Replace image under Background section.
The Select chapter background dialog opens. - In the left pane of the Select background dialog, select a tab:
- Background - A still image.
- Animated background - A moving cover.
- Select the background you want.
- Click Insert.

Configuring the chapter cover
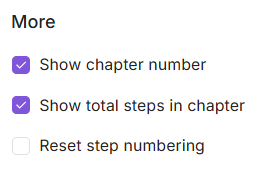
The More section of the Chapter panel controls what appears on the chapter cover.
| Option | Description | Default |
|---|---|---|
| Show chapter number | Displays the chapter number above the title, such as Chapter 2. | Selected |
| Show total steps in chapter | Displays the number of steps the chapter contains. | Selected |
| Reset step numbering | Starts the chapter at Step 1 instead of continuing the count from the previous chapter. | Not selected |
Best practices
- Name chapters after the task they cover - A title such as "Create your first form" tells a viewer more than "Chapter 2."
- Place the chapter before the first step of a section - The cover introduces the steps that follow it, not the ones before it.
- Match step numbering to the guide's structure - Enable Reset step numbering when each chapter is a standalone procedure. Leave it off when the guide is one continuous sequence, and viewers need a running count.
- Keep descriptions to a sentence or two - The cover is a signpost, not a summary of the section.
- Add chapters only when the guide needs them - A short guide reads better as a single sequence than as a set of one-step sections.
FAQ
Can I add chapters to a video or interactive demo?
No. Chapters are available in Step by step guides only.
What happens to step numbers when I enable Reset step numbering?
The chapter starts at Step 1 rather than continuing the count from the previous chapter. Chapters that do not have the option enabled continue the running count.
Can I use a chapter without a background image?
Yes. Click the Delete icon in the top-right corner of the background card in the Chapter panel to remove the default image.
Which fields can Rephrase with AI rewrite?
Both. The Rephrase with AI icon appears next to the Title label and the Description label, and rewrites whichever field you click it for.