The AI writing agent in Document360 lets you generate structured knowledge base articles directly in the Advanced WYSIWYG editor — from a text prompt, a video recording, an audio file, or a transcript. Describe what you need and Eddy AI produces a ready-to-refine draft, applying content structure, formatting, tone, and SEO metadata based on your style guide.
- The AI writing agent is available only in the Advanced WYSIWYG editor.
- If your project's default editor is Markdown or standard WYSIWYG, the Create with Eddy AI option will still appear in the Create menu. Any article created through the writing agent will be generated in the Advanced WYSIWYG editor, regardless of your project's default editor setting.
When to use the AI writing agent
Use the AI writing agent when you want to reduce the time spent on first drafts and repetitive documentation tasks.
- You're starting from scratch. Use a prompt to generate a full article on any topic without a blank-page block.
- You have a recording or call transcript. Upload a Zoom, Teams, or Google Meet recording — or an MP3 or DOCX transcript — and convert it directly into a structured article.
- You need a structured outline first. For complex topics, generate an outline and validate the structure before filling in content.
- You publish recurring article types. Use templates alongside the writing agent to produce consistent release notes, troubleshooting guides, or {{ glossary.API}} references at scale.
- You work across multiple languages. The AI writing agent is available in all languages supported by Eddy AI, making it suitable for multilingual documentation teams.
Before you begin
- You must have edit access to the documentation project.
- To apply a custom style guide during generation, set one up first. See Style guide.
Generate an article with the AI writing agent
Navigate to Documentation () in the left navigation bar in the knowledge base portal, then launch the Write Article panel using any of these entry points:
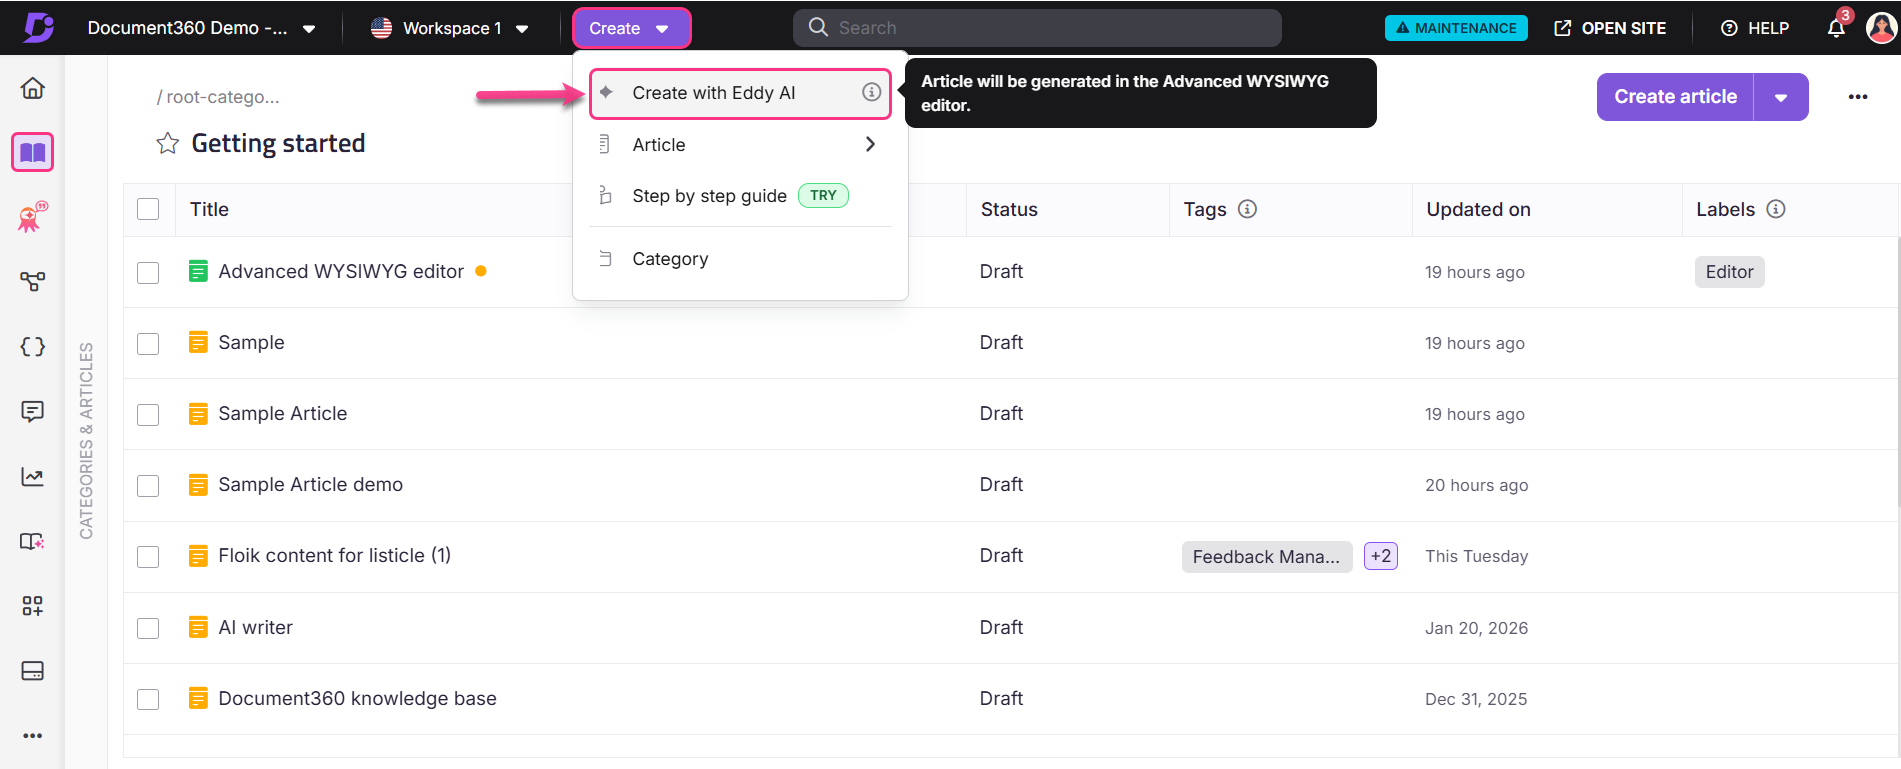
- Create button: In the top navigation bar, click Create and select Create with Eddy AI.
- Flywheel icon: Hover below any article in the Categories & Articles pane and click the () icon, then select Create with Eddy AI.
- More icon: Hover over a category in the Categories & Articles pane, click the icon, and select Create with Eddy AI.
- Folder/Index category: Inside a Folder or Index type category, click the Create article dropdown in the top-right corner and select Create with Eddy AI.
- Slash command: From within the editor, type
/in an empty article to access Start writing with Eddy AI.
In an article that already has content, click the Eddy AI chatbot at the bottom-right corner and select Continue writing.
You can also select a sentence of more than 10 words, then choose Eddy AI from the menu panel and select an option from the dropdown.
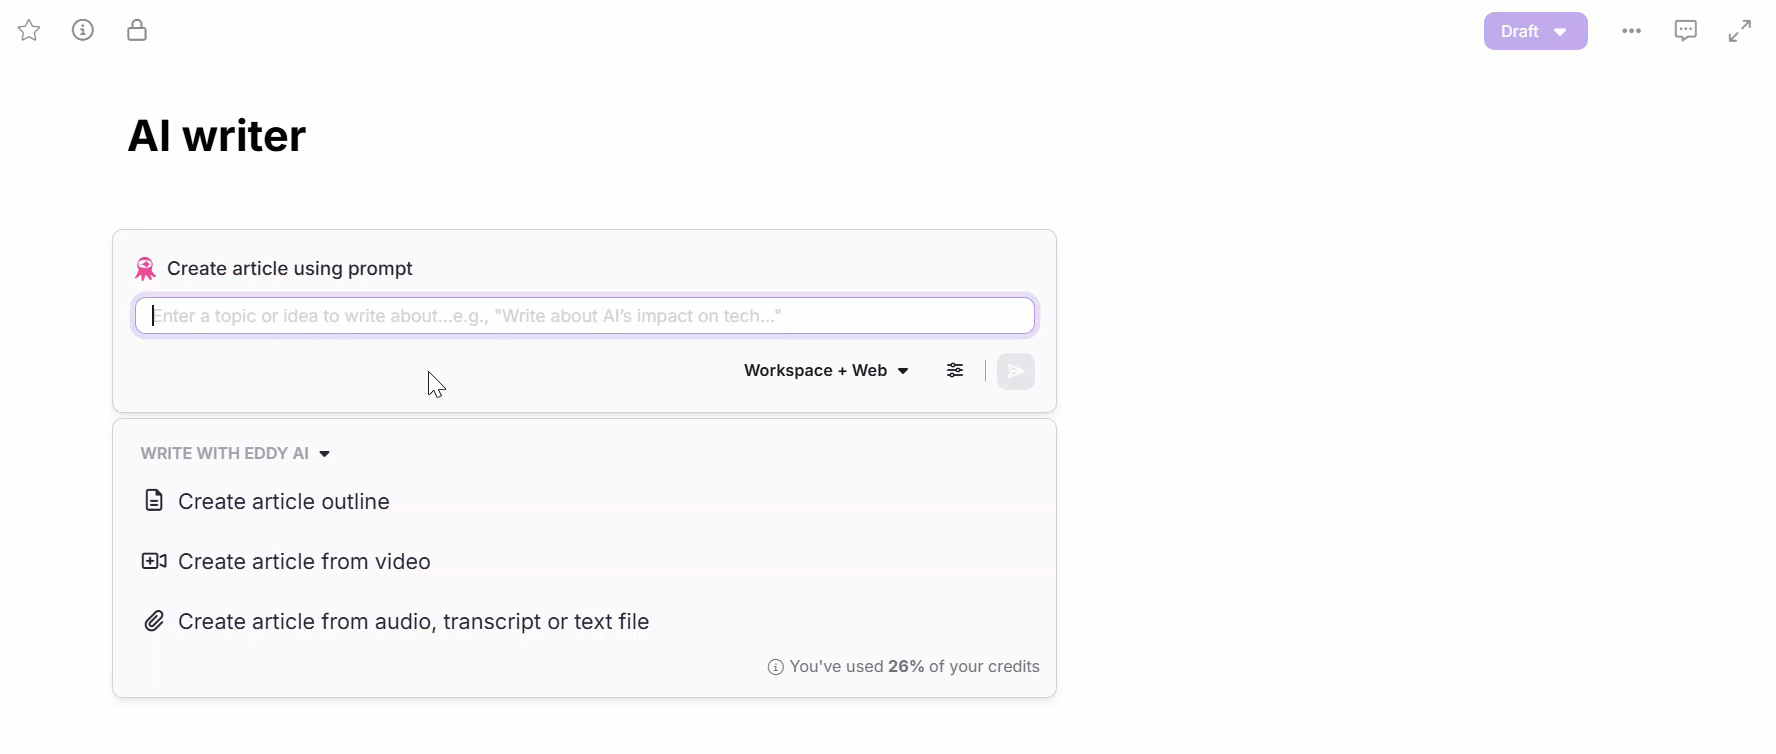
Generate an article from a prompt
Use this option when you know the topic and want a complete first draft.
- Open the Write Article panel. The default mode is Create article using prompt.
- Enter your prompt in the text field. The field expands as you type. Use specific language — for example, "write a troubleshooting article for login errors in a SaaS app" produces better output than "write about login issues."
- Click the Workspace + Web dropdown to choose your information source:
- Workspace + Web (default) — Eddy AI draws from both your workspace and the web.
- Workspace — Eddy AI draws only from your workspace content.
- Web — Eddy AI draws only from the web. Useful for topics not yet covered in your workspace.
- Click the Preference () icon to select a style guide and template:
- A system style guide is applied by default. Use the Style Guide dropdown to select a custom guide, or choose None to generate without one.
- Click Pick a template to open the Article from template panel. Select a template, preview it in the right pane, and click Use this template.
- Click the Send () icon. Eddy AI begins generating the article.
- After the article is generated, you can choose to either Keep it, Discard, or select Modify response and choose the desired option from the dropdown menu.
- If the title field of the article is left blank, Eddy AI will automatically generate a relevant title based on the provided prompt or content. You can always manually edit the generated title after content creation.
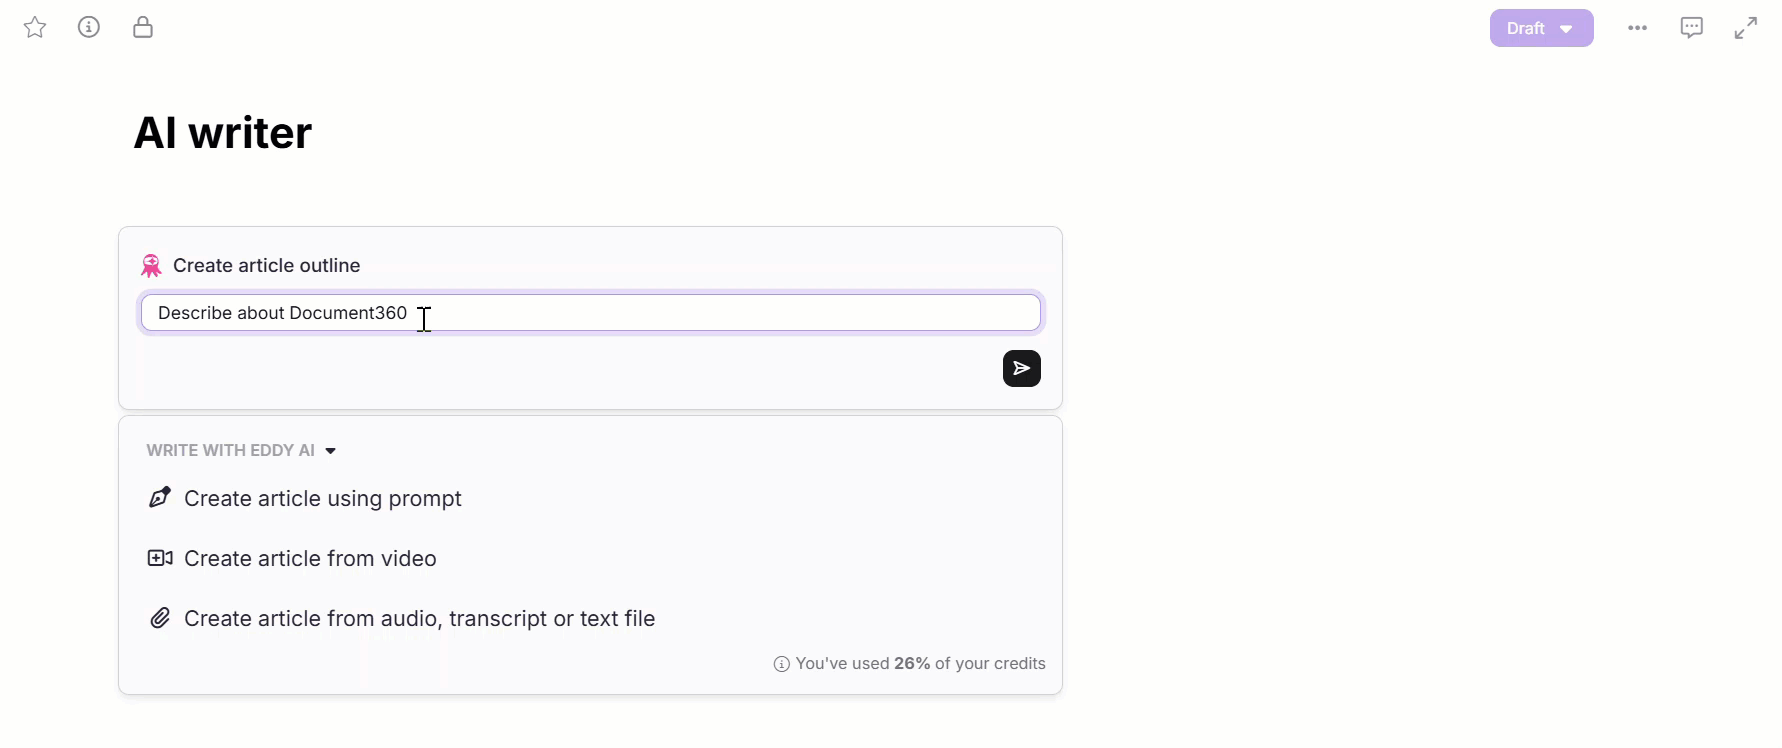
Generate an article outline
Use this option when your topic is complex and you want to review and adjust the structure before content is written.
- In the Write Article panel, click Create article outline.
- Enter your prompt or topic in the text field. Eddy AI will generate an initial draft based on the input, helping you quickly start your article.
- Click the Send () icon. Eddy AI generates a structured outline with headings and sections.
When you switch between creation modes (for example, from prompt to video), the text entered in the prompt field is retained.
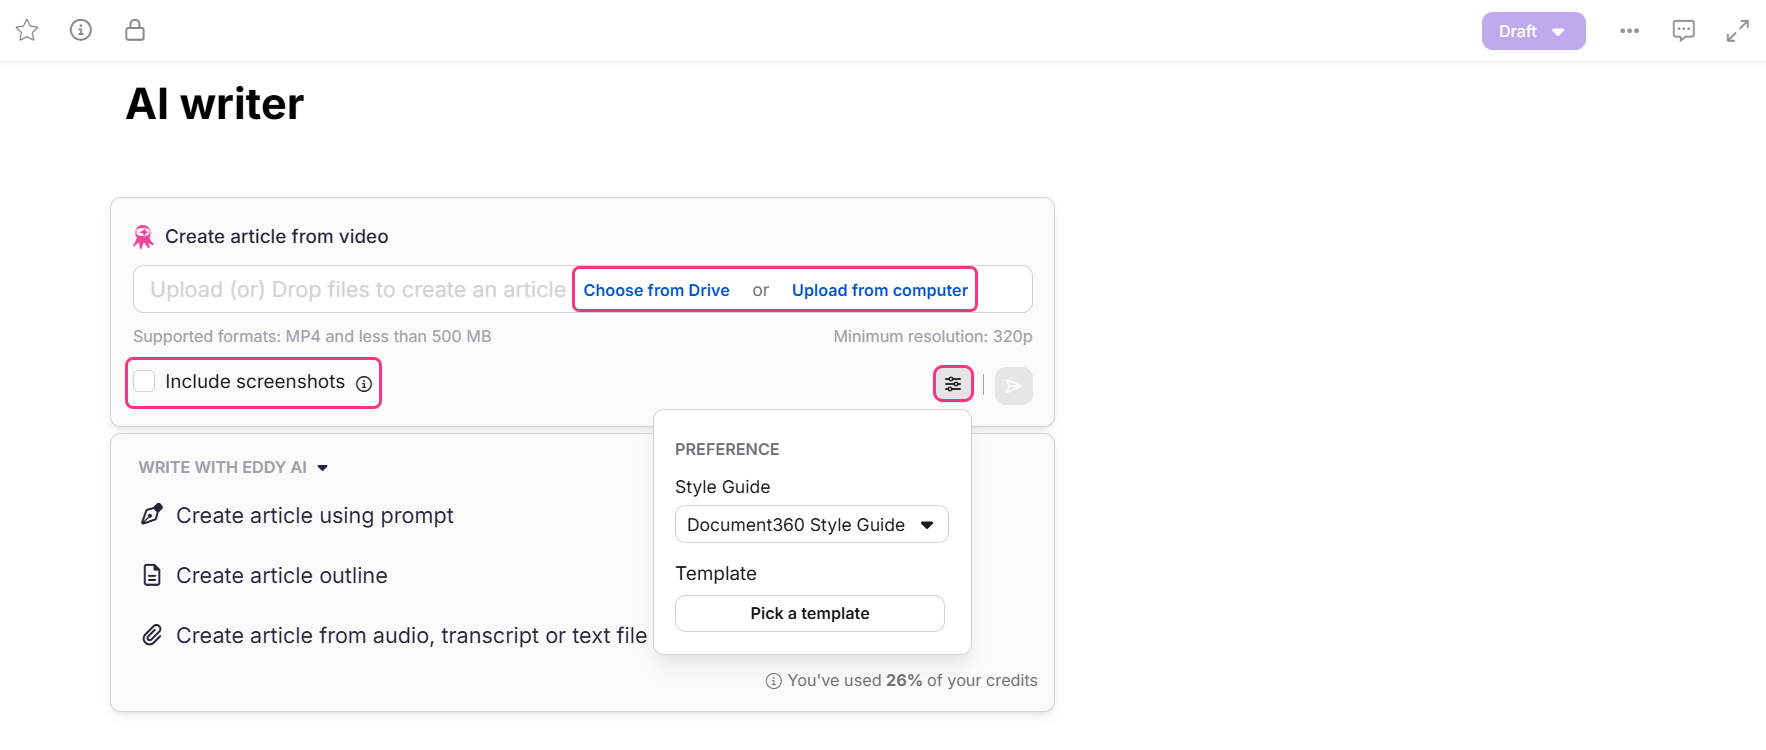
Generate an article from a video
Use this option to convert a screen recording or meeting video into a written how-to article.
- In the Write Article panel, click Create article from video.
- Upload your video using one of these methods:
- Choose from Drive — Select a video from the Document360 Drive and click Insert.
- Upload from computer — Select a local video file and click Open.
- Drag and drop — Drag a video file into the dialog.
Supported formats for video uploads are:
- The video must be in MP4 format.
- The video size must be less than 500 MB.
- The minimum resolution of the video must be 320p.
- Click the Delete () icon if you wish to remove the upload or enter a new one.
- Once uploaded, the text field becomes active. Enter a prompt or select a suggested prompt to refine the output.
When you switch between creation modes, the text entered in the prompt field is retained.
YouTube videos are not supported due to API restrictions.
Include screenshots from video in article
This option allows you to create a how-to article including images from the video that you upload. Eddy AI will extract and capture screenshots based on the clicks in the video and generate an article flow with images, offering a clearer and more visual picture of the article.
By default, the Include screenshots checkbox will be unchecked. In that case:
- You can select a template and style guide for article generation using the Preference () icon.
- The article will be generated in text format without including any screenshots.
If the Include screenshots checkbox is checked:
- The AI generates a how-to article with relevant screenshots auto-extracted from the video.
- You cannot choose a template or style guide. A default structure will be applied to generate the article.
Once done, click the Send () icon and Eddy will start generating the article.
- To generate an article with screenshots, the video length must be within 10 minutes. To generate an article without screenshots, the video length must be within 30 minutes. If the video exceeds this limit, an error message will appear during upload.
- The uploaded video must have clear, audible audio and visible screen interactions to ensure smooth article creation.
- The images from the accepted article suggestion by Eddy will be saved to the Drive.
- Videos uploaded from local storage will not be saved or stored in the Drive.
Generate an article from audio, transcript, or text file
Use this option to convert a call recording, meeting transcript, or Word document into a structured article.
- In the Write Article panel, click Create article from audio, transcript, or text file.
- Upload your file using one of these methods:
- Choose from Drive — Select a file from the Document360 Drive and click Insert.
- Upload from computer — Select a local file and click Open.
- Drag and drop — Drag a file into the dialog.
Supported formats for file uploads are:
- .txt - Text-based scripts or notes
- .mp3 - Audio recordings (e.g., customer calls, webinars)
- .doc or .docx - Word documents
- Click the Delete () icon to remove the upload or enter a new one.
- Once uploaded, the text field becomes active. Enter a prompt or select a suggested prompt to refine the output. Eddy AI converts the file content into a structured article.
- Click the Preference () icon to select a style guide and template.
- Click the Send () icon. Eddy AI generates the article.
.png)
Files uploaded from local storage will not be saved or stored in the Drive.
Note that you won't be able to interact with the editor during generation. You may switch to different sections of the portal or browser tabs, and in that case, a notification will inform you when the content is ready.
When you switch between creation modes, the text entered in the prompt field is retained.
Review and act on the generated article
After generation, a confirmation panel appears at the end of the article. Use it to accept, discard, or refine the response.
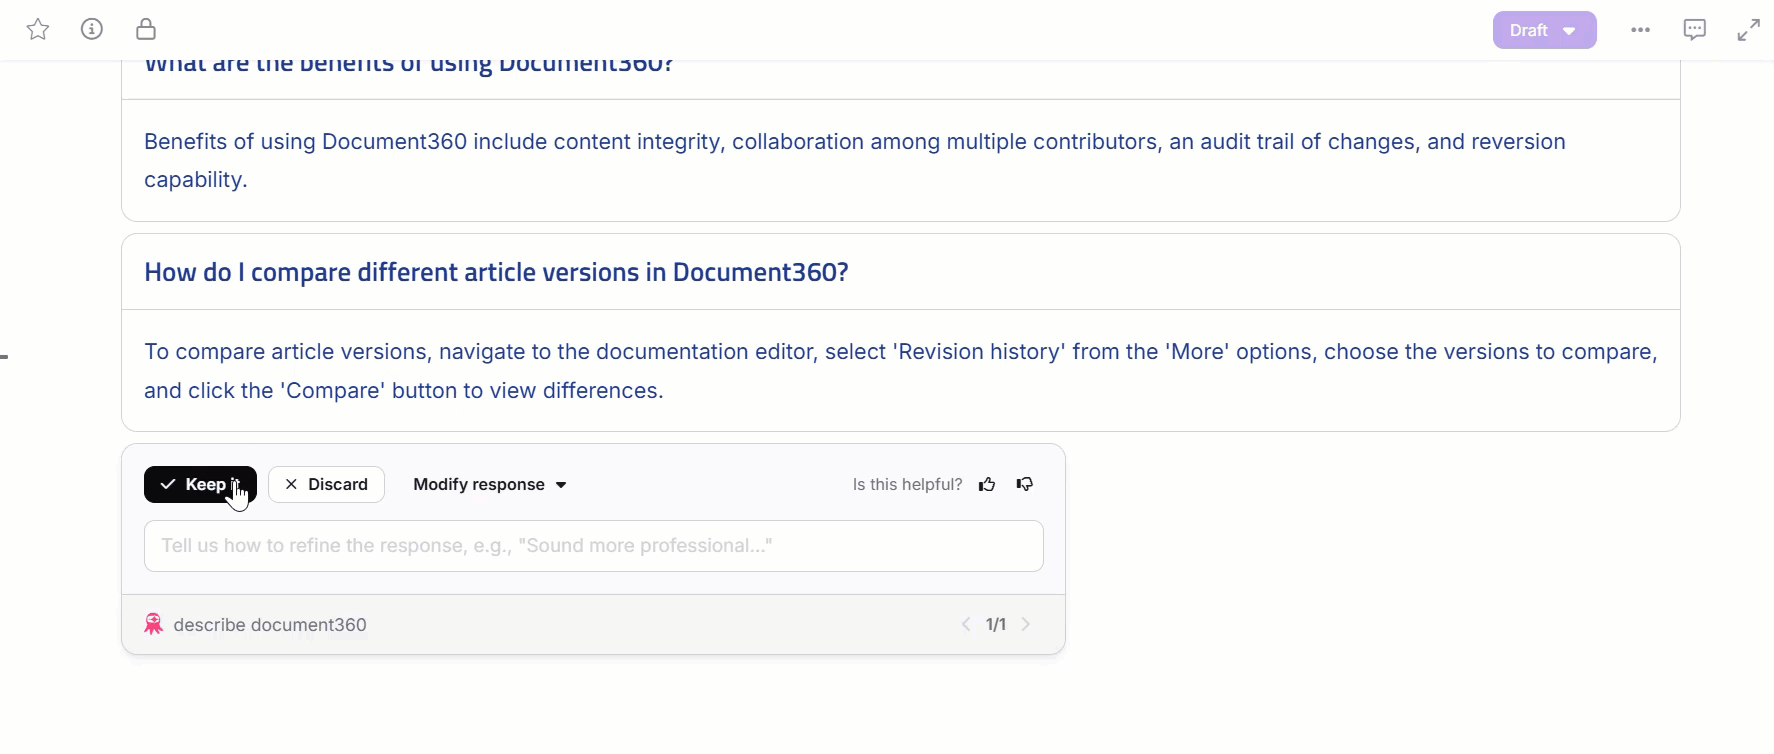
- Click Keep it if you wish to accept and retain the Eddy AI generated response.
- Or, click Discard if you do not want to accept the response and return to the prompt entry panel.
- Click Modify response to find more options on modifying the article to tailor it to your needs. The options are:
- Make longer
- Make shorter
- Improve it
- Change tone — Professional, Friendly, Casual, Straightforward, or Confident
- Convert speech — Direct to indirect or Indirect to direct
- Change voice — Active voice or Passive voice
- If you wish to refine the tone, voice, or style of writing in the generated response, use the text field to enter the prompt. For example, "sound more professional" or "make it instructional".
- Click the Send () icon, and Eddy will alter the response based on your prompt.
- All the responses generated can be viewed in the editor using the back () and forward () arrows. The number of responses generated for the article will be displayed alongside.
- Click the Like () icon if you're satisfied with the Eddy AI generated response, or click the Dislike () icon if you're not. This helps provide feedback to improve future responses.
You can regenerate an article up to 10 times. Refinement options are subject to project-level credit limits. Contact Document360 support for credits related query.
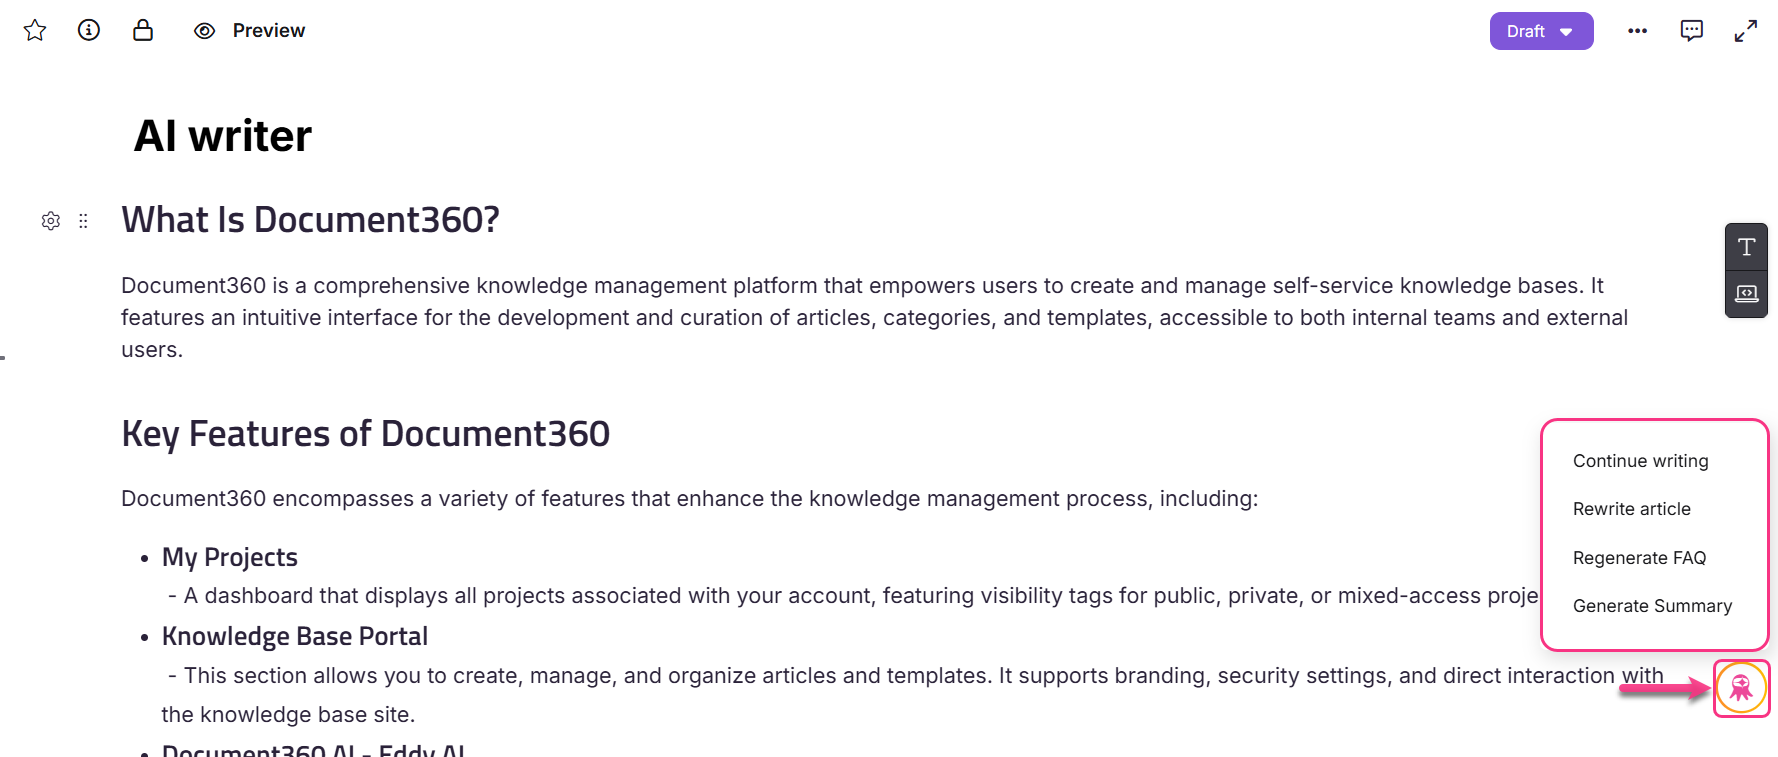
Once you accept the Eddy AI generated response using the Keep it option, you will see the Eddy AI menu at the bottom right. Click to view the options below:
- Continue writing
- Rewrite article
- Regenerate FAQ
- Generate summary
Continue writing
Use this to extend an existing draft. Eddy AI picks up from your content and continues writing.
- Click the Eddy AI menu and select Continue writing.
- The Write Article panel will open. Select one of the suggested prompts or enter your own, based on which Eddy AI will expand the contents of the article.
- Click the Workspace + Web dropdown to select the source from which you want Eddy AI to fetch information:
- Workspace + Web — This will be selected by default. With this selection, Eddy AI combines information from your workspace and the web.
- Workspace — With this selection, Eddy AI fetches content exclusively from your workspace.
- Web — With this selection, Eddy AI fetches content only from the web.
- Once done, click the Send () icon and Eddy will continue writing the article.
- A minimum of 10 words in the article is required for Eddy to continue writing the article.
- The Continue writing option is not supported for articles more than 3000 word count.
- Once the article is generated, you can accept the response by clicking Keep it in the confirmation panel.
- Or, click Discard if you do not want to accept the generated response. The response will be deleted, and the original draft content will be retained.
- Click Modify response to find more options on modifying the generated article to tailor it to your needs.
Rewrite article
Use this to regenerate the article with a different topic or revised prompt.
- Click the Eddy AI menu and select Rewrite article.
- The Write Article panel will open. Select one of the suggested prompts or enter your own, based on which Eddy AI will rewrite the article.
- Click the Preference () icon to change and choose templates.
- Once done, click the Send () icon and Eddy will rewrite the article.

- A minimum of 150 words in the article content is required for Eddy to rewrite the article.
- The Rewrite article option is not supported for articles more than 3000 word count.
Generate FAQ
Once the writing agent generates the article, click the Eddy AI menu and select Generate FAQ. Eddy AI generates FAQs based on the article content.
- A minimum of 150 words in the article is required for Eddy AI to generate FAQs.
- The Generate FAQ option is not supported for articles more than 3000 word count.
- The Generate FAQ option will create the number of FAQs specified in the Style Guide. If no number is defined and no FAQ context is mentioned, it will generate a minimum of five FAQs by default.
Generate summary
Once the writing agent generates the article, use this to produce a concise summary. This is useful for lengthy articles, call transcripts, or complex technical content.
Click the Eddy AI menu and select Generate summary. Eddy will generate an article summary based on the article content at the end of the article.
- A minimum of 150 words in the article is required for Eddy to generate article summary.
- The original content is not altered unless you explicitly choose to replace it with the summary.
Credit usage and limits
Each AI writing agent operation consumes a certain number of credits depending on the type of action performed.
| Operation | Credits deducted per article generation |
|---|---|
| Write article using MP3 (30 mins) | 10 |
| Write article using MP4 (10 mins) with up to 40 input images | 10 |
| Write article using Transcript (TXT/DOCX) | 5 |
| Continue, Rewrite, Outline creation, and Refine | 1 |
| Write article using prompt | 1 |
As credits are consumed, the AI writing agent displays the remaining percentage within the editor:
- Below 80%: An info icon shows remaining credits.
- Above 80%: A warning will appear prompting you to purchase additional credits.
If you don't have sufficient credits, certain operations (for example, writing from video or audio) will be disabled. The Enter button becomes inactive for restricted operations, and you can switch to other modes instead.
- 100% usage: A red banner will appear indicating that all credits are used. The Enter button will remain disabled.
If you wish to purchase additional credits, click on the support button. Our team will reach out to you with the next steps.
On 80%, 90%, and 100% usage, notification emails are triggered (if alerts are enabled).
Best practices
- Write specific prompts. The more detail you provide, the more accurate the first draft. Use "write a how-to article explaining how to create and format tables in the Advanced WYSIWYG editor" rather than "write about tables."
- Choose the right information source. Use Workspace when you want Eddy AI to draw from your existing content. Use Web for general topics not yet documented. Use Workspace + Web for the broadest coverage.
- Apply a style guide. Attaching a style guide before generating ensures the output matches your team's tone, terminology, and structure from the first draft.
- Use outline mode for complex topics. Generate the outline first, review and adjust the headings, then generate the full article. This avoids large rewrites caused by structural misalignment.
- Enable Include screenshots for video-based how-to articles. Auto-extracted screenshots significantly reduce the manual effort of capturing and inserting visuals.
- Always review before publishing. Eddy AI produces a strong first draft, but verify factual accuracy — especially for product-specific details, version numbers, and UI element names.
Video tutorial
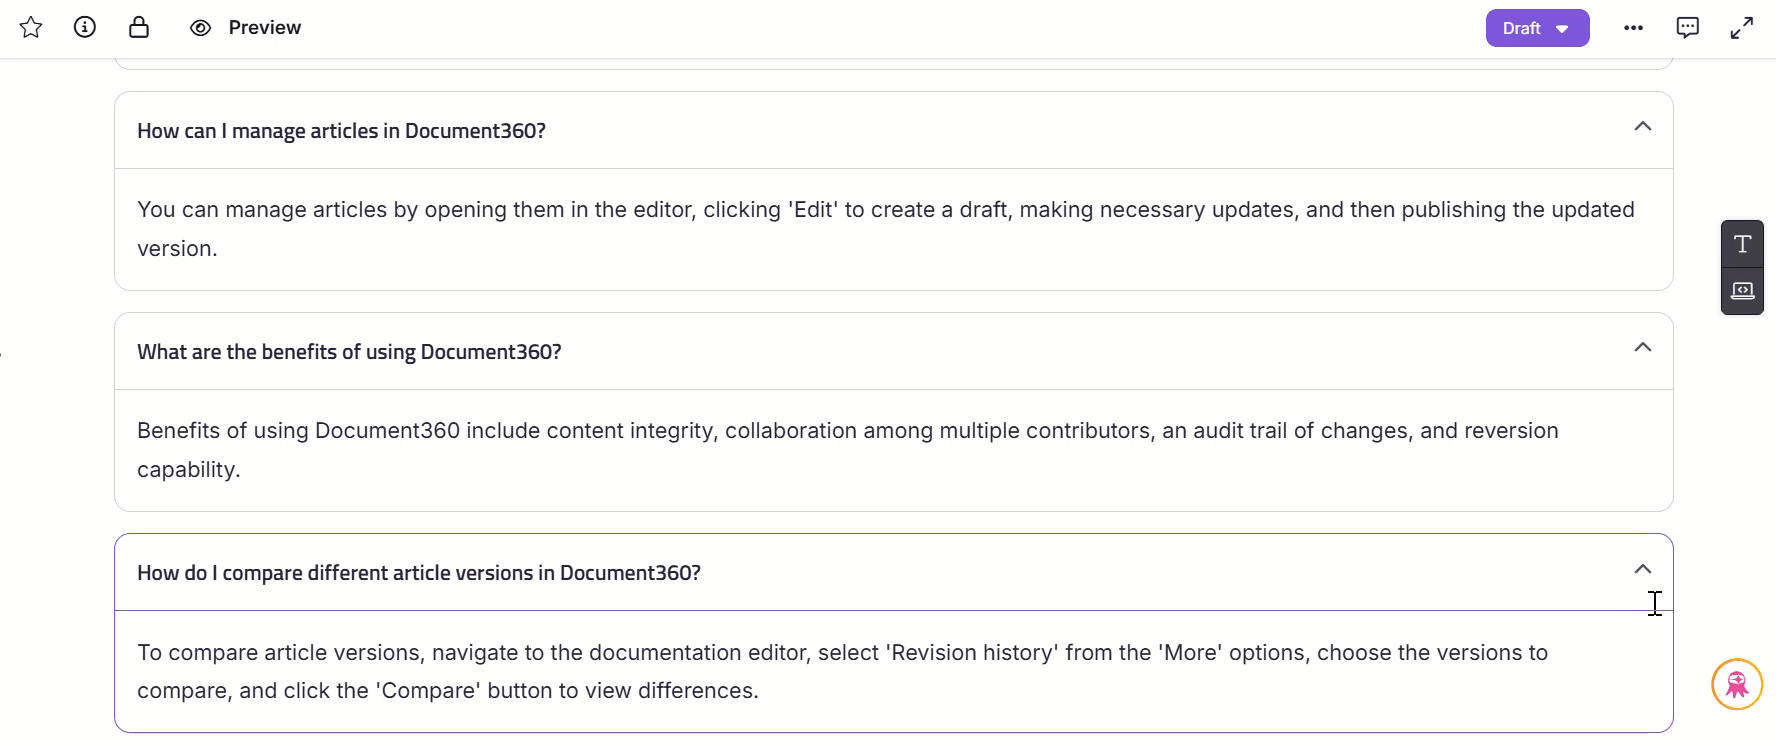
FAQ
How many tags does the AI writing agent create when generating an article? Can we add more?
The AI writing agent will create a maximum of 10 tags when generating an article, irrespective of the limit mentioned in the style guides. However, you can manually add tags to your article from the More () article options in the editor.
Can the AI writing agent apply formatting and customize fonts in the generated article?
The Eddy AI writing agent can apply basic text formatting, such as bold or italics, when specified in the prompt. However, it does not support font customizations like changing the font type, font size, or font color.
Is there a limit to how much I can use the AI writing agent?
Yes. Your usage is limited based on the credit allocation of your current plan. If you need additional credits, contact Document360 support to upgrade or purchase more.
What is the word limit for the Writing Agent Style Guide?
The Writing Agent Style Guide supports up to 25,000 characters. This limit applies only to the Style Guide document/file and does not affect article publishing or knowledge base storage limits. This allows teams to define detailed tone guidelines, terminology rules, structural conventions, and documentation standards within a single configuration.