Eddy AI is Document360's built-in AI writing agent. It allows you to generate complete, structured knowledge base articles directly within the Advanced WYSIWYG editor, without leaving the portal.
Instead of starting from a blank page, you can describe what you need, upload a recording or audio file, or provide a topic, and Eddy AI will generate a first draft for you. The draft is placed directly into the editor, ready to review, refine, and publish.
How teams use Eddy AI
- Technical writers can upload product walkthrough recordings and convert them into step-by-step how-to articles, eliminating manual transcription.
- Support teams can convert customer call recordings or meeting transcripts into structured knowledge base articles using the audio or transcript option.
- New contributors can use the prompt option to generate a first draft on an unfamiliar topic and refine it with subject matter expert input.
- Content managers can generate article outlines for recurring article types such as release notes or troubleshooting guides, and distribute them to writers as starting points.
Eddy AI supports four modes of article creation:
Using a prompt
Describe what you want to write and Eddy AI generates a complete, structured article. The more specific your prompt, the better the output.
Learn more →Article outline
Provide a topic and Eddy AI builds a structured outline with headings and sections. Use this when the subject is complex and you want to validate the structure before any content is written.
Learn more →From video
Upload a Zoom, Teams, or Google Meet recording and Eddy AI converts it into a written article. Include screenshots to automatically extract visuals from the video — ideal for how-to guides and product walkthroughs.
Learn more →From audio, transcript, or text file
Upload a customer call recording, meeting transcript, or Word document and Eddy AI turns it into a structured knowledge base article. No manual transcription or reformatting needed..
Learn more →Key capabilities of the AI writing agent include:
- Faster drafting — Generate entire articles from a simple prompt or knowledge source.
- Custom style guides — Maintain consistent tone, structure, and SEO across articles.
- Flexible inputs — Generate content from prompts, files, or knowledge base sources.
- Improved quality — Get suggestions for refinements and glossary terms after generation.
- Multilingual support — Available in all languages supported by Eddy AI.
Access Eddy AI writing agent
To access the Eddy AI writing agent,
- Navigate to Documentation in the left navigation bar.
- Click the Create dropdown in the top navigation bar and select Create with Eddy AI.
- The Write Article panel will appear.
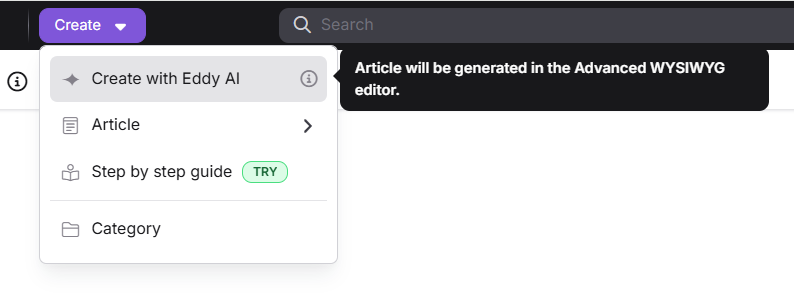
You can also access Eddy AI using the Flywheel (+) icon by hovering below any article in the category pane and selecting Create with Eddy AI, or from the (...) menu next to a category. If you're inside a Folder/Index type category, click the Create article dropdown in the top-right corner and select Create with Eddy AI. Alternatively, use the Slash (/) command directly from within the editor.
Create an article with Eddy AI
First drafts are the hardest part of documentation. Eddy AI eliminates that friction — whether you're starting from a prompt, a recording, or an existing file, it generates a structured, ready-to-refine article so you can spend your time on accuracy and quality, not blank pages.
Create article using a prompt
Use this when you know what you want to write but need a head start. A clear, specific prompt gives Eddy AI the direction it needs to produce something usable on the first try.
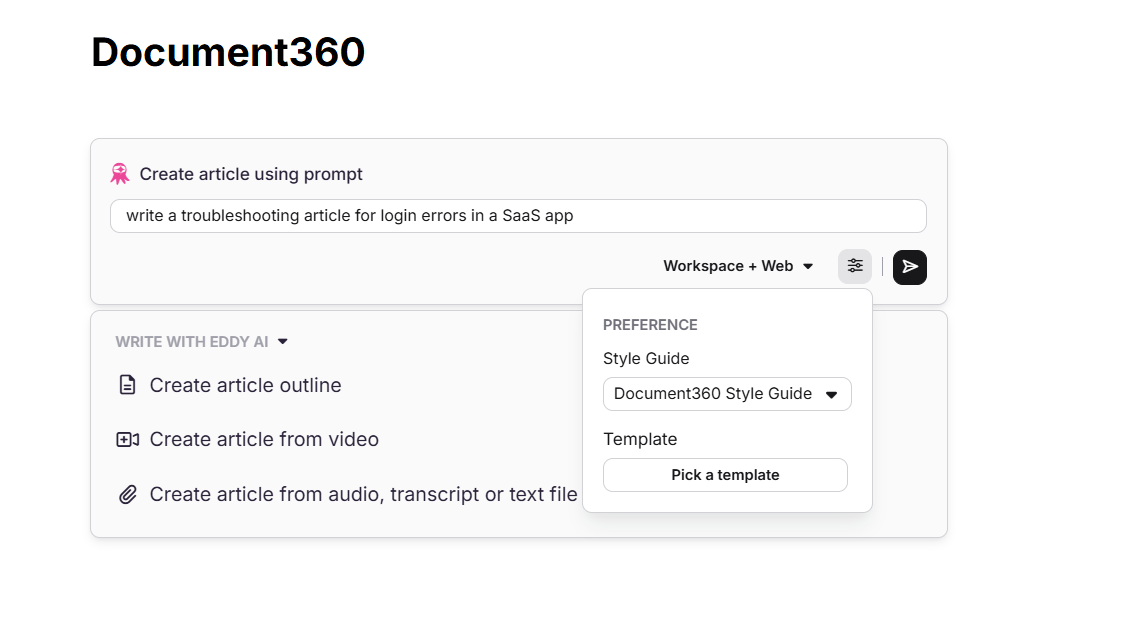
- Open the Write Article panel. The default mode is Create article using prompt.
- Enter your prompt. Be specific — "write a troubleshooting article for login errors in a SaaS app" will outperform "write about login issues" every time.
- Select your information source from the Workspace + Web dropdown:
- Workspace + Web (default) — Eddy AI combines information from your workspace and the web.
- Workspace — Eddy AI fetches content exclusively from your workspace.
- Web — Eddy AI fetches content only from the web. Useful for general topics not yet covered in your workspace.
- Click the Preference icon to select a style guide and template:
- A system style guide is applied by default. Use the Style Guide dropdown to select a custom style guide, or choose None to generate without one.
- Click Pick a template to open the Article from template panel. Select a template, preview it in the right pane, and click Use this template. To learn more, see Style guide.
- Click the Send icon. Eddy AI will begin generating the article.
- If the article title was left blank, Eddy AI will generate one automatically based on the prompt. You can edit the title manually after generation.
- Once generated, review the draft and take one of the actions described in Post-generation actions below.
You cannot interact with the editor while an article is being generated. You can switch to other sections of the portal or browser tabs. A notification will inform you when the content is ready
Create article outline
Use this option to generate a structured outline before writing the full article content.
- In the Write Article panel, select Create article outline.
- Enter the topic or prompt in the text field.
- Click the Send icon. Eddy AI will generate an outline with headings and sections based on your input.
- Review the outline in the editor, then expand each section manually or use Continue writing to let Eddy AI fill in the content.
Create article from video
Use this option to convert a video recording — such as a Zoom, Microsoft Teams, or Google Meet recording — into a written article.
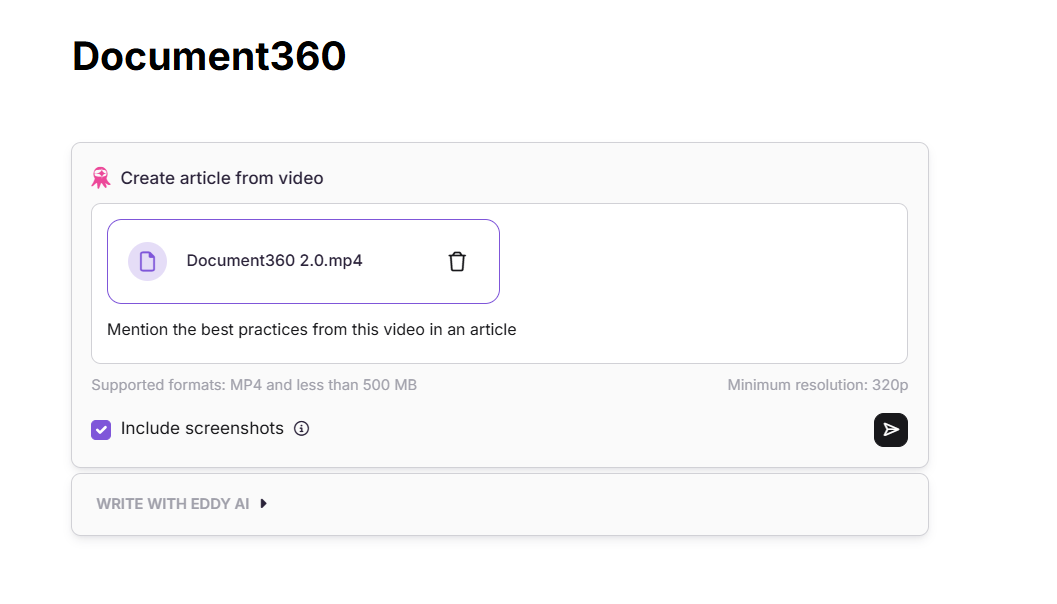
- In the Write Article panel, select Create article from video.
- Upload your video using one of the following options:
- Choose from Drive — Select a video from the Document360 Drive and click Insert.
- Upload from computer — Select a video from your local storage and click Open.
- Drag and drop — Drag a video file into the upload area.
- Click the Delete icon to remove the upload and start over if needed.
- Once uploaded, the text field becomes active. Enter your own prompt or select one of the suggested prompts to guide the article output.
- Choose whether to include screenshots:
- Include screenshots unchecked (default) — The article is generated as plain text. You can select a template and style guide using the Preference icon.
- Include screenshots checked — Eddy AI extracts screenshots based on interactions in the video and generates a how-to article with images. Template and style guide selection is not available in this mode; a default structure is applied.
- Click the Send icon. Eddy AI will process the video and generate the article.
Supported format: MP4 only. Maximum file size: 500 MB. Minimum resolution: 320p. Maximum video length: 10 minutes with screenshots; 30 minutes without screenshots. The video must have clear, audible audio and visible screen interactions for best results. Screenshots from an accepted article are saved to Drive. Videos uploaded from local storage are not saved to Drive. YouTube video links are not supported — download the video first and upload it directly.
Create article from audio, transcript, or text file
Use this option to generate an article from an audio recording, a meeting transcript, or a text document.
- In the Write Article panel, select Create article from audio, transcript, or text file.
- Upload your file using one of the following options:
- Choose from Drive — Select a file from the Document360 Drive and click Insert.
- Upload from computer — Select a file from your local storage and click Open.
- Drag and drop — Drag the file into the upload area.
- Click the Delete icon to remove the upload and start over if needed.
- Once uploaded, the text field becomes active. Enter your own prompt or select one of the suggested prompts to guide the output.
- Click the Preference icon to select a style guide and template.
- Click the Send icon. Eddy AI will convert the file into a structured article.
Supported formats: .mp3 (audio recordings), .txt (text scripts or notes), .doc or .docx (Word documents). Files uploaded from local storage are not saved to Drive.
Close the Write Article panel without generating
Hover outside the Write with Eddy AI panel — your cursor will change to a cancel icon (⊘) — and click it. A confirmation dialog will appear. Click Discard to exit.
Any prompt text you've entered will be lost when you close the panel. Copy your prompt before closing if you want to save it for later.
Post-generation actions
After Eddy AI generates an article, a confirmation panel appears at the end of the article with the following options:
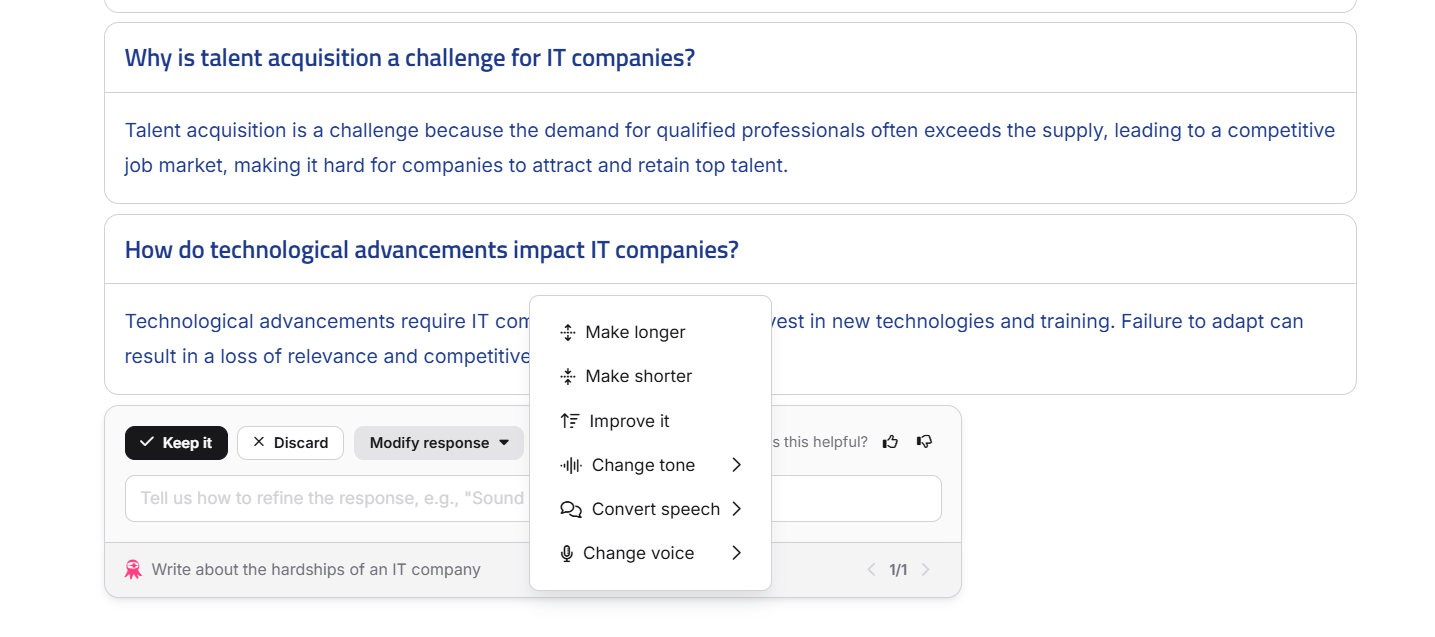
- Click Keep it to accept and retain the generated response.
- Click Discard to reject the response and return to the prompt entry panel.
- Click Modify response to refine the draft. The available options are:
- Make longer
- Make shorter
- Improve it
- Change tone: Professional, Friendly, Casual, Straightforward, or Confident
- Convert speech: Direct to indirect, or Indirect to direct
- Change voice: Active voice or Passive voice
- To refine tone, voice, or writing style further, enter a custom prompt in the text field (for example, "sound more professional" or "make it instructional") and click Send.
- Use the back and forward arrows to navigate between all generated responses. The total number of responses is displayed alongside the arrows.
- Click the Like icon if you are satisfied with the response, or the Dislike icon if you are not. This feedback helps improve future responses.
You can regenerate an article up to 10 times. Refinement actions are subject to project-level credit limits. Contact Document360 support for credit-related queries.
Once you accept the response using Keep it, the Eddy AI menu appears at the bottom-right of the editor with the following options:
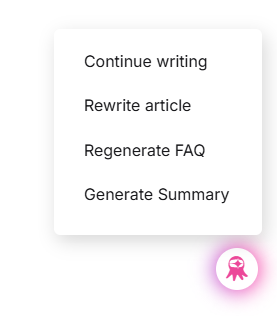
Continue writing — Extends an existing article based on a new prompt. Requires a minimum of 10 words; not available for articles over 3,000 words.
Rewrite article — Rewrites the article with a new topic or revised prompt. Requires a minimum of 150 words; not available for articles over 3,000 words.
Generate FAQ — Generates FAQs from the article content and inserts them automatically. The number of FAQs follows your style guide setting; defaults to five if not specified. Requires 150 words minimum; not available over 3,000 words.
Generate summary — Generates a concise summary and inserts it at the end of the article. Useful for long articles, call transcripts, or complex technical content. Requires 150 words minimum. The original content is not altered unless you choose to replace it.
Best practices
- Write clear, specific prompts. The more detail you provide, the more accurate the output. For example, instead of "write about tables", use "write a how-to article explaining how to create and format tables in the Advanced WYSIWYG editor."
- Select the right information source. Use Workspace when you want Eddy AI to draw from existing content. Use Web for general topics. Use Workspace + Web for broader coverage.
- Apply a style guide to ensure generated articles match your team's tone, terminology, and structure.
- Use article outline for complex topics — review and adjust the structure before asking Eddy AI to fill in the content.
- Use Include screenshots when generating how-to articles from video — it significantly reduces manual screenshot work.
- Always review generated content before publishing. Eddy AI provides a strong first draft, but verify accuracy, especially for technical or product-specific details.
FAQ
Are uploaded audio and video files stored in the Document360 Drive?
Files uploaded from local storage are not saved to Drive. Files selected directly from Drive remain in Drive. Screenshots extracted from an accepted video article are saved to Drive.
What is the character limit for the writing agent style guide?
The style guide supports up to 25,000 characters. This limit applies only to the style guide configuration and does not affect article publishing or knowledge base storage limits.
Can Eddy AI apply custom formatting or fonts to generated articles?
Eddy AI can apply basic formatting such as bold and italics when specified in the prompt. Font type, size, and colour customization are not supported.