You can upload files to any folder or subfolder in your Drive using drag and drop or the More option. Files uploaded to the Drive are available for use across articles, homepage customization, and content reuse elements throughout your knowledge base.
Why manage files in Drive
Drive is the single source of truth for all assets in your knowledge base. Uploading files through Drive — rather than directly into the article editor — gives you greater control over where assets are stored, how they are organized, and how they are reused across your content.
Uploading through Drive rather than inline in the editor lets you:
- Store assets in a predictable, organized folder structure that mirrors your category hierarchy.
- Add tags and alt text at upload time, making files immediately searchable and accessible.
- Reuse the same file across multiple articles without duplicating it, keeping your Drive lean.
- Maintain a central location where contributors can find, audit, and update shared assets.
Choosing the right upload method
| Method | Best for | Works on empty folders? |
|---|---|---|
| Drag and drop | Quickly uploading one or more files when the folder is already open in the main panel. | Yes — use the drag and drop area in the center of the folder view. |
| More option | Uploading files to a specific subfolder directly from the left navigation pane without opening the folder first. | Yes. |
Add a file using drag and drop
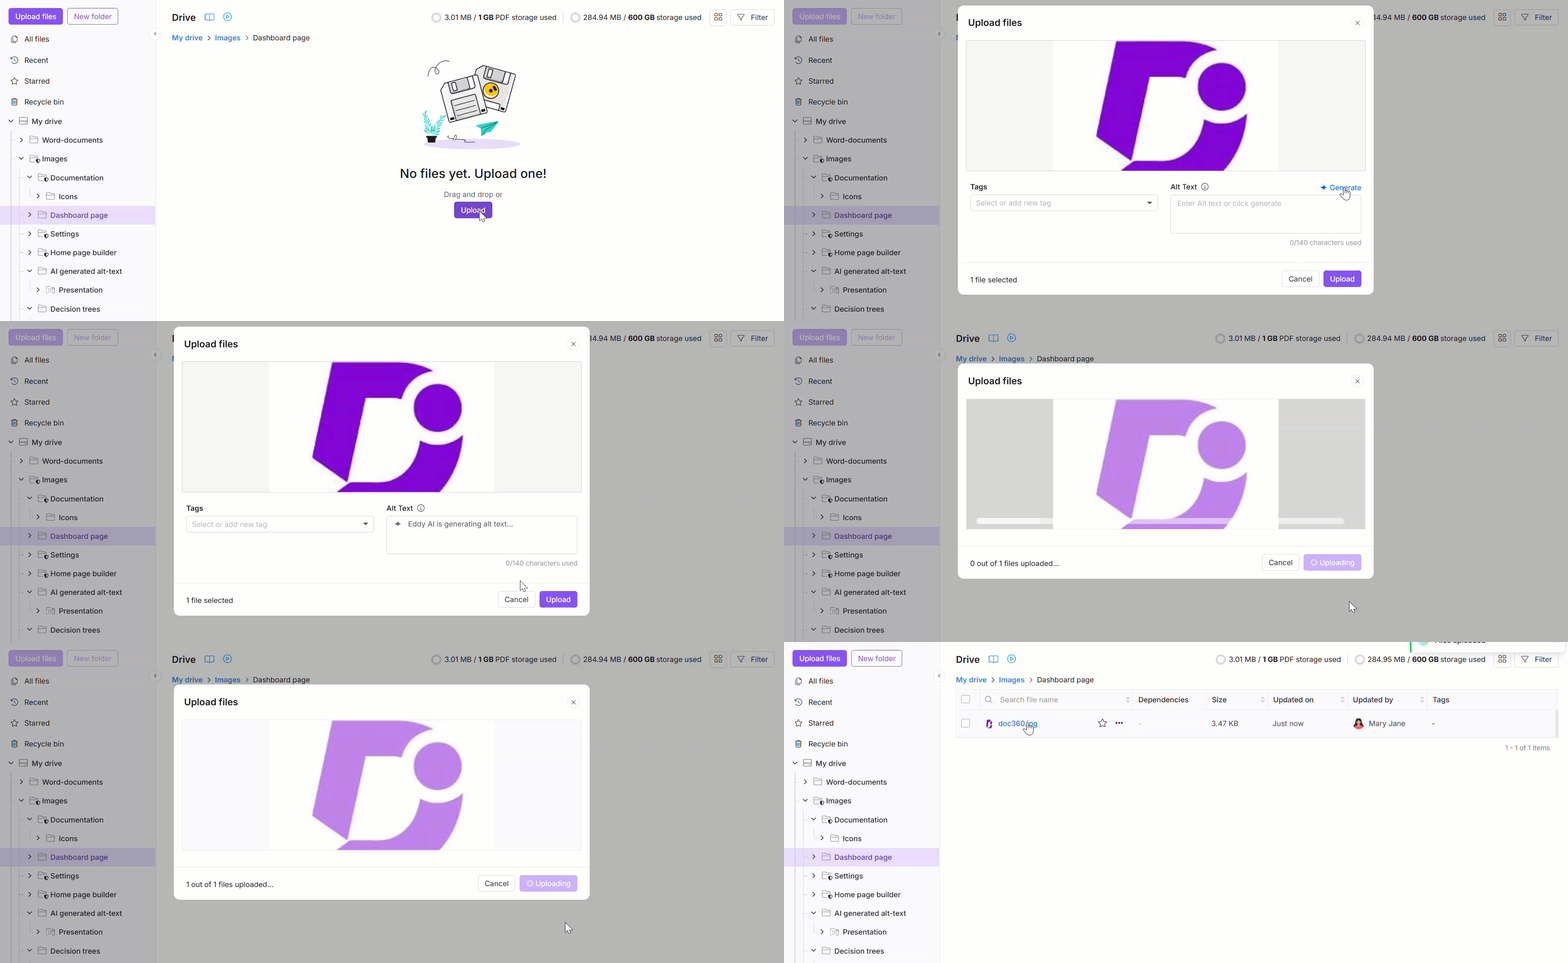
To upload files using drag and drop,
- Click the Drive icon in the left navigation bar and open the destination folder.
- Drag one or more files from your device and drop them into the designated area in the center of the folder view. Alternatively, click Upload from my device and select your files using the file explorer.
- In the upload panel, confirm or change the Folder location where the files will be stored. The folder currently selected in the Folder manager is set as the default location.
- Edit the File name field if you want to rename a file before uploading. For a single image, click Generate to have Eddy AI suggest a name based on the image content. For multiple images, use each image's Generate dropdown to generate a file name, alt text, or both. If your organization has a naming convention configured for image files, generated names follow it - see Drive image name convention.
- Add tags using Add tags for all files at the bottom of the upload panel. Select existing tags, or type a new one to create it.
- Add alt text for images. For a single image, enter alt text manually in the Alt text field, or click Generate. For multiple images, use each image's Generate dropdown, or click Generate in the banner at the top of the upload panel to generate alt text for every image in the batch at once.
- Click Upload.
Add a file using the More option
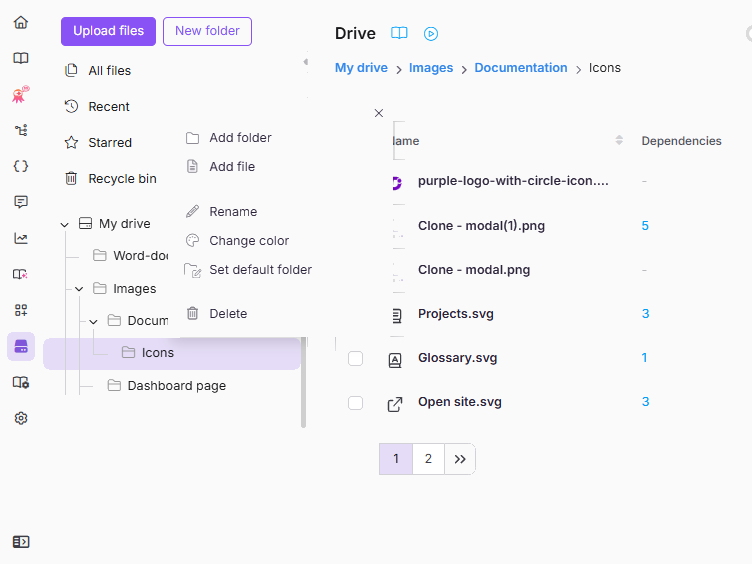
To upload files to a specific subfolder from the left navigation pane,
- Click the Drive icon in the left navigation bar.
- Click the More icon next to the target folder and select Add file.
- Upload your files in one of two ways: click Upload from my device and select files using the file explorer, or drag and drop the files into the upload area.
- Edit the File name field if needed. For a single image, click Generate to have Eddy AI suggest a name. For multiple images, use each image's Generate dropdown. If your organization has a naming convention configured for image files, generated names follow it — see Drive image name convention.
- Add tags using Add tags for all files, and add alt text for images manually or by clicking Generate — per image, or for the whole batch using the banner at the top of the panel.
- Click Upload.
File name, tags and alt text
Adding a clear file name, tags, and alt text at upload time is strongly recommended. The file name is set automatically from the original file and can be edited before uploading; tags and alt text are optional, but both have a meaningful impact on how discoverable and accessible your files are across the knowledge base.
| Field | What it does | Notes |
|---|---|---|
| File name | Sets the name the file is stored and displayed under in Drive. | Available for all file types. Maximum 150 characters. Can't contain +, %, #, =, \, /, :, *, ?, ", <, or >. For images, click Generate for an Eddy AI-suggested name (uses the same credits as Alt text). |
| Tags | Labels the file for search and filtering in Drive. Tags are shared across articles and files from the same tag library. | Available for all file types. When uploading a mix of images and other formats, only tags can be added — not alt text. |
| Alt text | Provides a text description of an image for screen readers and assistive technology, supporting accessibility compliance. | Available for images only. Maximum 140 characters. Click Generate for an Eddy AI-suggested alt text (uses the same credits as File name). Can be added or edited after upload via the file's details panel. |
If a file's untouched default name collides with an existing file in the destination folder, Document360 automatically appends a number to it (for example, logo.png becomes logo(1).png). If you manually edit the File name field to a name that's already in use by another active file in Drive, the upload is blocked with a "File name already exists" error, and you'll need to enter a different name before the upload can complete. If you intend to replace an existing file's content while keeping its name, refer to Replace a file.
Alt text should be descriptive and concise, providing meaningful context about the image. For example, use "Bar chart showing Q3 revenue by region" rather than "chart" or "image". Good alt text improves both accessibility compliance and searchability within Drive.
File limits and restrictions
The following limits apply to all file uploads in Drive:
| Limit | Value |
|---|---|
| Maximum files per root folder | 5,000 files (includes all files in the root folder and its subfolders) |
| Maximum size per single file | 150 MB by default; can be higher with the Large File add-on (Decimal units: 1 MB = 1,000,000 bytes — approximately 143.05 MiB in binary units) |
| Maximum combined size for multi-file upload | 160 MB |
| Recommended image resolution | Below 536 MP (megapixel) for cross-browser compatibility |
File names can't contain +, %, #, =, \, /, :, *, ?, ", <, >, or |, and are limited to 150 characters. If the file's original name — as it exists on your device — already contains +, %, #, or =, the upload is rejected immediately; rename the file on your device and try again. Files with any other disallowed character, or names over the limit, will fail to upload. See Rename a file for more information.
Restrict allowed file types
By default, Document360 allows all media formats to be uploaded to the Drive. You can restrict uploads to specific file types to enforce asset standards across your team — for example, allowing only .png and .svg files.
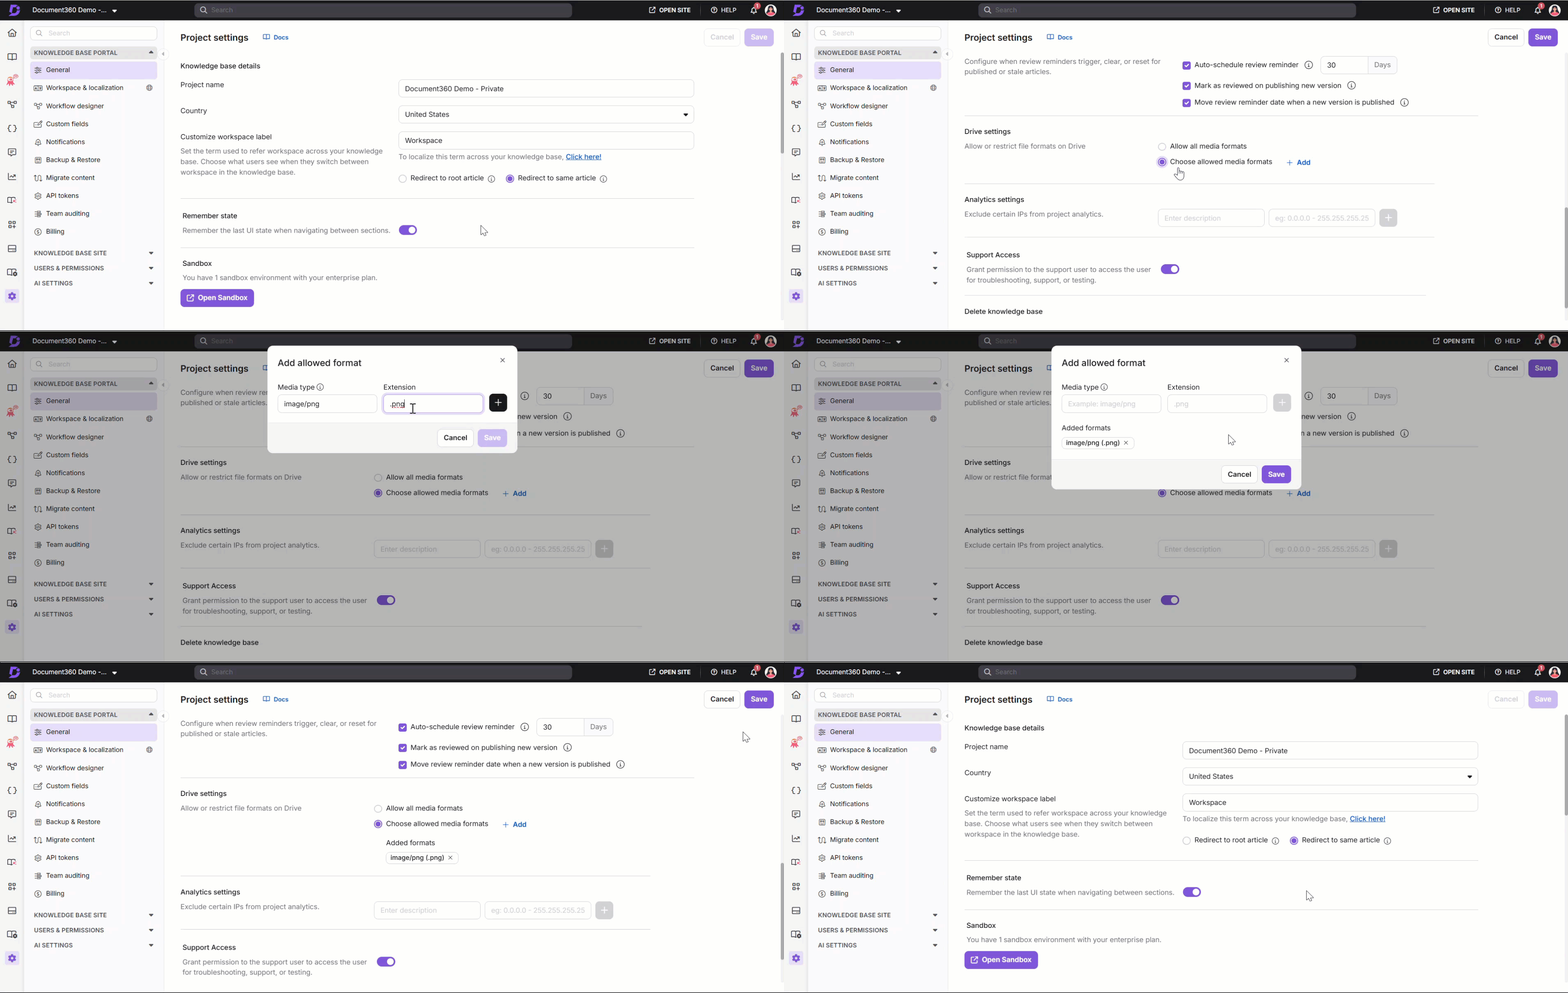
To add file type restrictions,
- Navigate to Settings in the left navigation bar.
- Go to Knowledge base portal > General > Drive settings.
- Scroll down to Drive settings. By default, Allow all media formats is selected.
- Click Choose allowed media formats, then click Add.
- Enter the Media type in the format
media-type/extension— for example,image/png. - Enter the Extension in lowercase — for example,
.png. This field is case-sensitive. - Click + to add the format to the allowed list.
- Click Save.
The Extension field is case-sensitive. Always enter extensions in lowercase (for example, .png, .svg, .jpg). An incorrectly cased extension may prevent valid files from uploading.
Best practices
- Name files clearly at upload time. Use a clear, descriptive name, or click Generate on an image to have Eddy AI suggest one. If your admin has set a naming convention under Portal Settings > AI Settings > Drive image name convention, Eddy AI's suggested names follow it automatically.
- Tag files at upload time. Tagging during the upload flow is faster than updating files individually later, and keeps Drive searchable as your content grows.
- Add alt text to every image. Use a concise description of what the image shows — not just what it is — and keep it under 140 characters. This supports accessibility compliance and improves searchability in Drive.
- Restrict file types to enforce asset standards. If your team follows a defined format convention (for example,
.pngfor screenshots,.svgfor diagrams), configure file type restrictions in Drive settings instead of relying on contributors to remember. - Use Replace to update existing files, not re-upload. Replacing a file preserves its original URL, keeping all article references intact.
FAQ
Can I rename a file after uploading it to Drive?
Yes. You can rename a file at any time after uploading it. Select the file in Drive, choose Rename from the More menu, and enter a new name. Renaming doesn't change the file's CDN URL, so any article or page that already references the file keeps working with no extra steps. You can also set the file's name while uploading it, using the File name field in the upload panel. For the full set of renaming options, see Rename a file.