Document360 allows you to import text-based PDF files directly into your knowledge base. Instead of manually copying content, you can upload a PDF and have it converted into a ready-to-edit article in the Advanced WYSIWYG editor — preserving headings, paragraphs, lists, tables, images, and links in the process.
You can import a PDF in two ways:
As multiple articles
The document is split into separate articles based on heading levels (H1, H2, H3)..
Learn more →When to use PDF import
- Migrating existing documentation — Teams with product manuals, user guides, or reference documents in PDF format can bring content into the knowledge base without retyping.
- Converting structured reports — A team with a multi-section PDF report can use the Multiple articles option to split it by heading and create a well-organized category in one step.
- Importing third-party content — Technical documentation received as a PDF can be imported and edited in Document360 to match your knowledge base style and structure.
- Rapid knowledge base setup — New teams can import existing PDF-based documentation to quickly populate a knowledge base and refine from there.
- Maximum file size: 30 MB or 300 pages, whichever comes first.
- Only text-based PDFs are supported. Scanned PDFs, password-protected files, and multi-column layout PDFs are not supported.
- PDF import is available only when the Advanced WYSIWYG editor is set as the default editor in your project settings.
- Only one PDF import can run per project at a time. Other users in the project cannot start a new import until the current one completes.
Import PDF file as a single article
Use this option when your PDF contains content for one article.
-
Navigate to Documentation in the left navigation bar.
-
Hover over the desired category in the pane, click the More (⋯) icon, and select Article > Import document (.docx, .pdf). The Import panel will appear.
You can also access the Import panel from the Create button in the top navigation bar, or from the Create article dropdown in the top-right corner of a Folder/Index category.
-
Drag and drop the PDF file or click Upload file from my device. By default, the Single article option is selected.
If the PDF contains more than 300 pages, the import option automatically switches to Multiple article.
- Edit the auto-populated article name and category if needed, then select a Drive location for media files.
- Click Import. A toast message confirms that the import is in progress.
- Once complete, a success message appears. Click Go to article to navigate directly to the imported article.
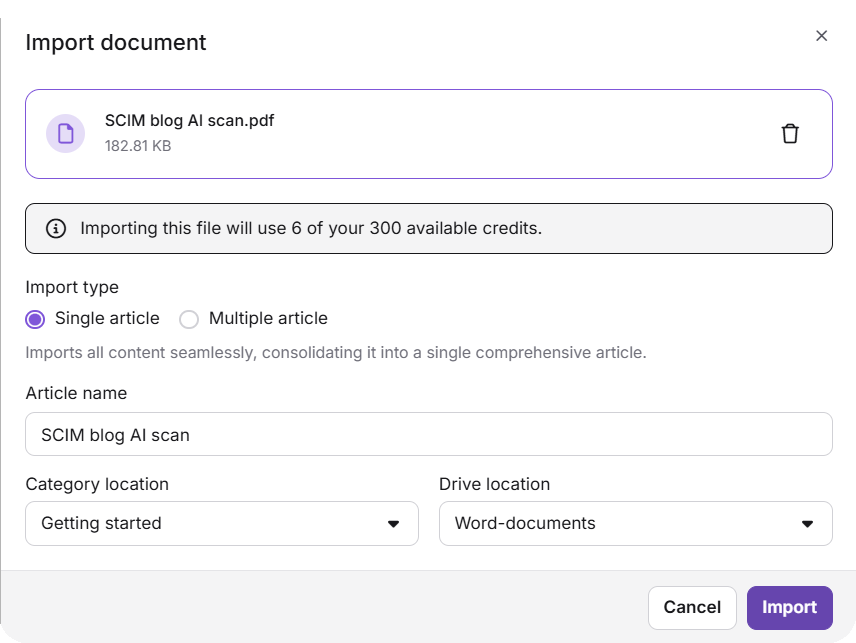
- Images from the PDF are uploaded as individual files to the selected Drive folder.
- If the article name is manually updated during import, the change will not be captured in Team auditing.
Import PDF file as multiple articles
Use this when the PDF is structured with headings and should become several articles.
- Navigate to Documentation in the left navigation bar.
- Access the Import panel using any of the methods described above.
- Drag and drop the PDF file or click Upload file from my device.
- Select the Multiple article tab in the Import panel.
- Select the Drive location for media files.
- In the Split document by heading level field, select the heading levels to use for splitting. H1 is selected by default and cannot be removed. For example:
- If only H1 is selected, a new article is created at each H1 heading.
- If both H1 and H2 are selected, articles are created at each H1, and H2 sections within each H1 are also created as separate articles.
- Click Import. Once complete, click View details to see the full article list, or Go to article to open the first imported article.
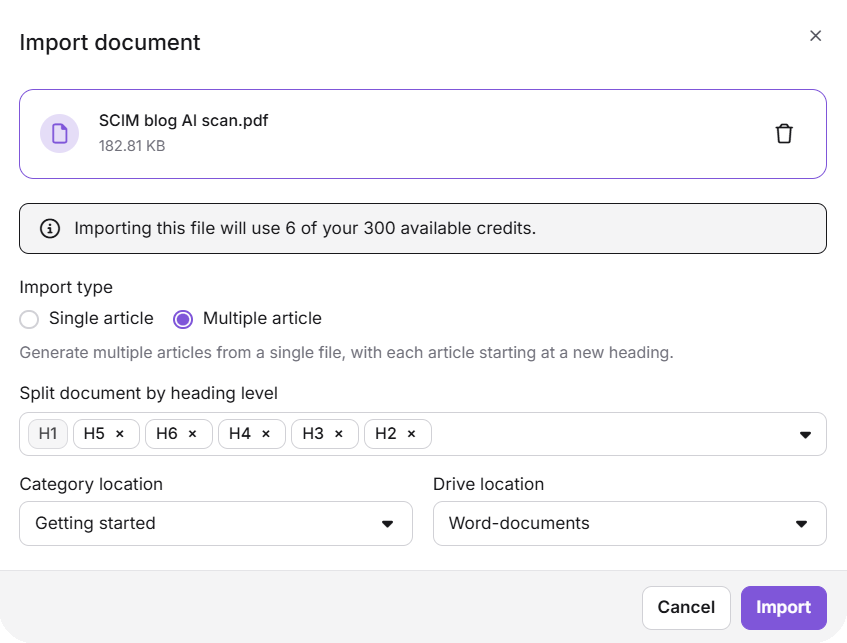
Images from the PDF are uploaded as individual files to the selected Drive folder.
Import directly from the Advanced WYSIWYG editor
If you have already created a blank article, you can import a PDF directly from within the editor.
- Open an empty article in the Advanced WYSIWYG editor. The Import document option appears on the blank page.
- Click Import document. The Import panel will appear.
- Upload the PDF using drag-and-drop or the Upload a File option.
- Click the Delete icon to remove the file and start over if needed.
- Click Import. The article content is populated from the PDF. If you have already entered an article title, it is preserved. If the title field is empty, it is auto-generated from the filename.
What gets imported and what doesn't
The import process preserves common content elements such as headings, paragraphs, lists, tables, images, and links. However, due to the nature of PDF formatting, some elements may be altered or omitted:
| Content | Behavior on import |
|---|---|
| Headings, paragraphs, lists | Imported and preserved |
| Tables | Imported; tables spanning multiple pages may be split into separate blocks |
| Images | Imported at full width; may appear more than once in some cases |
| Hyperlinks | Retained; links where visible text differs from the URL may be replaced with a placeholder |
| Emojis and LaTeX expressions | May be imported as plain text or omitted |
| Checklist formatting | Converted to standard lists |
| Charts, shapes, and decorative graphics | Not imported |
| Glossary terms, Snippets, Variables | Imported as regular text |
| Nested list elements (e.g. images within lists) | May not render inline |
All imported content is fully editable in the Advanced WYSIWYG editor. You can refine formatting and structure after import as needed.
Best practices
- Use text-based PDFs. Scanned PDFs and image-only PDFs are not supported. Ensure the PDF contains selectable text before importing.
- Keep files under 30 MB and 300 pages. Split larger PDFs into smaller files before importing.
- Structure headings clearly in your PDF before importing as multiple articles. Well-defined H1 and H2 headings ensure a clean, logical split.
- Review and refine content after import. Complex formatting such as multi-column layouts or decorative graphics will not transfer. Plan time to clean up the imported article.
- Set the Advanced WYSIWYG editor as your default before importing to ensure all articles open in the correct editor.
- Monitor your credit balance before importing large files. Each page consumes one credit — check available credits in the Import panel before proceeding.