SCIM integration with Microsoft Entra allows you to manage Document360 users, readers, and groups directly from Entra in an automated and centrally controlled manner.
When a new user is added in Entra, their Document360 account is provisioned automatically. Any updates to their role or group membership are synced in real time, and when a user is deactivated or removed in Entra, the same is reflected in Document360 without any manual intervention. This eliminates the need for separate account management in Document360 and ensures that user data remains accurate and up to date across both platforms.
Why manage users and readers through SCIM
Managing users manually across multiple platforms is time-consuming and creates risk. Without SCIM, administrators must remember to add new employees to Document360 separately and manually revoke access when someone leaves. Mistakes can result in unauthorized access or delayed onboarding.
With SCIM enabled between Microsoft Entra and Document360:
- New employees are provisioned to Document360 automatically when added in Entra — no separate setup required.
- Role assignments are consistent and controlled through a single source of truth in your IdP.
- When a user is deleted in Entra, their access to Document360 is revoked automatically.
- Group membership changes in Entra are reflected in Document360 in real time.
- Content access remains manageable from within Document360 even when identity is controlled by Entra.
Before you begin
SCIM provisioning in Document360 is set up as part of your SSO configuration. Ensure the following are completed before proceeding:
- Your Microsoft Entra application must be created as a Non-Gallery app using: New application > Create your own application > Integrate any other application you don't find in the gallery. If you use a Gallery app, SCIM provisioning will not be available.
- SAML SSO must be fully configured and working between Microsoft Entra and Document360.
- SCIM provisioning must be enabled in Document360. Navigate to Settings () > Users & permissions > SSO Configuration, open your SSO setup, and confirm the Enable SCIM provisioning toggle is turned on.
SCIM provisioning with Microsoft Entra is only supported through SAML. OpenID Connect with Entra does not support SCIM provisioning in Document360.
Start provisioning
To start provisioning in Entra, ensure you have already created and integrated SCIM with Entra. Once done:
- Navigate to your SCIM application in Entra and click Start provisioning.
- In the confirmation dialog, click Yes.
.png)
With SCIM, you can manage readers, users, and groups, and any changes made will be automatically synced to Document360.
Assign attribute mapping
To create a new attribute mapping for the User role condition:
- Open the Enterprise app tab and select your SCIM SSO application.
- Navigate to the Provisioning tab, then select Attribute mapping (Preview) from the left menu and click Provision Microsoft Entra ID Users.
- Scroll down to the Attribute mappings section, select the Show advanced options checkbox and then click Edit attribute list for customappsso to proceed.
- On the Edit attribute list page, scroll down, enter the URL parameter in the Name field, and set the Type as shown below.
| Name | Type |
|---|---|
| urn:ietf:params:scim:schemas:extension:document360:2.0:User:userType | String |
| urn:ietf:params:scim:schemas:extension:document360:2.0:User:isTeamAccount | Boolean |
.png)
Ensure there are no whitespaces when entering the URL parameter in the Name field. userType is a String attribute that supports all three roles (user, reviewer, reader). isTeamAccount is a legacy Boolean attribute that supports only User and Reader. Existing configurations using isTeamAccount continue to work without changes — switching to userType is only required if you want to provision Reviewers. For the full precedence rules, see Attribute precedence in the SCIM provisioning article.
- Click Save, then click Yes in the confirmation dialog.
Use Expression Builder to map roles
You can configure an attribute mapping expression in Entra that evaluates each user's existing profile attribute, such as Job Title, and automatically determines whether they should be provisioned as a User, Reviewer or Reader in Document360.
The expression maps directly to the userType or the legacy isTeamAccount attribute:
userType = user→ provisioned as a UseruserType = reviewer→ provisioned as a RevieweruserType = reader→ provisioned as a ReaderisTeamAccount = True→ provisioned as a UserisTeamAccount = False→ provisioned as a Reader
Steps to configure:
- Open your SCIM SSO application in Entra and navigate to Provisioning > Attribute Mappings.
- Locate the
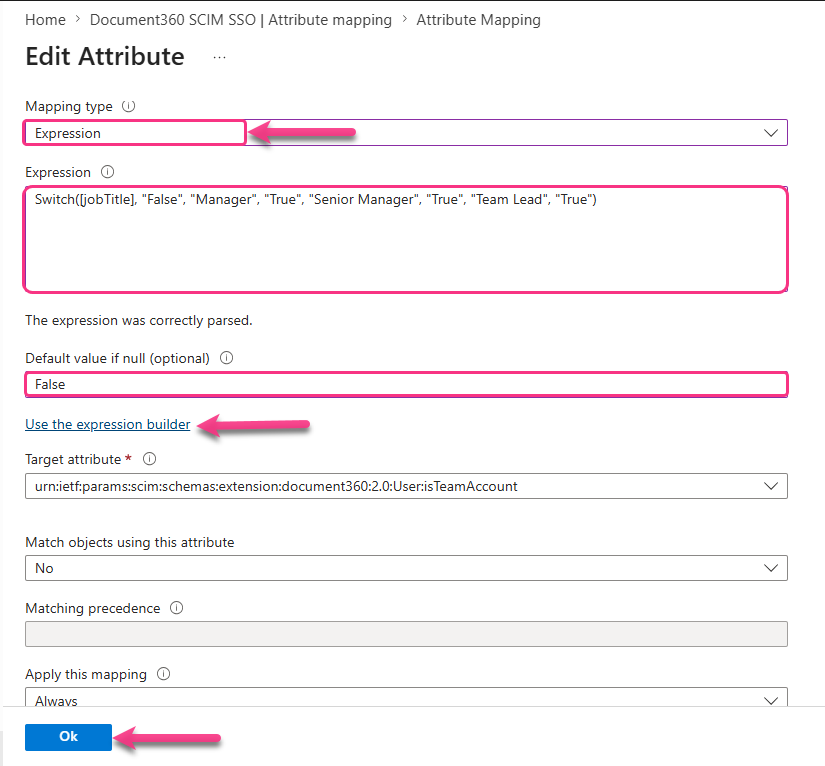
userTypeorisTeamAccountattribute and click the Edit icon next to it. This will navigate to the Edit Attribute page. - Set the Mapping type to Expression.
- Enter your expression in the expression field. The expression evaluates each user's profile attribute and determines whether they should be provisioned as a User, Reviewer, or a Reader. Refer to the Use the expression builder link below the expression field to visually build and test your expression against a real user in your directory before applying it.
For more information on building and testing expressions in Entra, refer to Microsoft's Expression Builder documentation.
- Set the Default value if null (optional) to
Reader(foruserType) or False (forisTeamAccount). This ensures that any user without a matching attribute value is provisioned as a Reader by default. - Click Ok to save the attribute.
Example
- If your users have a Job Title attribute in their Entra profile, you can map roles based on their title using
userType:
Switch([jobTitle], "reader", "Manager", "user", "Senior Manager", "user", "Team Lead", "reviewer")
Users with the title Manager or Senior Manager are provisioned as Users, Team Lead is provisioned as a Reviewer, and any other Job Title returns Reader .
- If your users have a Job Title attribute in their Entra profile, you can map roles based on their title using
isTeamAccount:
Switch([jobTitle], "False", "Manager", "True", "Senior Manager", "True", "Team Lead", "True")
Users with the title Manager, Senior Manager, or Team Lead are provisioned as Users. Any other Job Title returns False and the user is provisioned as a Reader.
Create users, readers, and groups
Create a user
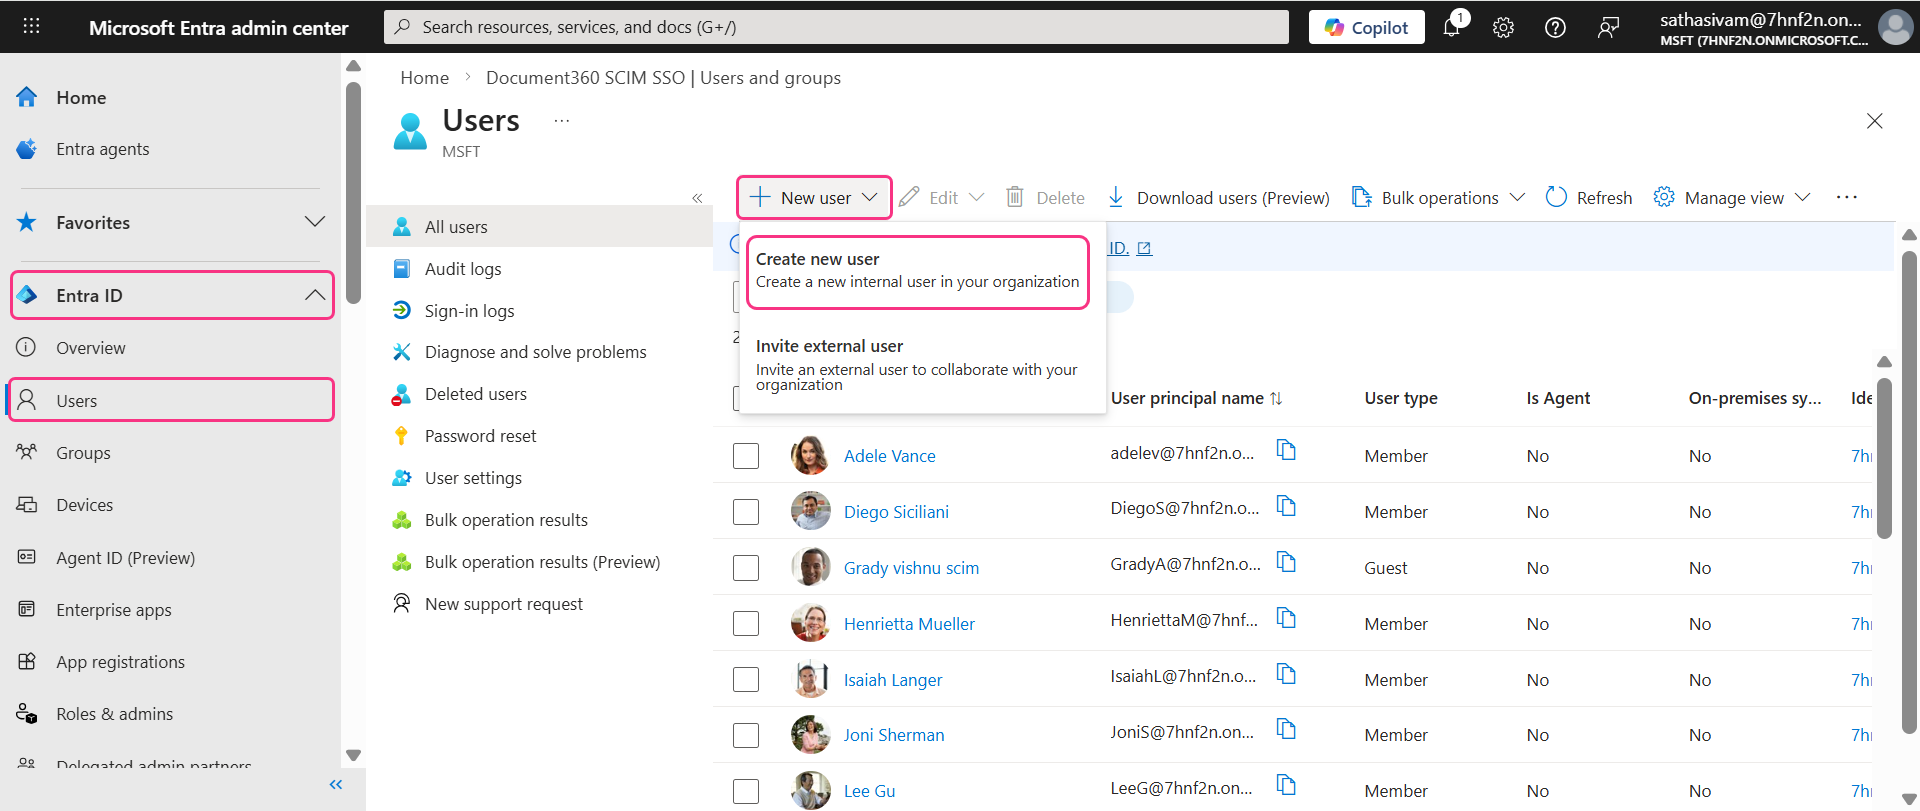
- Expand the Entra ID dropdown in the left navigation bar and click Users.
- Click New user > Create new user and fill in the required user details.
- Click Create + review, then click Create to finalize and create the user.
Once the user is created and provisioned, Document360 automatically determines their role based on the expression configured in the Expression Builder and provisions them accordingly as a User.
Assign user to application
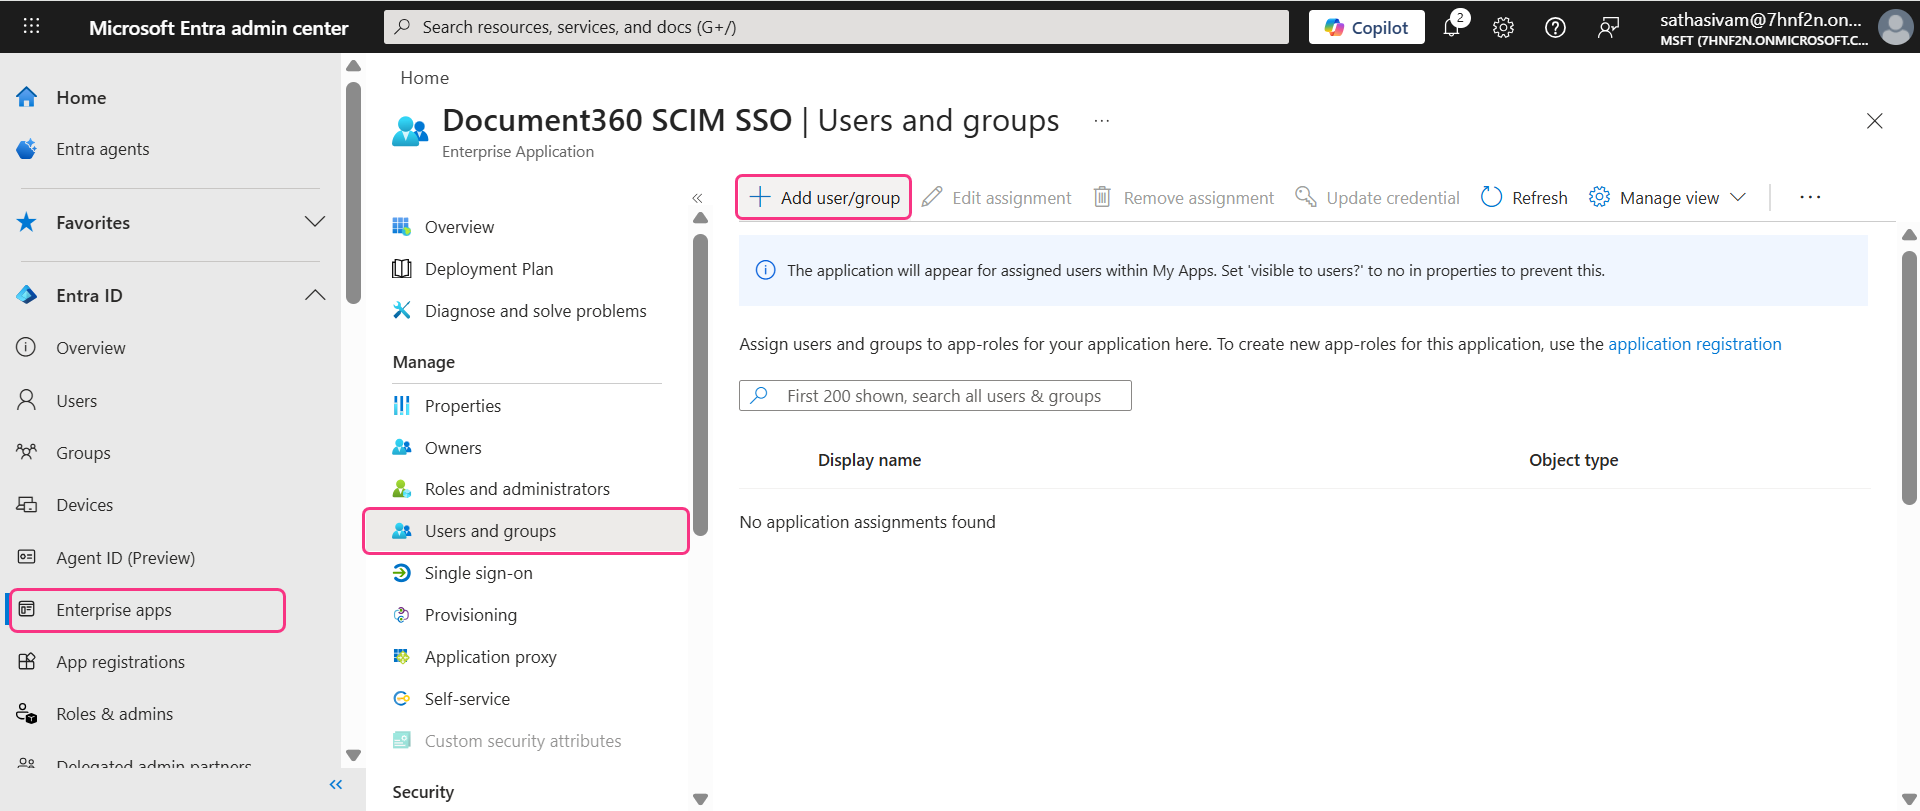
- Click Enterprise apps in the left navigation bar and locate your SCIM SSO application.
- Select the application and navigate to the Users and groups tab, then click Add user/group.
- On the Add assignments page, click Users and groups, search for the user in the search bar, then click Select > Assign. The user has been successfully assigned to the application.

- To push the user to Document360, navigate to the Provisioning tab in the left menu and click Provision on demand.
- In the Selected user search bar, search for and select the user, then click Provision.

The user will be automatically added to Document360. To verify, go to Document360 and navigate to Settings () > Users & permissions > Users & groups.
Reviewers can also be provisioned directly from Entra by setting userType = reviewer. No manual conversion is needed.
If your configuration still uses the legacy isTeamAccount attribute, note that all SCIM-provisioned users are initially counted under the User quota. This means SCIM cannot provision additional users once the User limit is reached, even if some are meant to be Reviewers.
To work around this:
- Provision the users from Entra through SCIM as usual. They'll sync to Document360 under a default role.
- In Document360, manually update the required users' role to Reviewer.
- This moves them to the Reviewer quota instead, freeing up User slots for new provisioning.
Create a reader
- Expand the Entra ID dropdown in the left navigation bar and click Users.
- Click New user > Create new user and fill in the required user details.
- Click Create + review, then click Create to finalize and create the reader.
.png)
Once the user is created and provisioned, Document360 automatically determines their role based on the expression configured in the Expression Builder and provisions them accordingly as a Reader.
Assign reader to application
- Click Enterprise apps in the left navigation bar and locate your SCIM SSO application.
- Select the application and navigate to the Users and groups tab, then click Add user/group.
- On the Add assignments page, click Users and groups, search for the user in the search bar, then click Select > Assign. The user has been successfully assigned to the application.
.gif)
- To push the reader to Document360, navigate to the Provisioning tab in the left menu and click Provision on demand.
- In the Selected user search bar, search for and select the user, then click Provision.
.png)
- The reader will be automatically added to Document360. To verify, go to Document360 and navigate to Settings () > Users & permissions > Readers & groups.
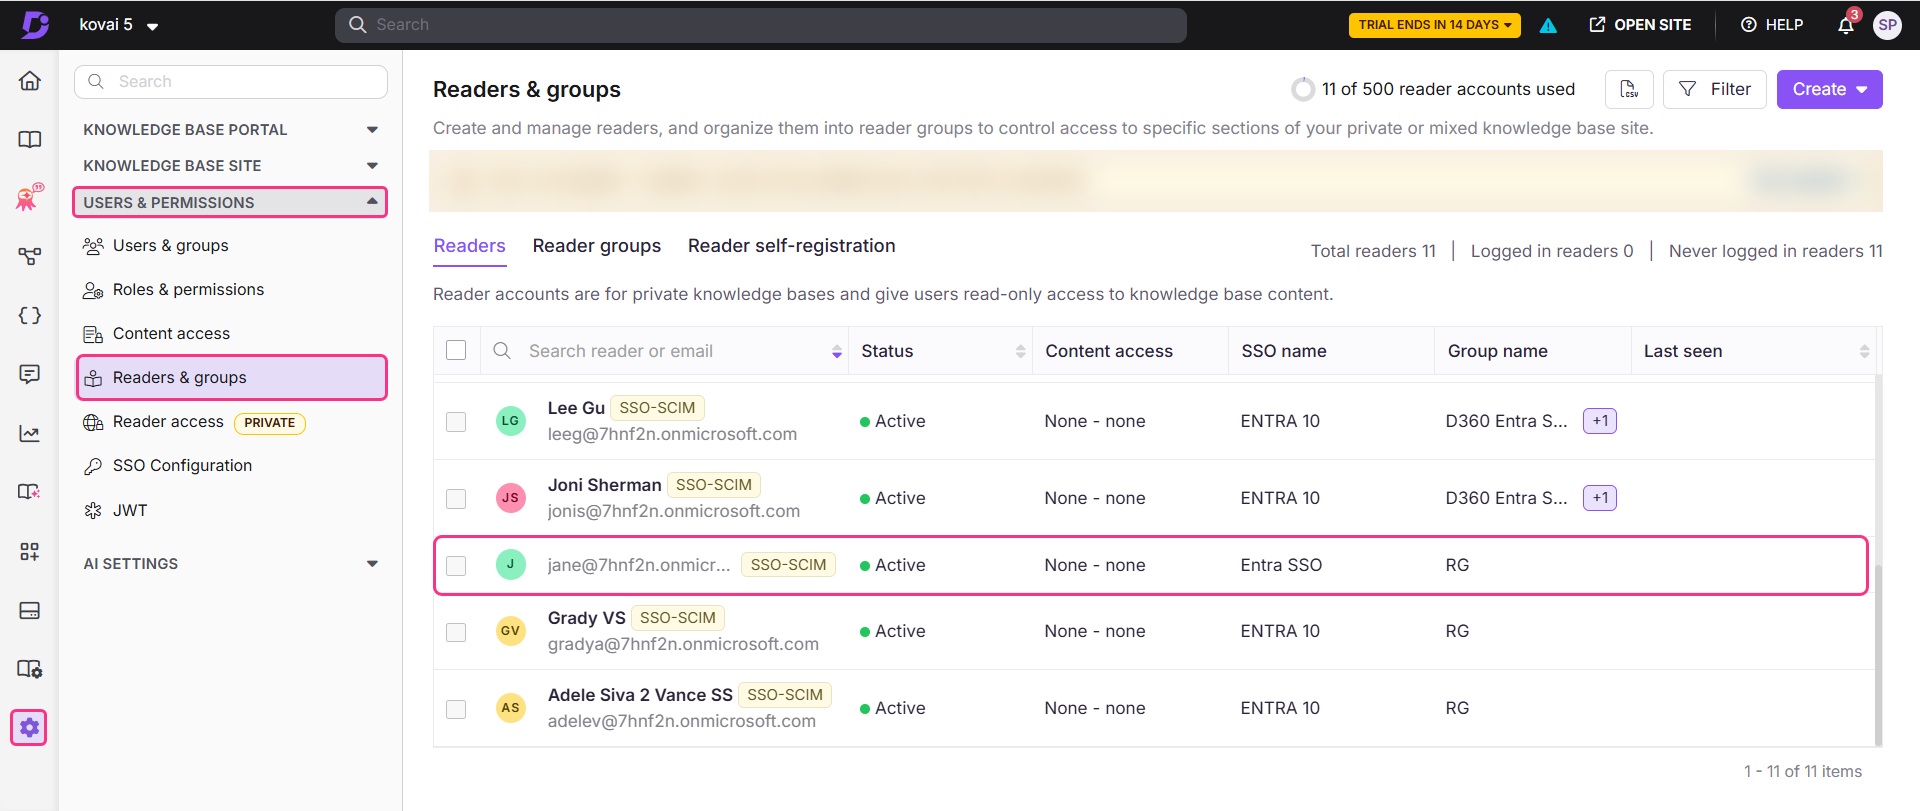
Create a group
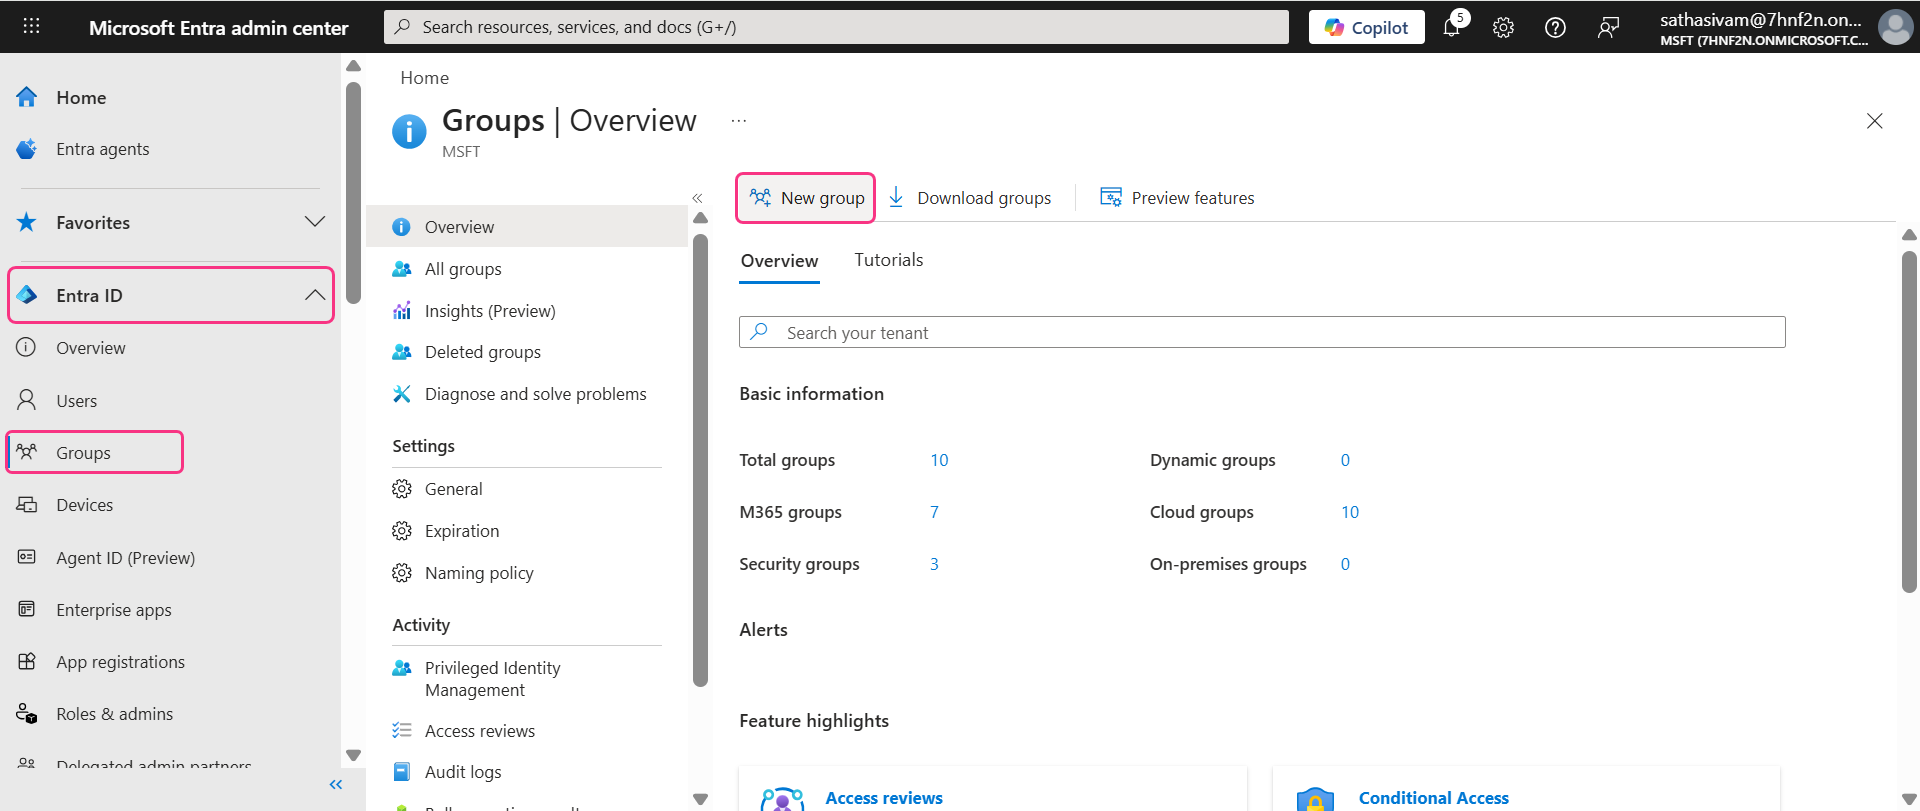
- Open the Groups tab in the left menu and click New Group.
- Fill in the required details and click Create.
Assign group to application
- Navigate to Enterprise apps and select your SCIM SSO application.
- Open the Users and groups tab, click Add user/group, then click None selected under Users and groups and search for the group name.
- Select the group and click Assign.
.gif)
To provision the group to Document360:
- Navigate to the Provisioning on demand tab, search for the group name, and click Provision.
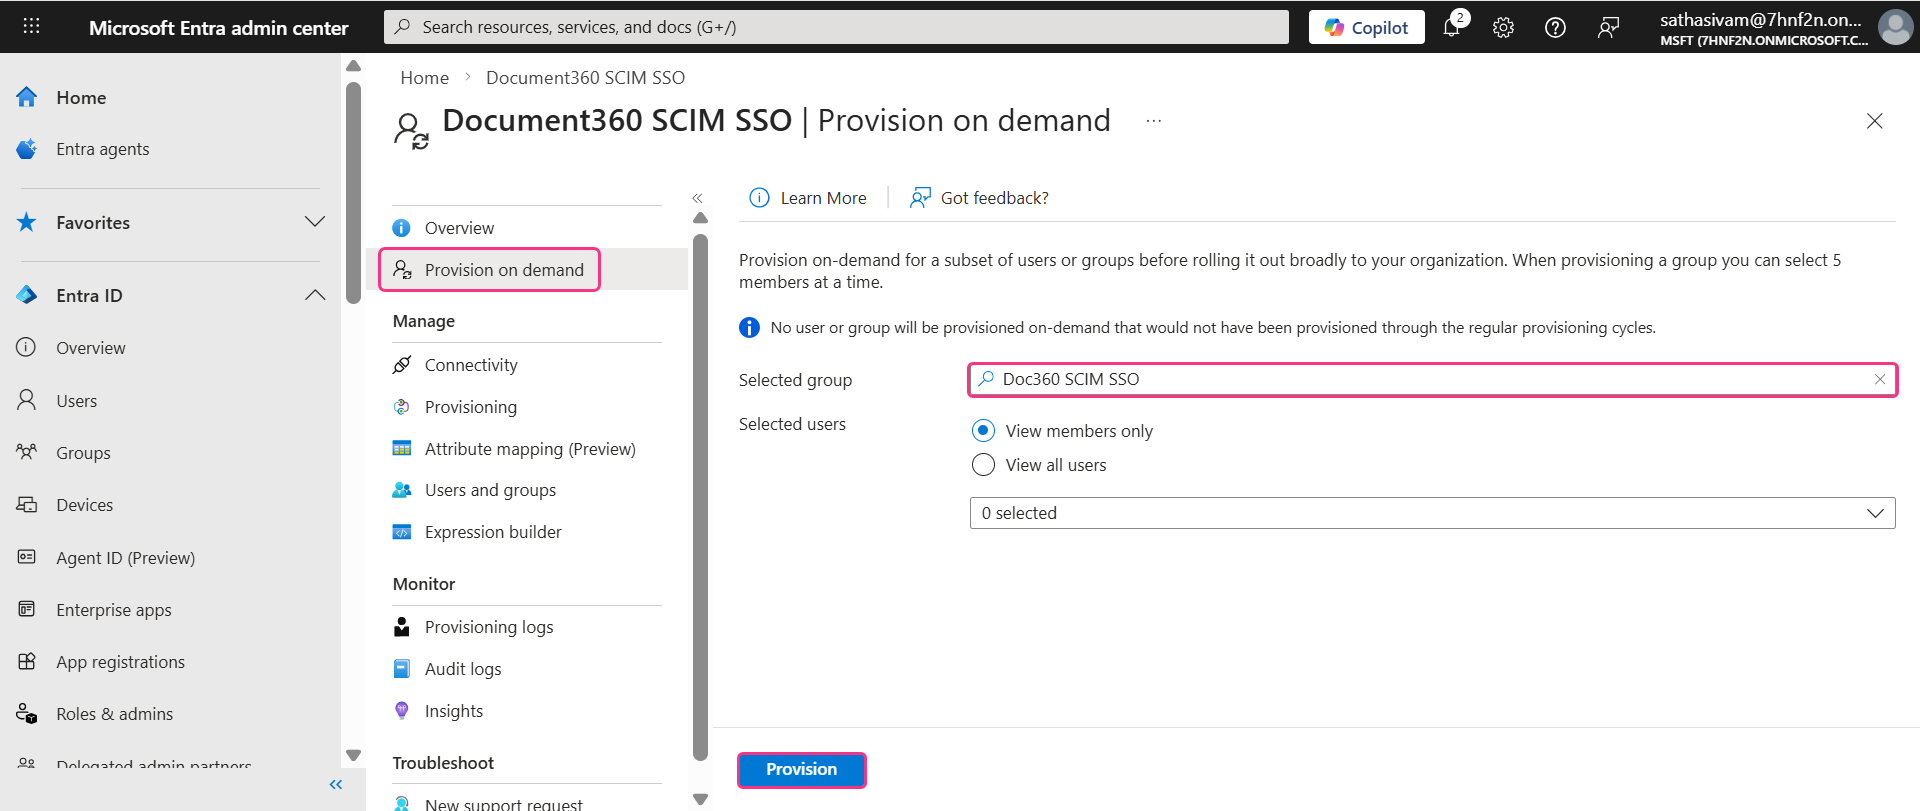
- You can select the number of users or members in the group by selecting the radio buttons.
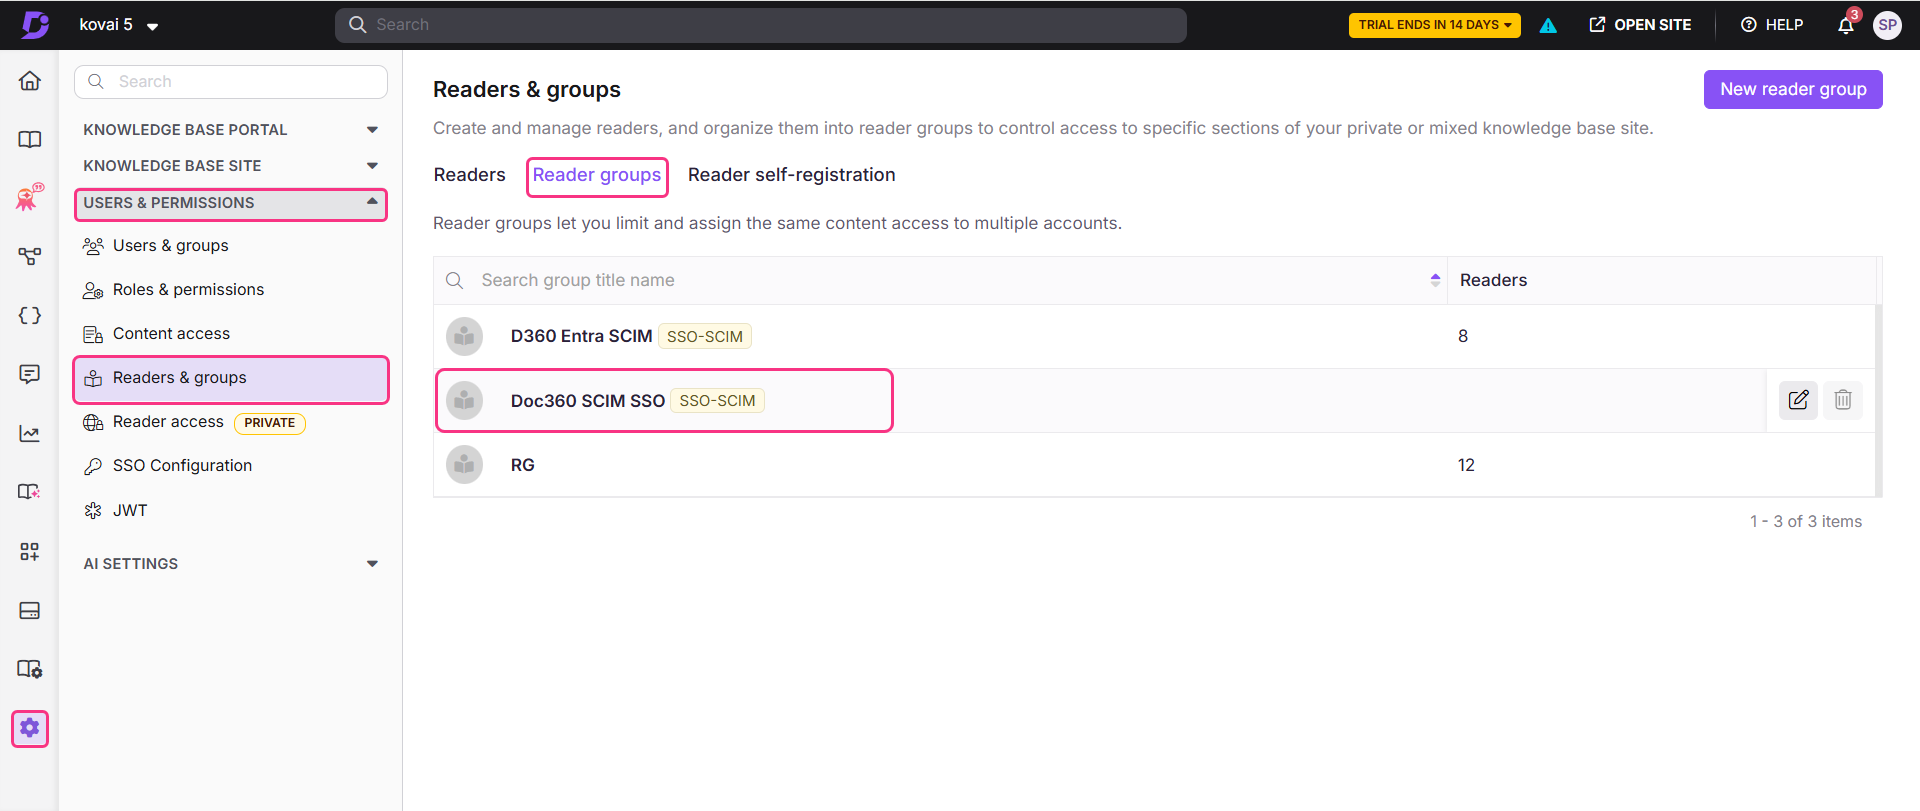
- The group will be successfully added to Document360. To verify, go to Document360 and navigate to Settings () > Users & permissions > Readers & groups > Reader group tab.
Manage content access for users, readers, and groups
In Document360, user and group names cannot be edited or deleted directly — these actions must be managed from Entra. However, you can still manage roles, permissions, and content access within Document360.
- Select the desired user and click Manage content access.
- In the dialog, use the dropdowns to select the desired content access.
- If needed, you can also manage group assignments and add the user to a desired group.
.png)
- Click Update to confirm and save the changes.
Update a user, reader, or group
To make changes to a user or group name:
- In the left navigation bar, click Users and search for the user in the search bar, then click Select.
- On the user's Overview page, open the Properties tab and click the Edit icon to make the necessary changes.
.png)
- Once changes are made, click Save.
- To reflect these changes in Document360, navigate to Enterprise apps > SCIM SSO app > Provisioning > Provision on demand.
- Select the updated user in the Provisioning on demand page, then click Provision.
.png)
The updated user details will now be reflected in Document360.
Delete a user, reader, or group
To delete a user, reader, or group:
- Open the Users tab in the left menu, then search and select the desired user.
- Click Delete.
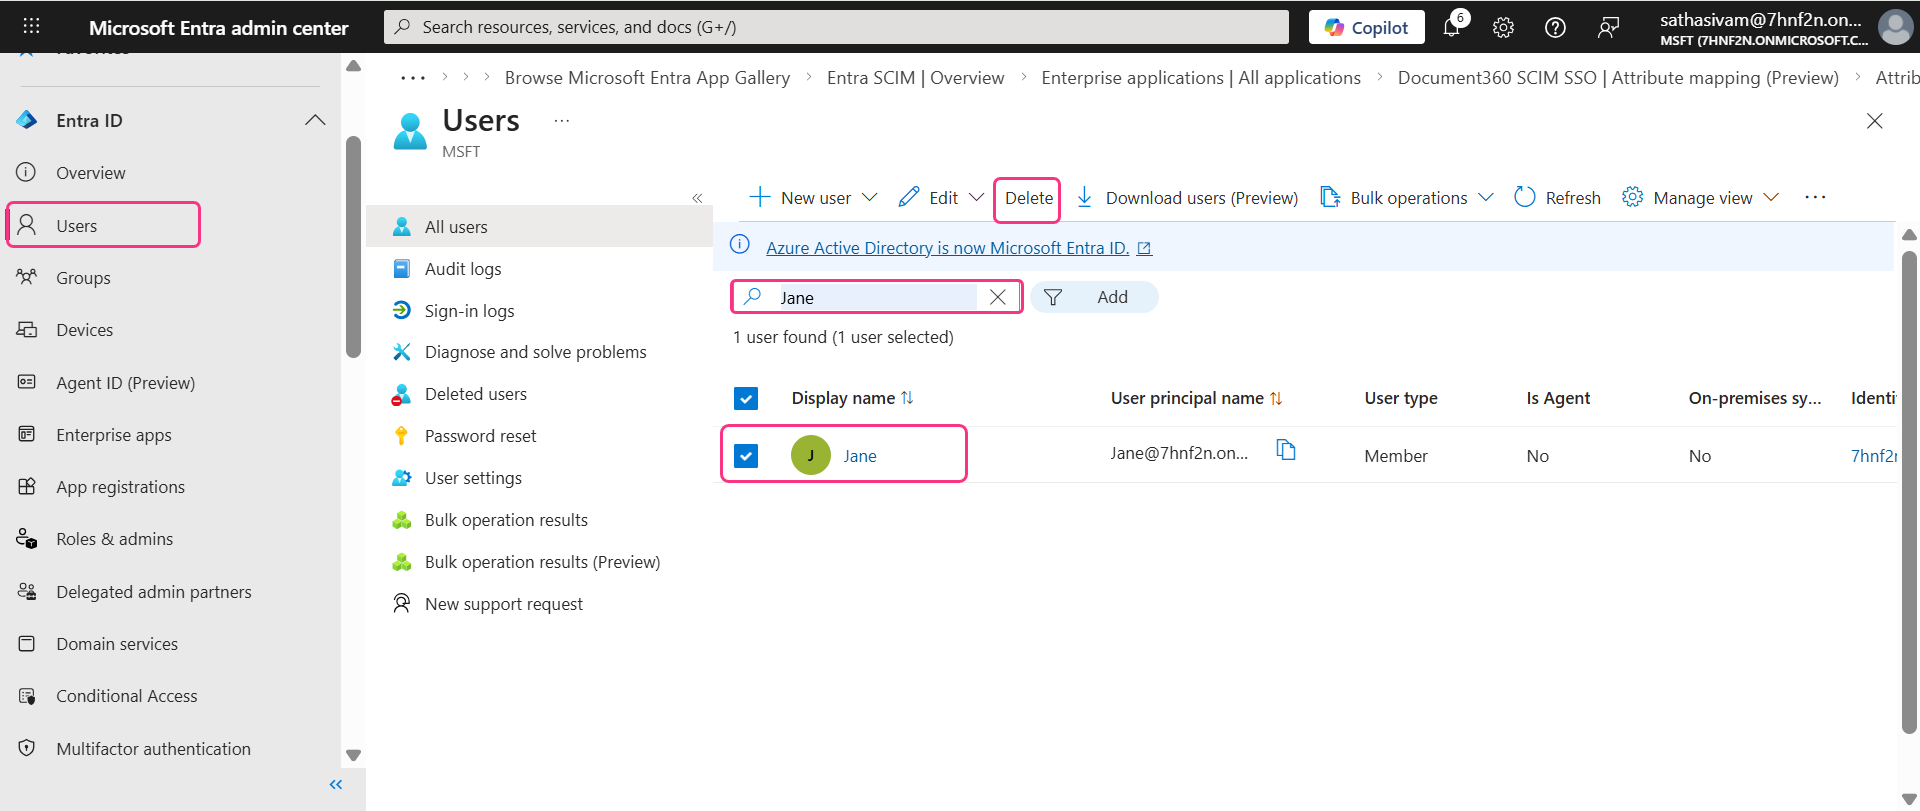
The user is deleted successfully. This change will be reflected in Document360.
Deleting a user in Entra does not remove the user profile from Document360. Instead, the status of the user will change from Active to Inactive.
Inherit from another application
When creating a new SSO configuration in Document360, you can inherit SCIM settings from an existing SSO connection. This approach simplifies the setup process, avoids repeating configuration steps, and helps administrators save time while ensuring consistency across integrations.
Child inherited SSO configuration
On the Configure Identity Provider (IdP) page, select the Configure an existing connection field and choose the parent SSO SCIM-enabled application you want to inherit from. Selecting this option designates the current project as the child project, inheriting all relevant properties from the parent.
.png)
Once the SSO configuration is created, the SCIM provisioning settings will be inherited from the parent application and cannot be modified in the child application.
Parent inherited SSO configuration
The parent application will display a list of all projects that have inherited its configuration. Any changes made to the parent application will automatically be reflected in the child application.
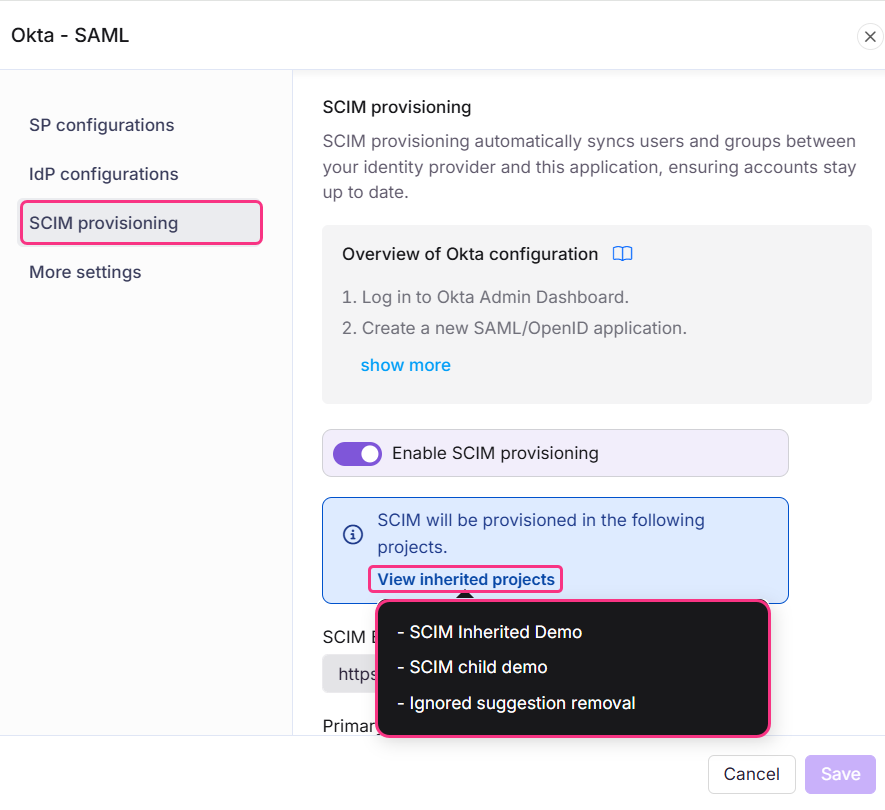
- If SCIM is enabled in the parent project after child projects have already inherited it, the users and groups will be automatically provisioned to all child projects in the background.
- Enabling inheritance makes it easier to manage multiple SSO configurations with SCIM enabled, as all settings are controlled from one parent application. This saves time and reduces the effort required to manage each configuration individually.
Best practices
- Always use a Non-Gallery application in Entra. Gallery applications do not support custom SCIM provisioning. Always select Create your own application and choose Integrate any other application you don't find in the gallery when creating your Entra application.
- Always set
userTypeorisTeamAccountat the user level, not the group level. Users who belong to multiple groups with conflicting values may receive incorrect roles in Document360. Setting it at the user level ensures each user has one clear, consistent value. - Set the default value for
userTypeto "reader" orisTeamAccountto False. This ensures that any user without a matching attribute value is provisioned as a Reader by default, rather than failing or receiving an unintended role. - Complete and save the Document360 SSO configuration before testing the SCIM connection. Testing before the Document360 configuration is saved will always fail. Always finish the Document360 setup first, then return to Entra to test the connection.
- Store your primary and secondary secret tokens securely. Tokens are displayed only once at the time of creation. Store them in a secrets manager or password vault. If a token is compromised, regenerate it immediately and update your Entra configuration without delay.
- Use the secondary token for safe rotation. If the primary token needs to be replaced, switch Entra to the secondary token first, then regenerate the primary. This ensures user provisioning continues without interruption during the transition.
- Always use Provision on demand to push individual users and groups. This gives you precise control over which users are provisioned and allows you to verify each one before a full sync.
- Deleting a user in Entra does not remove them from Document360. Their status changes to Inactive in Document360. Reactivate the account in Entra if access needs to be restored.