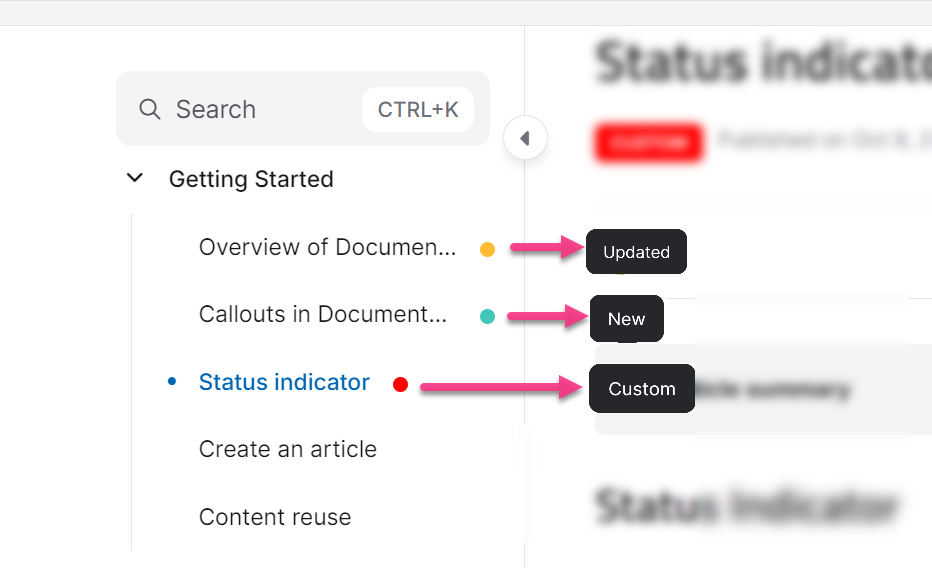
The status indicator is a small badge that appears near the article title on the knowledge base site, signalling to readers whether an article is new, has been recently updated, or has a custom status. It helps readers quickly identify fresh or changed content without reading through the article itself.
There are three possible statuses: New, Updated, and Custom.
When to use the status indicator
Use the status indicator when you want to draw readers' attention to recently published or updated content. It is particularly useful after major documentation updates, new feature releases, or when publishing a new article in an area readers check regularly.
Status indicator types
| Status | When it appears | Color |
|---|---|---|
| New | When an article is published for the first time. | Teal |
| Updated | When an article is edited and republished. | Yellow |
| Custom | When set manually by your team. | Red |
Automatic status indicator
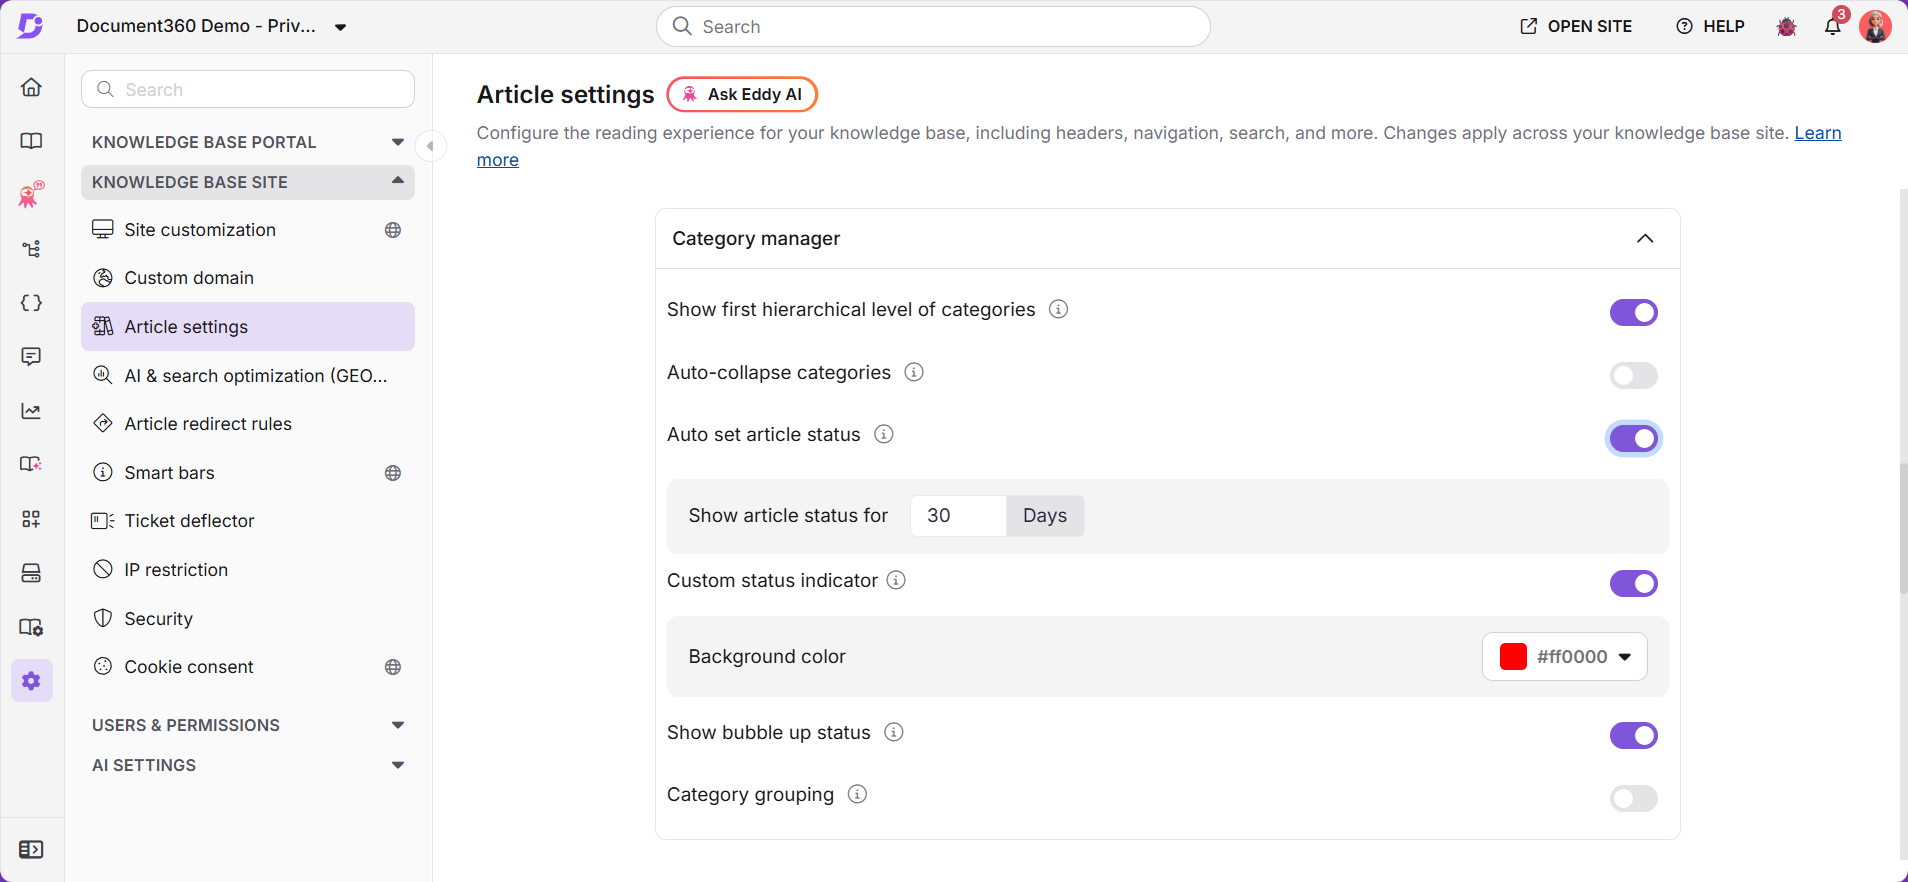
If the Automatically set article status toggle is enabled, the status indicator updates automatically every time an article or category page is published. No manual action is needed per article.
When this toggle is off, no status badge appears when an article is published. The status must be set manually per article using the procedure in Manually set the status indicator for an article below.
- Navigate to Settings () in the left navigation bar.
- Select Knowledge base site > Article settings in the left navigation pane.
- In the Category manager accordion, turn on the Auto set article status toggle.
- In the Show article status for field, enter the number of days the status badge should remain visible.
Manually set the status indicator for articles
For a single article
- Navigate to the article in the knowledge base portal.
- Click the More () icon in the article header and select More article options.
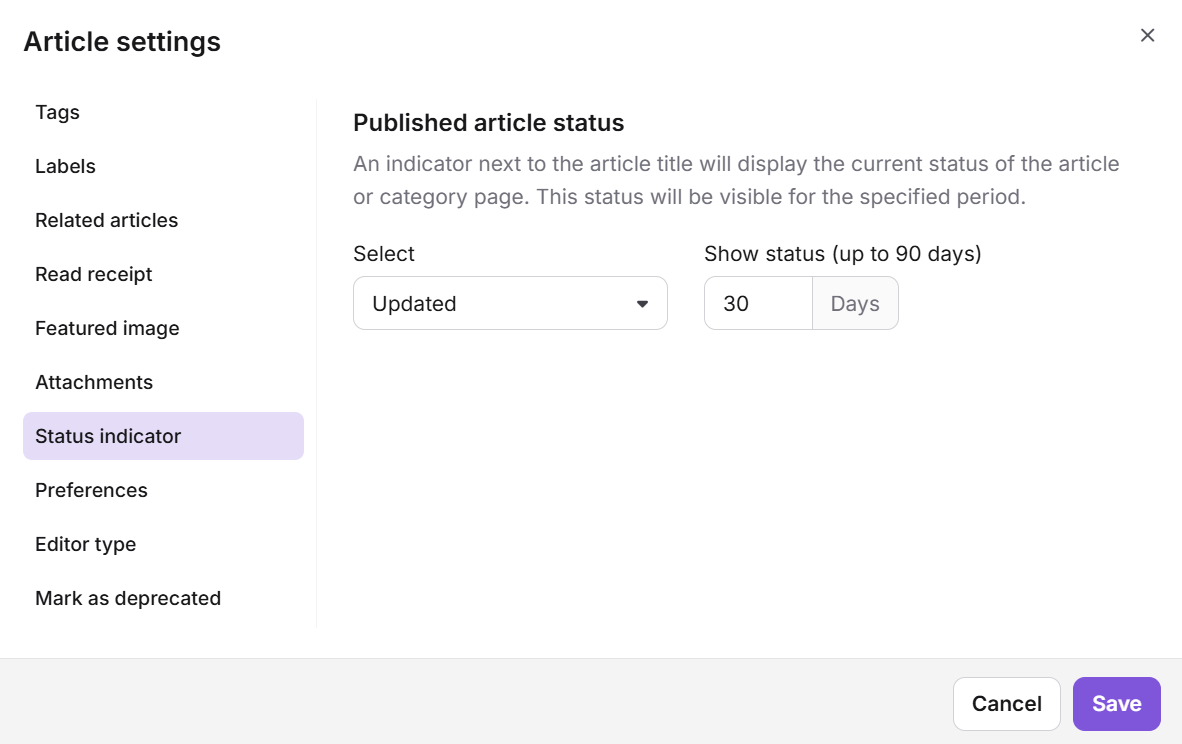
- In the Article settings panel, select the Status indicator tab.
- Choose the status from the Select status dropdown: None, New, Updated, or Custom.
- In the Show status for field, enter the number of days the badge should appear on the knowledge base site.
By default, this field shows the duration from the global setting in Article settings. If you enter a value here, the article-specific setting takes precedence over the global setting for this article. In both cases, the number shown is the days remaining, not the days originally set. It decreases by one each day from the published date until it reaches zero and the badge is removed.
- Click Save.
For multiple articles
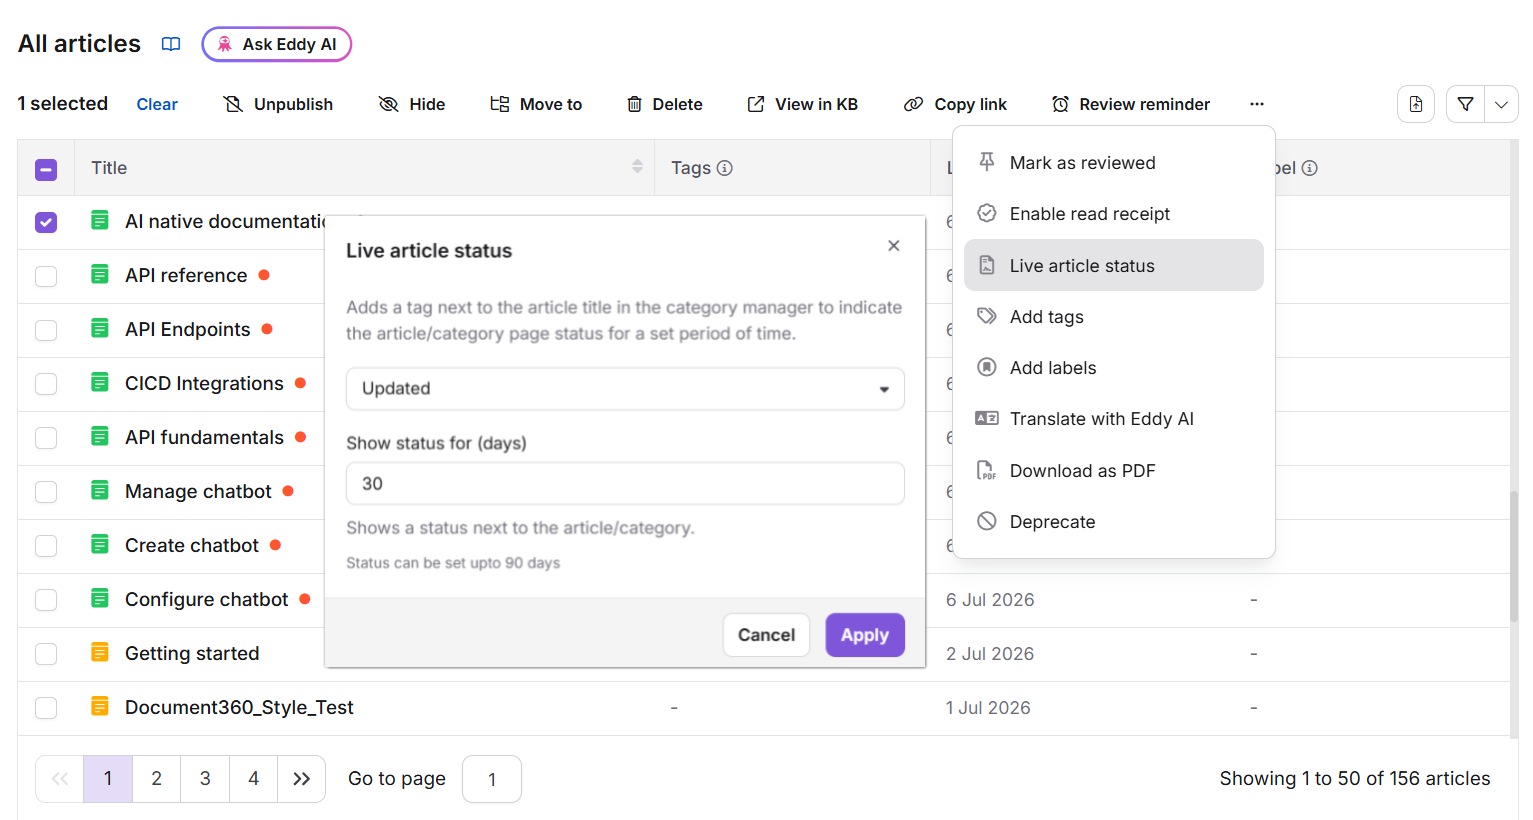
- Navigate to Documentation in the left navigation bar.
- Click All articles in the left navigation pane.
- Select the checkboxes next to the articles you want to update.
- Click Live article status from the bulk actions bar at the top.
- Choose the desired status and set the validity period.
- Click Apply.
Set a custom status indicator
Customise the custom status label
- Navigate to Settings () in the left navigation bar.
- Select Knowledge base portal > Workspace & Localization > Localization variables in the left navigation pane.
- Scroll down and expand the Category manager accordion.
- Edit the Custom field to change the display text. The custom status name can be up to 20 characters.
- Click Save.
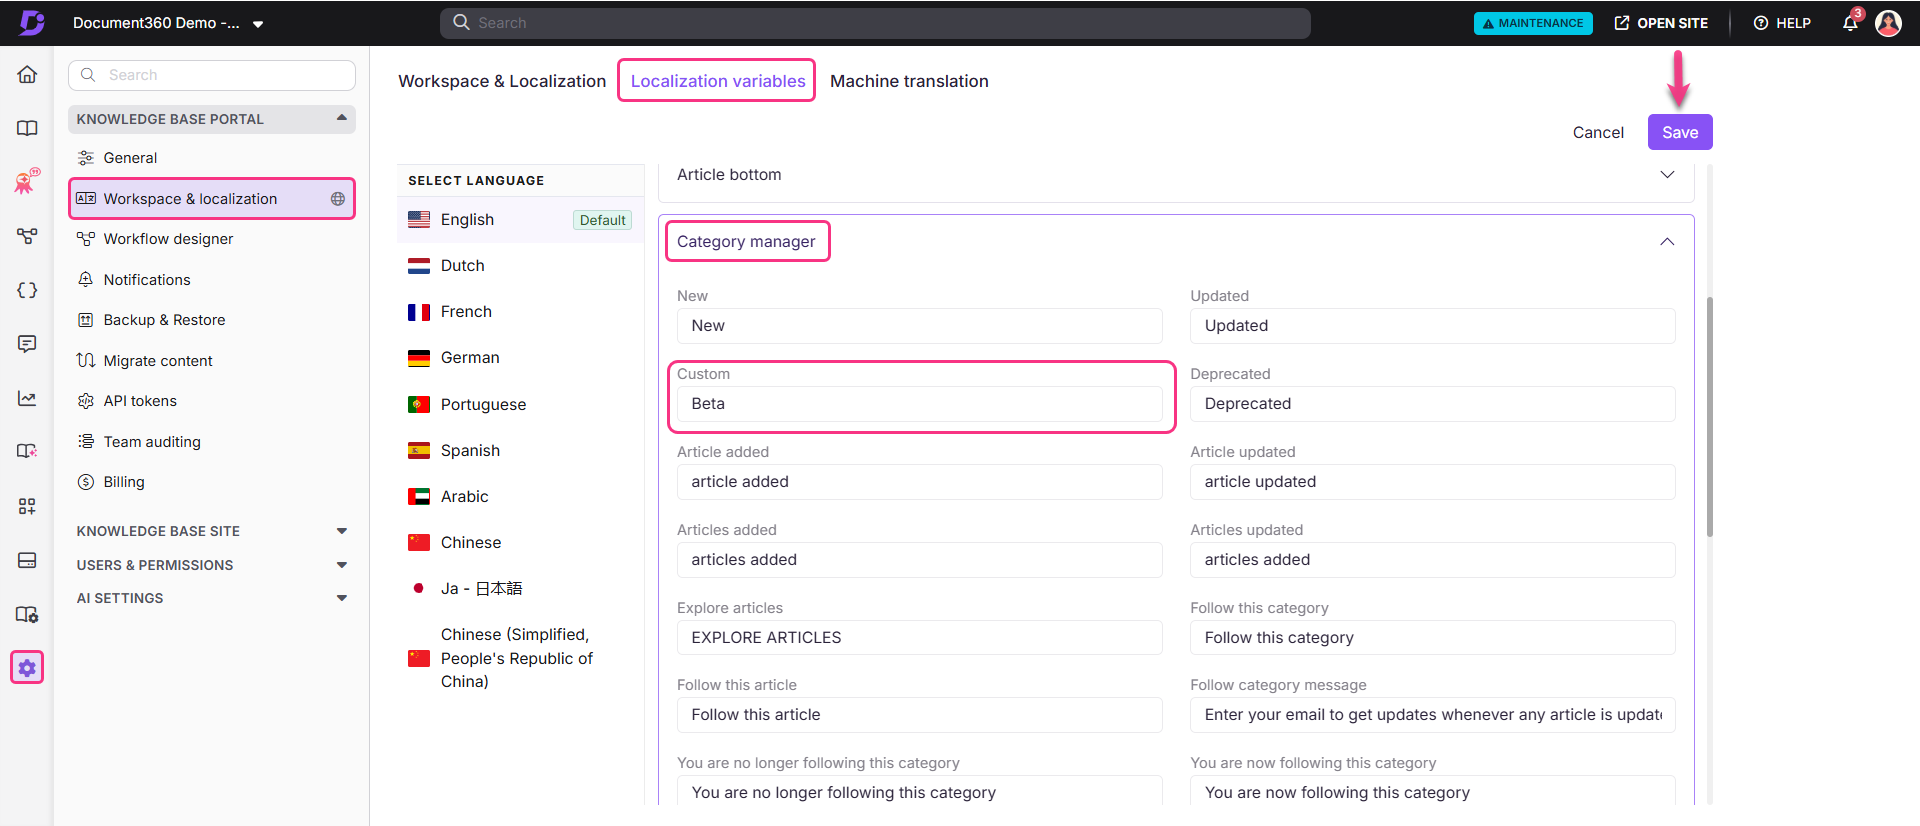
Customise the custom status color
- Navigate to Settings () in the left navigation bar.
- Select Knowledge base site > Article settings in the left navigation pane.
- In the Category manager accordion, select the color for the Custom status indicator.
- Click the Apply to save the changes.
Limitations
| Item | Detail |
|---|---|
| Custom status label length | Maximum 20 characters. |
| Custom status color | Set globally. Applies to all articles using the Custom status. |
| Duration precedence | The global setting applies unless a duration is set at the article level. An article-level duration overrides the global setting for that article only. |
Best practices
- Use the automatic toggle for active knowledge bases. The automatic setting keeps New and Updated badges current without manual effort per article, which is the recommended approach for teams publishing regularly.
- Set a reasonable visibility duration. 7 to 14 days is common. The badge disappears once the content is no longer new to your regular readers.
- Reserve Custom for specific publishing events. Use Custom for meaningful labels such as "Beta" or "Preview" rather than general use, so the badge carries clear meaning for readers.
- Use None to clear a status. If an article has a status badge that is no longer relevant, select None from the dropdown and save to remove it.
FAQ
Which duration applies if the global setting and the article-level setting are different?
The article-level setting. The global setting in Article settings applies to every article by default. When you set a duration on the Status indicator tab for a specific article, that value is used instead. In either case, the tab shows the days remaining as of today, counting down from the published date.
Why is the Show status for value lower than what was entered?
The field shows days remaining, not days configured. It reduces by one each day from the published date.