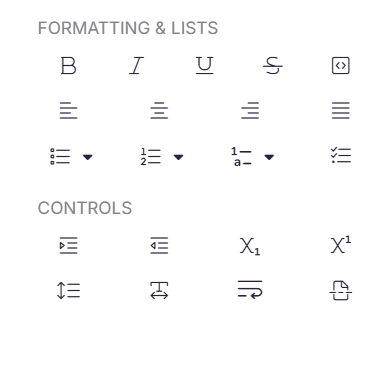
The Formatting panel in the Advanced WYSIWYG editor provides inline and block-level formatting controls to help you style and structure your content. It is organized into two sections:
- Formatting & Lists - controls for inline text emphasis (bold, italic, underline, strikethrough), text alignment, and list indentation.
- Controls - controls for indentation, subscript, superscript, letter spacing, line height, line break, and page break.
To access the Formatting panel, click the Format icon on the right side of the editor panel.
When to use formatting elements
- Use bold to highlight key terms, warnings, or action items within a step
- Use italic to indicate UI labels, variable names, or titles referenced within prose
- Use strikethrough to mark deprecated steps or outdated values without deleting them — useful for changelog-style content
- Use subscript and superscript when documenting chemical formulas (H₂O), mathematical expressions (x²), or footnote references
- Use line break inside a list item to add a second line of explanation without creating a new bullet point
- Use page break before a major section in long articles to control PDF layout for print-ready documentation
Formatting & Lists
Bold, Italic, Underline, Strikethrough
These are inline text emphasis options applied to selected text.
| Option | Keyboard shortcut | Description |
|---|---|---|
| Bold | Ctrl + B |
Emphasizes important words or phrases. |
| Italic | Ctrl + I |
Highlights text or indicates terms such as variables or titles. |
| Underline | Ctrl + U |
Adds a line below the text for emphasis. |
| Strikethrough | Strikes out text to indicate removal or revision. |
To apply:
- Select the text you want to format.
- Click the corresponding icon in the Formatting & Lists section, or use the keyboard shortcut.
Alignment
Text alignment controls how content is positioned horizontally within a block.
| Option | Description |
|---|---|
| Left align | Aligns text to the left (default). |
| Center align | Centers text within the block. |
| Right align | Aligns text to the right. |
| Justify | Distributes text evenly across the full width of the block. |
To apply:
- Click anywhere in the paragraph or select the text.
- Click the desired alignment icon in the Formatting & Lists section.
Indentation
Indentation increases or decreases the indent level of a paragraph or list item.
| Option | Keyboard shortcut | Description |
|---|---|---|
| Increase indent | Tab |
Moves the content one level to the right. |
| Decrease indent | Shift + Tab |
Moves the content one level to the left. |
To apply:
- Click in the paragraph or list item you want to indent.
- Click Increase indent or Decrease indent from the Formatting & Lists section, or use the keyboard shortcuts.
In a numbered list, increasing the indent changes the numbering format automatically according to the multi-level list cycling sequence.
Controls
Subscript and Superscript
Subscript and superscript display text slightly below or above the baseline, respectively.
| Option | Description |
|---|---|
| Subscript (X₁) | Displays text slightly below the line — useful for chemical formulas or mathematical expressions. |
| Superscript (X¹) | Displays text slightly above the line — useful for footnotes, exponents, or ordinal indicators. |
To apply:
- Select the text.
- Click Subscript or Superscript from the Controls section.
Subscript and superscript Markdown syntax is not supported. Apply these options manually from the Controls section.
Letter spacing
Letter spacing adjusts the horizontal space between characters in selected text.
To apply:
- Select the text.
- Click the Letter space icon in the Controls section.
- Choose your desired spacing value.
Line height
Line height controls the vertical spacing between lines within a paragraph.
To apply:
- Click in the paragraph you want to adjust.
- Click the Line height icon in the Controls section.
- Select your desired line height value.
Line break
A line break moves the cursor to the next line within the same block, without starting a new paragraph or block.
To insert a line break:
- Click the Line break icon in the Controls section, or press
Shift + Enter.
Use a line break when you want to continue on a new line within the same paragraph, without the additional spacing that a new block creates.
Page break
A page break specifies where the current page ends and the next page begins when exporting an article as a PDF.
To insert a page break:
- Place your cursor at the point where you want the page to break.
- Click the Page break icon in the Controls section.
Page breaks only affect PDF exports. They have no visible effect on the knowledge base site.
Best practices
- Use bold and italic sparingly — overuse reduces their impact and makes content harder to scan.
- Use strikethrough instead of deleting content when you want readers to see what changed, such as in release notes or versioned procedures.
- Avoid using alignment other than left for body text — centered or justified body text is harder to read in documentation.
- Use line breaks instead of empty paragraphs to add spacing within a block, to keep the document structure clean.
- Insert page breaks intentionally in long articles before exporting as PDF, to ensure section breaks land in logical places.
FAQ
What is the difference between a line break and a new block?
A line break (Shift + Enter) moves to the next line within the same block, with no extra spacing. A new block (Enter) creates a separate content block with standard paragraph spacing between them.
Do page breaks affect how the article looks on the knowledge base site?
No. Page breaks only take effect when exporting an article as a PDF. They have no visible impact on the knowledge base site.
Can I adjust line height for individual lines?
Line height is applied at the paragraph block level, not to individual lines within a block.