The Advanced WYSIWYG editor supports four types of lists to help you organize and present content effectively.
| List type | Use when |
|---|---|
| Bullet List | Items have no inherent order or sequence. |
| Numbered List | Items follow a specific sequence, such as steps in a procedure. |
| Multilevel List | Items are hierarchical, such as nested steps or an outline. |
| Check List | Items represent tasks or options that users can mark as complete or incomplete. |
Ideal use cases
- Use a bullet list for features, prerequisites, or options where order does not matter
- Use a numbered list for step-by-step procedures where sequence is critical — for example, installation steps or troubleshooting flows
- Use a multilevel list with Hierarchical Numeric format for {{ glossary.API}} documentation or technical specifications where each sub-item must be uniquely identifiable (for example, 1.2.1)
- Use a checklist at the end of a setup guide so readers can track which steps they have completed
- Use the Continue numbering option when a screenshot or code block interrupts a numbered procedure, to ensure the list reads as one continuous sequence
Bullet list
A bullet list presents items as an unordered set. Use it when the order of items does not matter, such as a list of features, requirements, or options.
Creating a bullet list
In a paragraph block, type - or * followed by a space. The editor automatically converts the paragraph into a bullet list item. You can also use the slash command /bullet list, or select existing content and press Ctrl + Shift + 8.
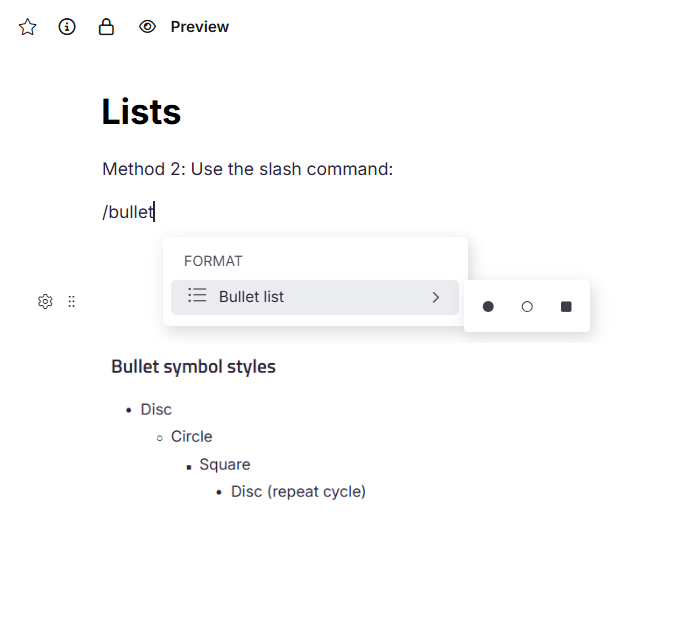
Bullet symbol styles
When you increase the indentation level of a bullet list item, the symbol changes according to the following cycling sequence.
| Level | Shape |
|---|---|
| 1 (top level) | Disc |
| 2 | Circle |
| 3 | Square |
| 4+ | Repeats from Disc |
To increase indentation, press Tab. To decrease indentation, press Shift + Tab.
Numbered list
A numbered list presents items in a defined sequence, with each item preceded by a number or letter. Use a numbered list for step-by-step procedures, ranked items, or any content where order is significant.
List formatting cannot be applied inside headings (H2, H3, or H4). Headings will not convert into lists.
Creating a numbered list
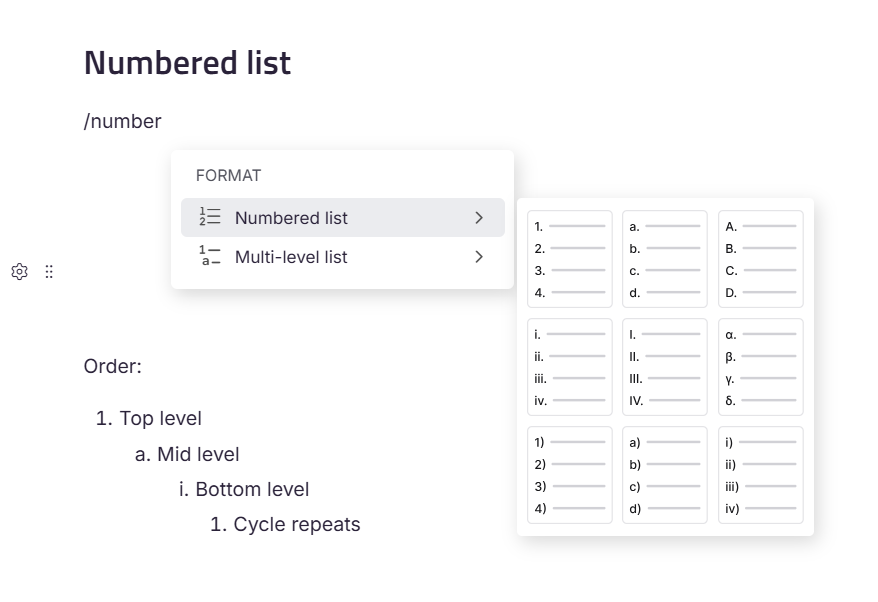
In a paragraph block, type a prefix such as 1. followed by a space. The editor converts the paragraph into a numbered list item in the corresponding style. You can also type /numbered list and hover over Numbered list in the slash menu to preview and select from available styles, or select existing content and press Ctrl + Shift + 7 or Ctrl + Shift + O.
By default, a new numbered list starts at 1. and increments as 1., 2., 3., and so on.
The following prefixes are available.
| Prefix | Resulting style |
|---|---|
1. |
Numeric — 1., 2., 3. |
a. |
Lowercase alphabetic — a., b., c. |
A. |
Uppercase alphabetic — A., B., C. |
i. |
Lowercase Roman — i., ii., iii. |
I. |
Uppercase Roman — I., II., III. |
(α). |
Greek lowercase — α., β., γ. |
1) |
Numeric with parentheses — 1), 2), 3) |
a) |
Lowercase alphabetic with parentheses — a), b), c) |
i) |
Lowercase Roman with parentheses — i), ii), iii) |
Numbered list styles
The following nine styles are available for numbered lists.
| Format | Example | Description |
|---|---|---|
| Numeric | 1., 2., 3. | Standard Arabic numerals. Use for sequential steps or ranked items. |
| Lowercase alphabetic | a., b., c. | Lowercase English letters. Use for sub-items or alternative options. |
| Uppercase alphabetic | A., B., C. | Uppercase English letters. Use for major sections or formal outlines. |
| Lowercase Roman | i., ii., iii. | Lowercase Roman numerals. Common in legal and academic documents. |
| Uppercase Roman | I., II., III. | Uppercase Roman numerals. Use for top-level sections in formal documents. |
| Greek lowercase | α., β., γ. | Lowercase Greek letters. Use for mathematical or scientific content. |
| Numeric (parentheses) | 1), 2), 3) | Arabic numerals with a closing parenthesis. Use for inline enumeration. |
| Lowercase alpha (parentheses) | a), b), c) | Lowercase letters with a closing parenthesis. |
| Lowercase Roman (parentheses) | i), ii), iii) | Lowercase Roman numerals with a closing parenthesis. |
Adjusting indentation
Press Tab to increase the indentation level of a numbered list item. Each press moves the item one level deeper and changes its numbering style. Press Shift + Tab to move the item one level up. Adjusting the indentation will activate the multi-level list formatting.
Ordered list cycling sequence: Numbers (1.) → Lowercase Letters (a.) → Lowercase Roman (i.) → repeats
Continuing a numbered list after a break
When you insert a block element such as an image, table, page break, or code block within a numbered list, a spark (⚡) icon appears next to the first list item that follows the break. Select the icon to choose one of the following options.
- Continue numbering — Resumes numbering from where the previous list left off and preserves the existing indentation. Use this when the items before and after the break belong to the same sequence.
- Restart numbering — Starts a new list from
1.and resets the indentation. Use this when the items after the break represent an independent list. - Set numbering value — Starts the list at a custom number. Enter the value directly or use the
up/downarrows to adjust it. This option retains only the first-level indentation.
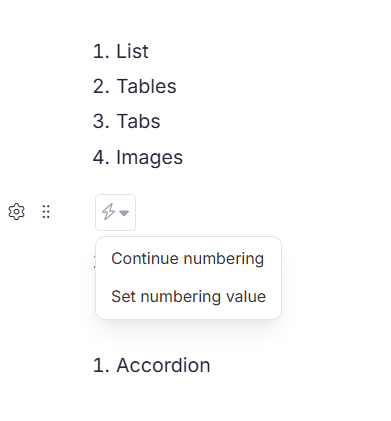
The spark (⚡) icon appears only next to the first list item immediately after a break or block element. It does not appear for subsequent items in the same list segment.
Reordering list items using drag and drop
You can drag content blocks to new positions within a numbered list. When you move a block, the editor prompts you to update the numbering to reflect the new order.
Example: If Block A and Block B are numbered items and you drag an unnumbered Block C between them and select Continue numbering, the list updates to the order A, C, B with numbering adjusted to reflect the new sequence.
Multilevel list
A multilevel list represents hierarchical content using nested levels, where each level has its own numbering style. Use multilevel lists for structured procedures with sub-steps, technical specifications, or document outlines where items must show parent-child relationships.
Creating a multilevel list
Type /multi-level list in a paragraph block and hover over Multi-level list in the slash menu to preview and select from the available formats. You can also create a numbered list using any method, then press Tab on any item to nest it one level deeper.
Multilevel list formats
Three multilevel list formats are available.
Numeric → Alphabetic → Roman
The first level uses numbers, the second uses lowercase letters, and the third uses lowercase Roman numerals. This format suits instructional content with sequential steps that contain sub-steps.
Example:
-
- Step one
- a. Prepare the environment
- i. Install required packages
-
- Step two
Hierarchical numeric
Each sublevel extends the numbering using decimal notation (for example, 1., 1.1, 1.2, 1.2.1). Use this format for technical specifications, project plans, or documentation where items must be uniquely referenceable by number.
Example:
-
- Project Setup
- 1.1 Create folders
- 1.2 Configure settings
- 1.2.1 Update the config file
-
- Deployment
Numeric (Parentheses) → Alphabetic (Parentheses) → Roman (Parentheses)
Uses numbers, letters, and Roman numerals, each followed by a closing parenthesis. Use this format in forms or legal documents where a parenthesized style is preferred.
Example:
-
- User registration
- a) Enter personal details
- i) Validate the input
-
- Confirmation
Hierarchical Numeric (Parentheses)
Combines hierarchical decimal numbering with a closing parenthesis at each level. This is a variant of Hierarchical Numeric for contexts where parenthesized numbering is a style requirement.
Example:
-
- Installation
- 1.1) Download the setup file
- 1.2) Run the installer
- 1.2.1) Accept terms and conditions
-
- Finish setup
Adjusting indentation in multilevel lists
Press Tab to nest an item one level deeper. Press Shift + Tab to promote it one level up. The numbering style at each level is determined by the selected multilevel format.
Indentation levels cycle through predefined styles. The cycling sequence restarts from the beginning after the last style in the sequence has been used.
Checklist
A checklist presents items as tasks or options, each preceded by a checkbox that can be marked as complete or incomplete. Use a checklist for to-do items, task tracking, acceptance criteria, or any content where readers need to indicate completion status.
Creating a checklist
In a paragraph block, type [] followed by a space. The editor converts the paragraph into an unchecked checklist item. You can also type /check list to insert a checklist using the slash command.
Using checkboxes
Each checklist item displays a checkbox to the left of the text.
- To mark an item as complete, select the checkbox. The item is checked and the text is styled to indicate completion.
- To mark an item as incomplete, select the checkbox again to uncheck it.
.png)
Converting an existing list to a checklist
To convert a bullet list or numbered list to a checklist, select all the list items, then use the toolbar to apply the checklist format. Existing item text is preserved; checkboxes are added automatically.
Best practices
- Match the list type to the content — use numbered lists only when order matters, and bullet lists when it does not.
- Keep list items parallel in structure — start each item with the same part of speech (for example, all verbs or all nouns).
- Avoid nesting more than three levels deep in multilevel lists — deeper nesting makes content harder to scan.
- Use Set numbering value when you need to reference a specific step number elsewhere in the article, to ensure numbering stays consistent even if items are added or removed.
- Convert existing bullet or numbered lists to checklists for task-oriented content rather than rebuilding them from scratch.