Routing ticket deflector submissions to Salesforce connects your Document360 ticket deflector to Salesforce Cases, using Salesforce's own On-Demand Email-to-Case feature rather than a dedicated connector. Once set up, every deflector submission a reader doesn't resolve from the suggested articles is created as a Salesforce case automatically. This article walks you through the full setup: enabling Email-to-Case in Salesforce, creating and verifying a routing address, wiring it into your deflector's notification settings, and testing the end-to-end flow.
When to use this integration
- Support runs in Salesforce, docs run in Document360 - Your support queue is managed in Salesforce Service Cloud, while your knowledge base and ticket deflector run in Document360.
- No native connector needed - Unresolved deflector submissions become Salesforce cases automatically, without a middleware tool.
- Basic case creation, not contact matching - Cases are created from the submission, but aren't automatically matched to an existing Salesforce contact. See How the case is populated for what's included by default.
How it works
Salesforce's On-Demand Email-to-Case feature gives you an auto-generated inbox, the Email Services Address. You add that address as a recipient in the ticket deflector's notification settings. Whenever a reader submits the deflector form, Document360 emails that address, and Salesforce turns the email into a case automatically, with no mail server forwarding or middleware involved.
Before you begin
You'll need the following in place:
| Requirement | Notes |
|---|---|
| Salesforce Service Cloud, with admin access to Setup | Email-to-Case requires the Core, Advanced, or Max Service Cloud edition. It's not included on Starter Suite or Pro Suite. |
| A published Document360 ticket deflector form | The ticket deflector feature needs to be available on your plan, and the form already created and published. |
| Access to an inbox for the routing address | Salesforce sends a verification link here before the routing address goes live. This is not the address Document360 will send to, that's a separate, auto-generated address you'll copy in Step 2. |
Step 1 - Salesforce: Enable Email-to-Case and On-Demand Service
- From the Salesforce home page, click the gear icon at the top right and select Setup.
- In the Quick Find box, search for Email-to-Case (with the hyphen), and select it from the results under the Service section.
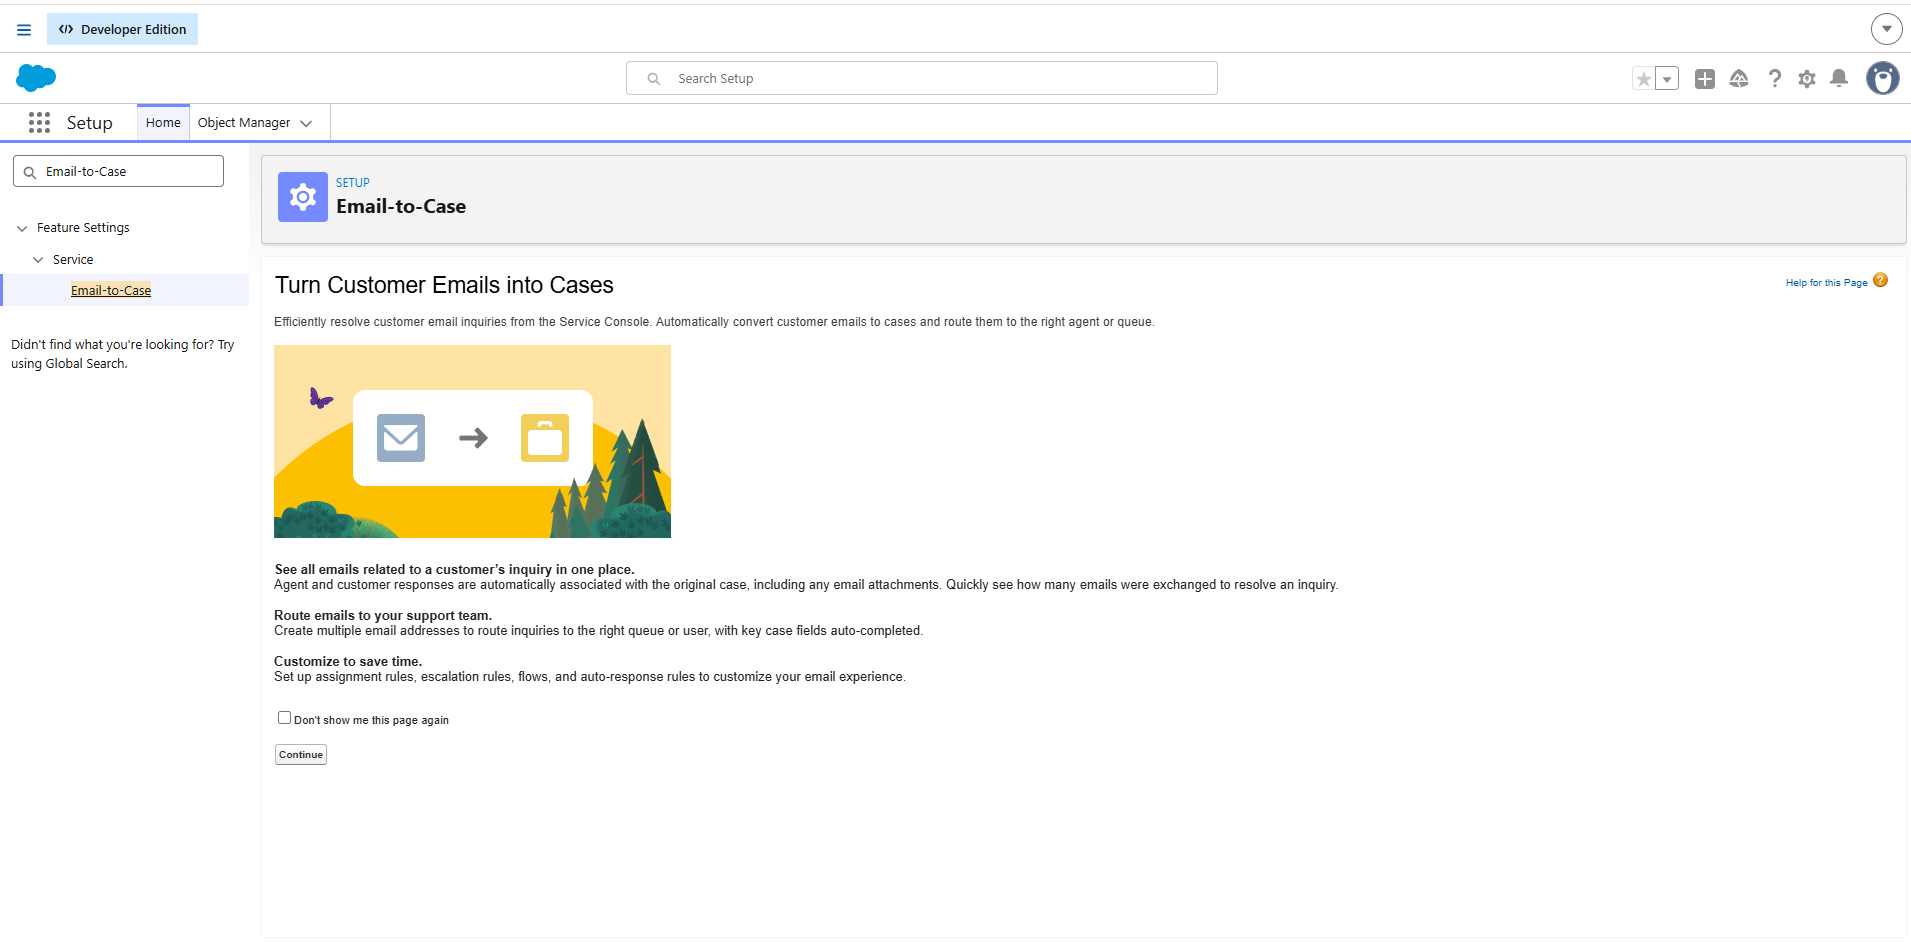
Searching "email to" with a space surfaces Email to Salesforce, a different feature. Search "Email-to-Case" with the hyphen to get the right result.
- On the Email-to-Case splash page, click Continue.
- On the settings page, click Edit.
- Select Enable Email-to-Case.
- Select Enable On-Demand Service. This lets Salesforce host the mailbox, so no mail server forwarding is needed.
- Optionally select Save Email-to-Case attachments as Salesforce files if your deflector form accepts attachments.
- Click Save.
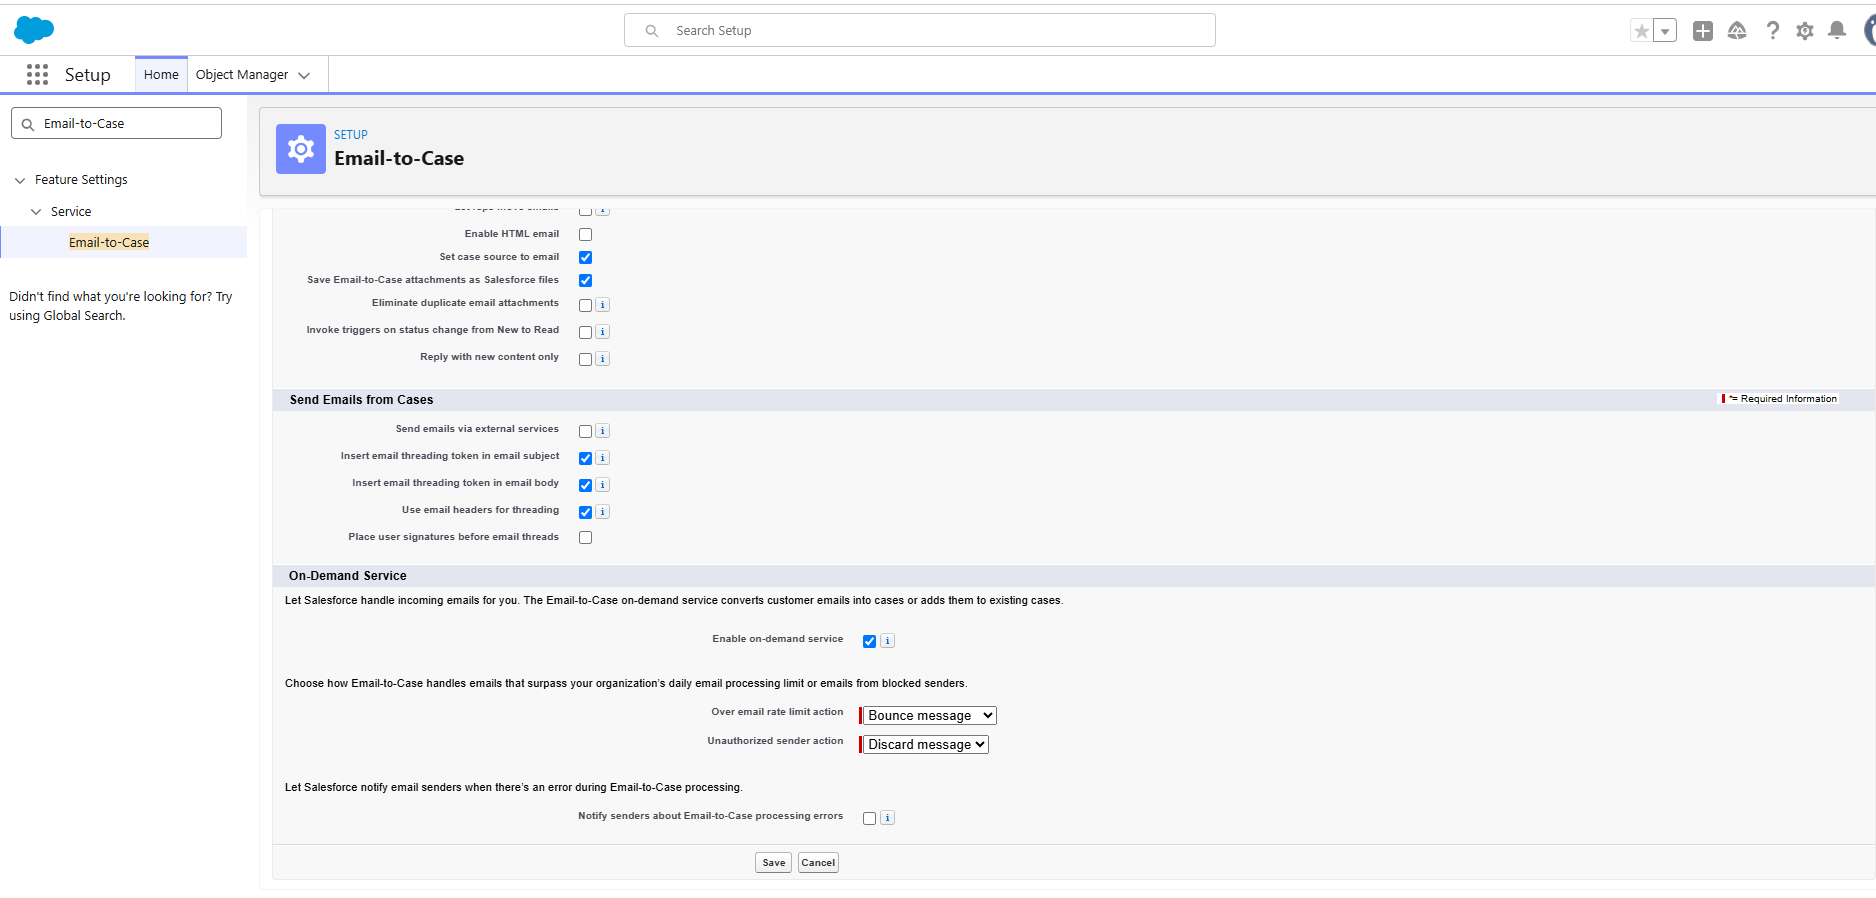
Once Email-to-Case is enabled, it cannot be disabled, only reconfigured. This is a Salesforce platform constraint.
Step 2 - Salesforce: Create and verify a routing address
After saving, the page reloads in read mode, and a Routing Addresses section appears at the bottom.
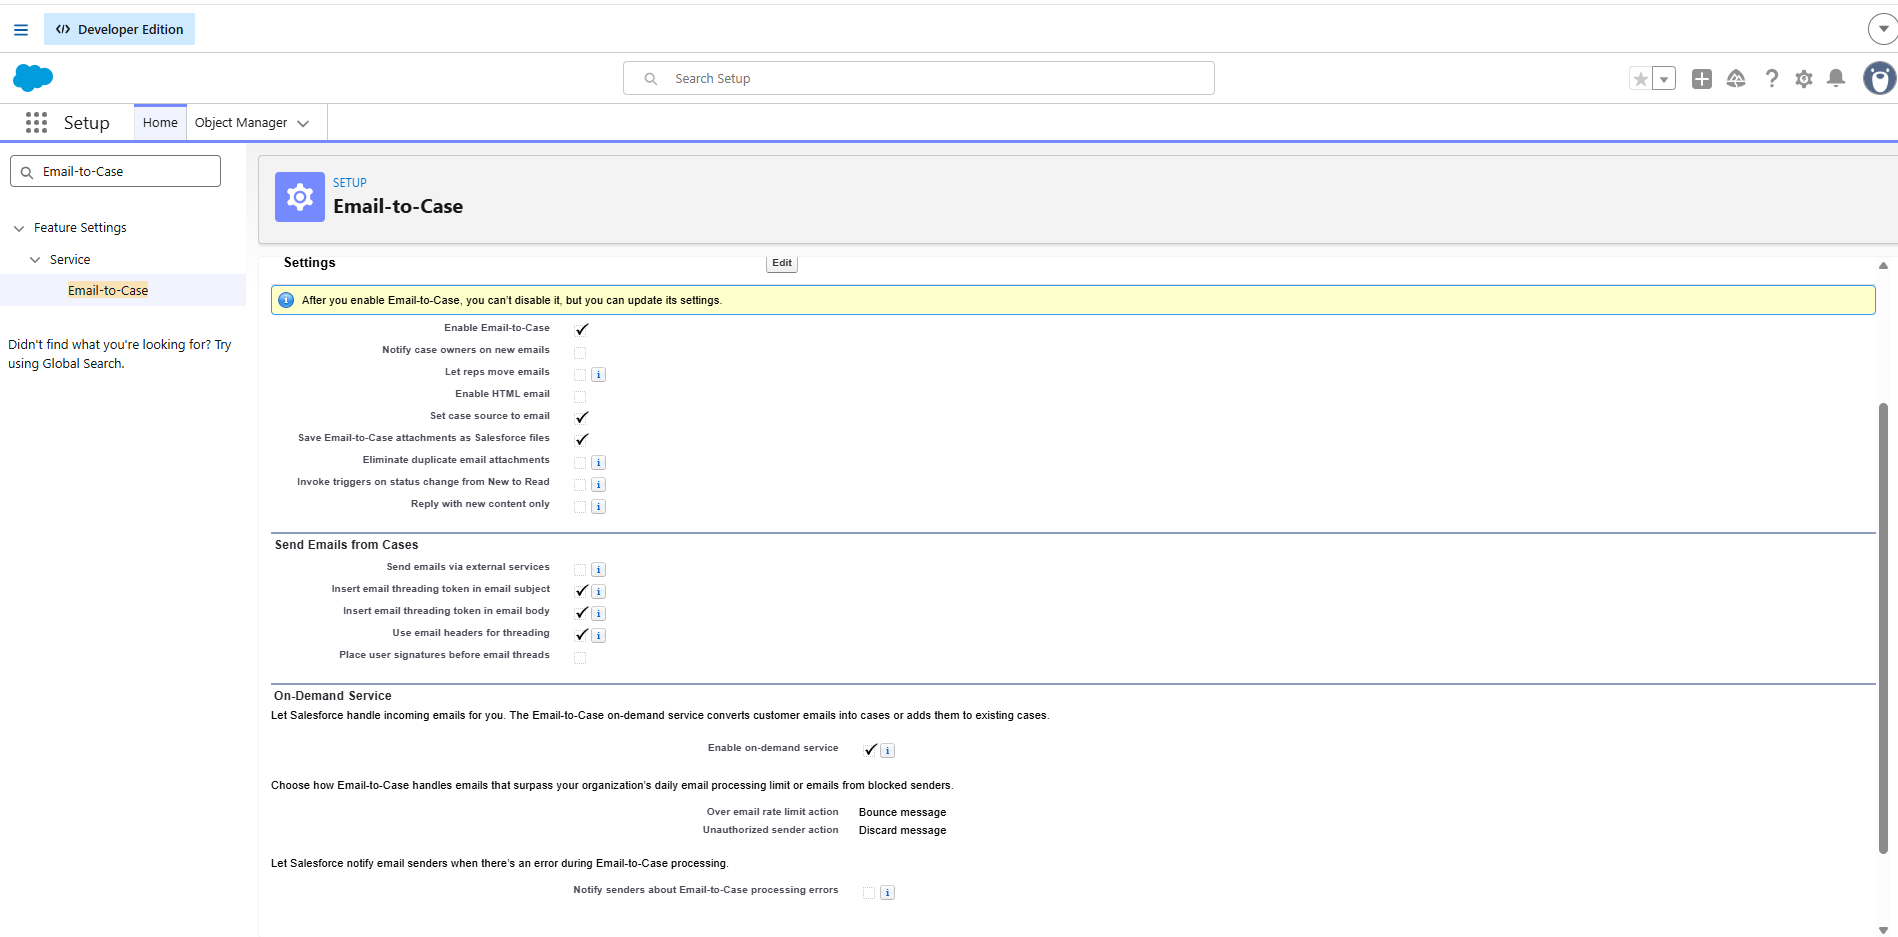
- Click New next to Routing Addresses.
- Fill in the routing address form:
- Routing Name: a label for this address, for example "Ticket deflector."
- Email Address: an inbox you can access. Salesforce sends a verification link here, this is not the address Document360 will send to.
- Case Owner: required. Click the magnifying glass and select a user or queue.
- Case Priority: set as appropriate, for example Medium.
- Case Origin: set to Email, so cases are visibly tagged by source.
- Leave Accept Email From blank to allow mail from any sender, including Document360.
- Click Save.
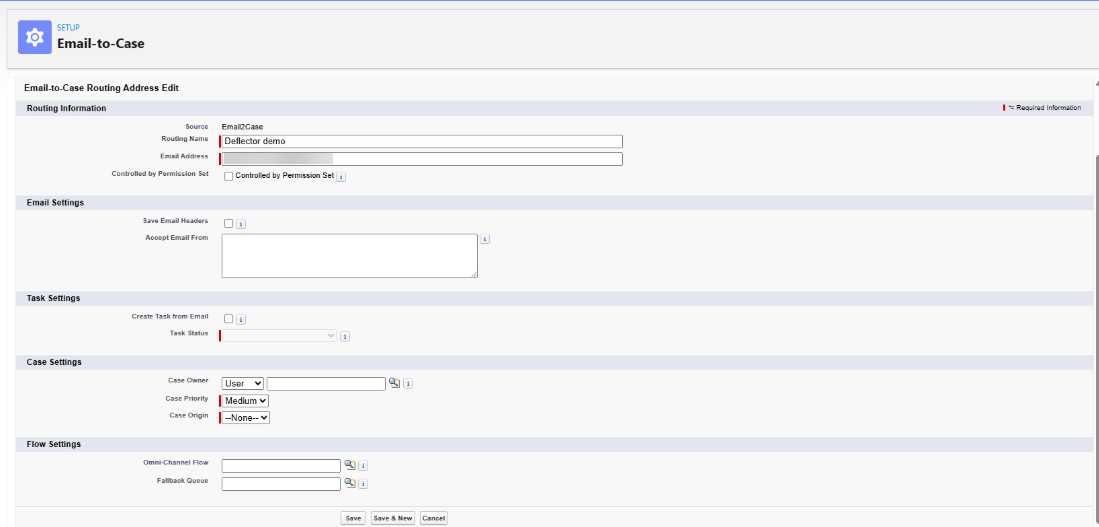
Case Owner is a required field. Confirm it's populated before saving.
- After saving, Salesforce emails a verification link to the address you entered. Open the email and click the link. The routing address row updates to show Verified.
- On the routing address detail page, locate the Email Services Address field. This is a long, auto-generated address ending in
.case.salesforce.com. - Copy this full address exactly. A single wrong character means mail is silently discarded with no error.
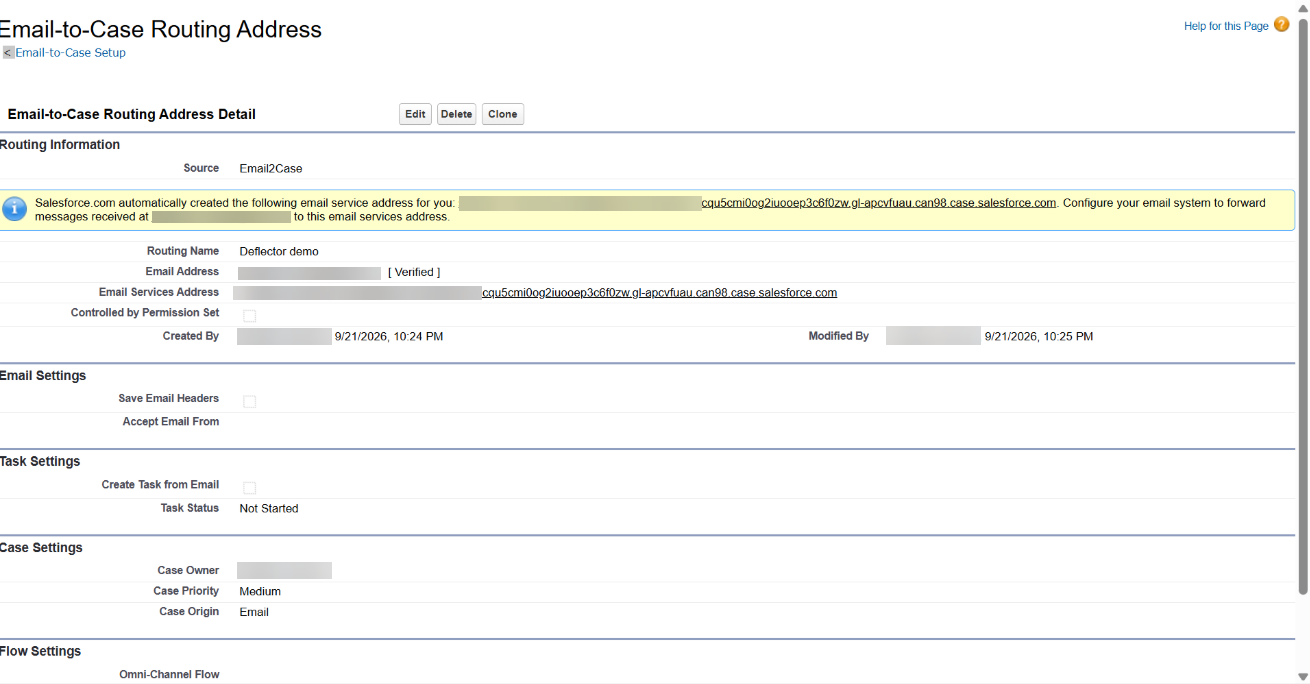
The Email Services Address and the email address you entered in step 2 are two different things. Document360 must send to the Email Services Address, not your own inbox address. Only the Email Services Address creates cases.
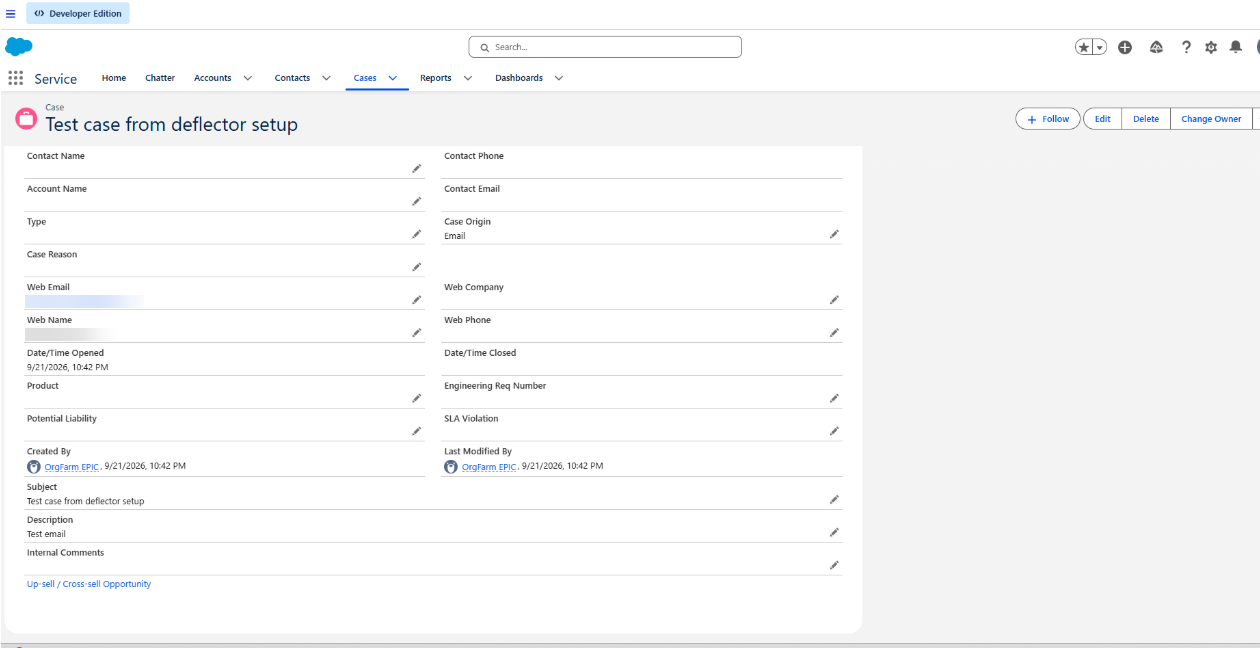
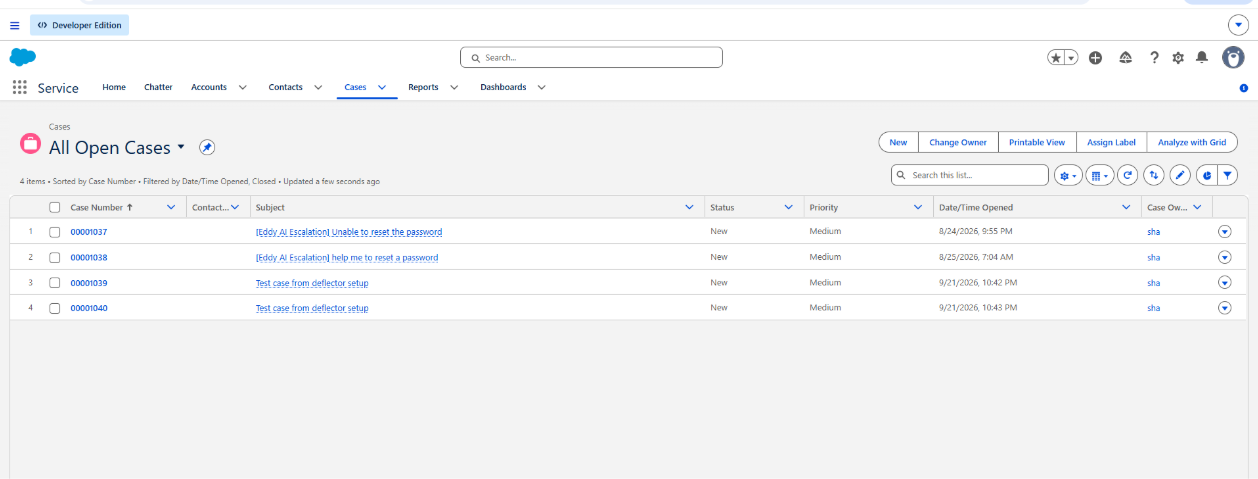
Test before continuing: send a plain email from any mail client to the Email Services Address. Open the Cases tab in the Salesforce Service app and switch the list view to All Open Cases. Confirm a case appeared with your subject line before moving on to the Document360 setup.
Step 3 - Document360: Add the Email Services Address to the deflector
- In the Document360 portal, go to Settings > Knowledge base site > Ticket deflector and open your deflector form.
- In the left panel, click Ticket submission settings.
- Expand Ticket submission email notification.
- In the These emails field, paste the Email Services Address you copied from Salesforce. Press Enter to commit it as a recipient.
- Click Save.
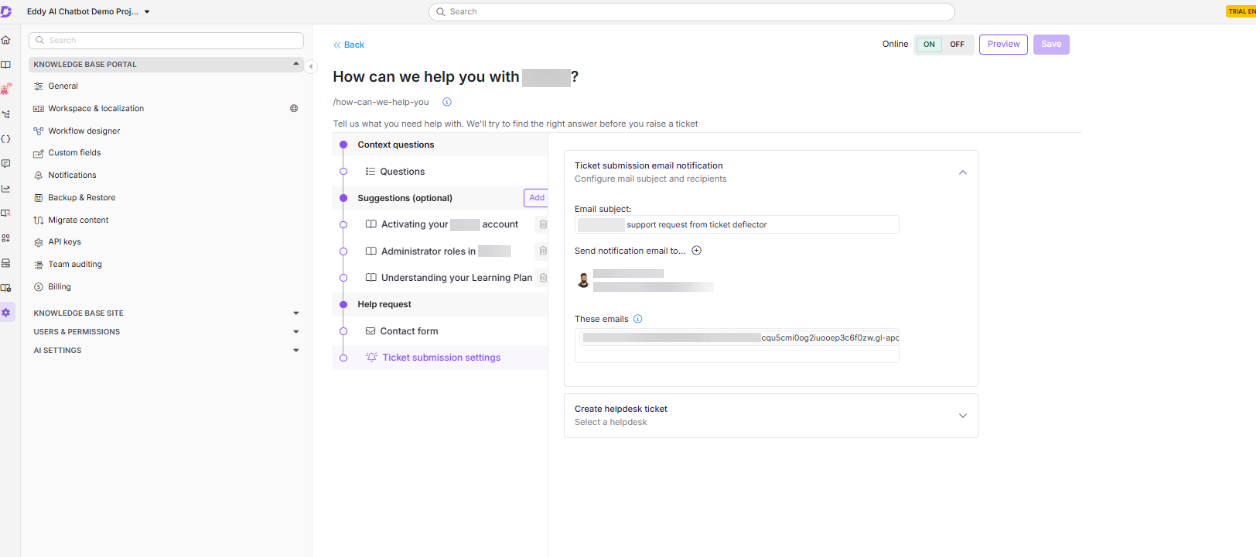
After saving, reload the page and confirm the address is still showing in the field. The field renders as plain text, so this is the only way to verify it persisted.
The These emails field accepts any email address, including group addresses, with no limit on recipients. This is separate from the Send notification email to field above it, which is restricted to project team accounts. You can add multiple Salesforce routing addresses here to split submissions across different queues by deflector form.
Step 4 - Test the end-to-end flow
- Open your knowledge base site and navigate to the deflector form (path:
/get-help/<your-deflector-slug>). - Select a context question, review the suggested articles, and decline them.
- Fill in the contact form using an email address that's different from your own. This lets you verify which address appears on the case.
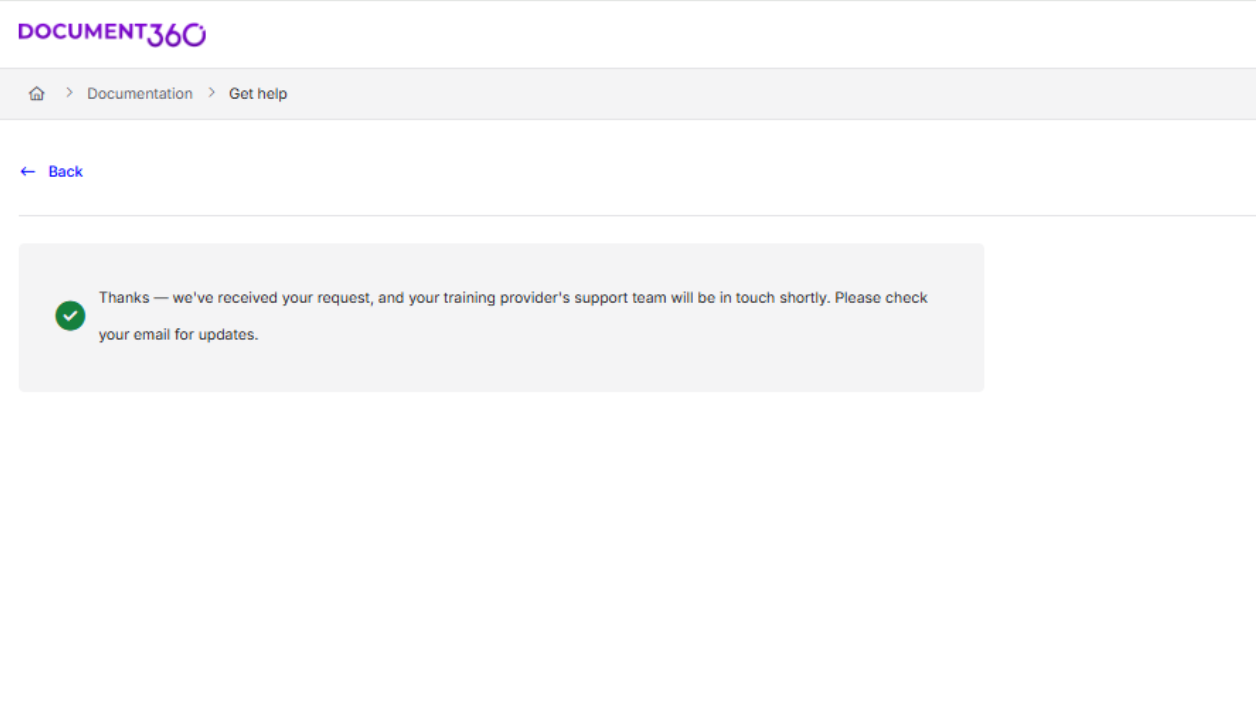
- Click Submit. You should see a confirmation message.
- In Salesforce, open the Cases tab and switch the view to All Open Cases. The new case should appear within one to two minutes.
- Open the case and check:
- Subject: should match the subject you typed in the form.
- Description: should contain the form fields as labeled lines: Name, Email, Phone, Subject, Description.
- Web Email: see How the case is populated below for what to expect here.
- Case Origin: should show Email if you configured it in Step 2.
How the case is populated
When a deflector submission creates a Salesforce case, the fields are populated as follows:
| Salesforce field | Value |
|---|---|
| Subject | The subject the reader typed in the form |
| Description | All form fields as labeled lines: Name, Email, Phone, Subject, Description |
| Web Email | product@document360.io (Document360's sender, not the reader's address) |
| Web Name | Document360 |
| Case Origin | The value configured on the routing address |
| Contact Name / Contact Email | Empty, not auto-populated |
| Type, Product, Case Reason | Empty, not auto-populated |
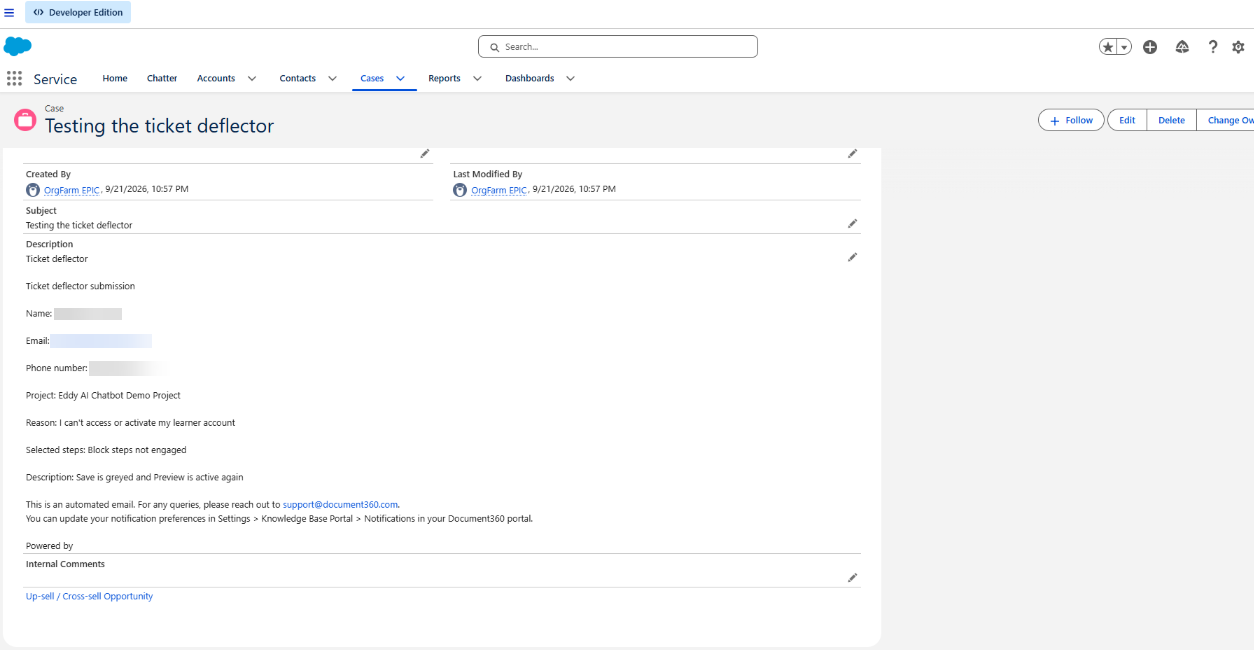
Web Email shows Document360's address rather than the reader's, because Document360 sends the notification email from product@document360.io, its standardized transactional sender. Salesforce attributes the case to that sender rather than to the reader.
The reader's actual email address is present in the Description field as a labeled line. A Salesforce admin can attribute cases correctly to contacts and enable reply-to-customer by building a flow or Apex email service that parses the Description body and updates the Contact Email and Contact Name fields on case creation.
Structured case fields (Type, Product, Priority, Case Reason) aren't populated from deflector submissions. Teams that rely on these fields for routing or reporting can set them manually or with an automation rule after case creation.
Troubleshooting quick reference
| Symptom | Cause | Fix |
|---|---|---|
| Quick Find doesn't surface Email-to-Case | Searched "email to" with a space, which matches "Email to Salesforce" instead | Search "Email-to-Case" with the hyphen |
| New case doesn't appear in the Cases tab | The Recently Viewed list view only shows cases you've personally opened | Switch the list view to All Open Cases |
| Case never arrives at all | Outbound mail was rejected by a mail gateway that blocks the long .case.salesforce.com address format |
Check your outbound mail gateway's logs for a bounce |
| The Email Services Address field looks empty after saving | The These emails field renders as plain text | Reload the page and confirm the address is still showing before assuming it didn't save |
Limitations
- No native Salesforce connector: this relies on Salesforce's own Email-to-Case feature and Document360's ticket submission email notification setting, not a certified integration.
- Cases aren't attributed to a Salesforce contact automatically. The reader's email lands in the case Description as a labeled line, not in Contact Email. Matching it to a contact needs a Salesforce flow or Apex email service on your side.
- Structured case fields (Type, Product, Case Reason) aren't populated from deflector submissions and need manual entry or an automation rule after case creation.