Ticket escalation in Eddy AI Chatbot lets users raise support tickets directly from the chatbot interface when the chatbot cannot assist them. When you connect Zendesk, Freshdesk, or email-based ticket creation, users can raise a ticket from the chatbot after a set number of questions. The ticket is pre-filled with the chat transcript, an AI-generated subject line, and an AI-generated issue description that the user can edit before submitting.
When to use ticket escalation
- Use this when you want to give users a fallback option within the chatbot, so they do not need to leave the chat to contact support.
- Use this when users frequently encounter questions the chatbot cannot answer, and you want those interactions to generate actionable support tickets automatically.
- Use this to capture structured ticket data from chatbot conversations — including the full transcript — so agents have complete context when they pick up the ticket.
Before you begin
- You must have created an Eddy AI Chatbot with at least one source connected.
- Have the details ready for the option you plan to connect:
- Zendesk: API Token, Administrator Email ID, and Subdomain URL.
- Freshdesk: API Token and Subdomain URL.
- Email-based ticket creation: The email subject prefix, the individual or group email addresses to send ticket notifications to (To), and any additional addresses to copy (CC).
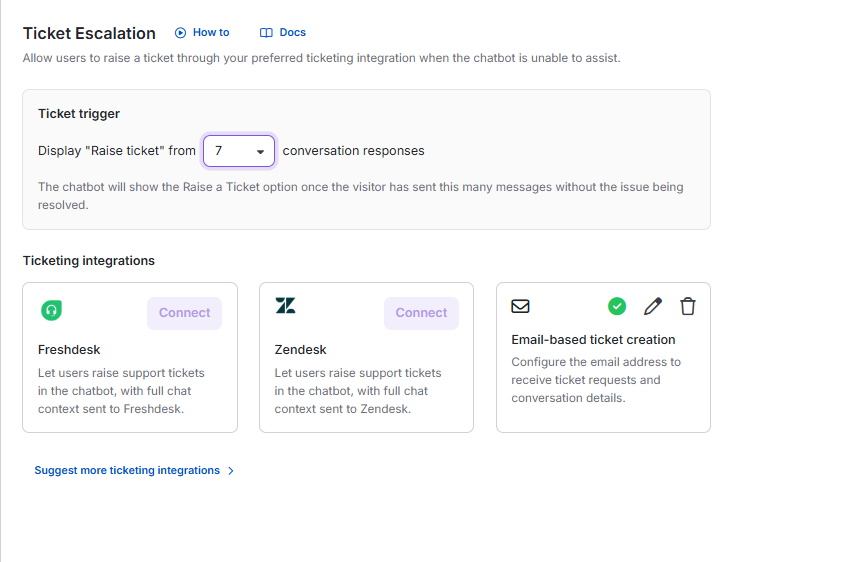
- You can connect only one ticket escalation option at a time.
Configure ticket escalation
- Navigate to AI Chatbot (
 ) in the left navigation bar and click Customize.
 - Navigate to the Ticket escalation () tab.
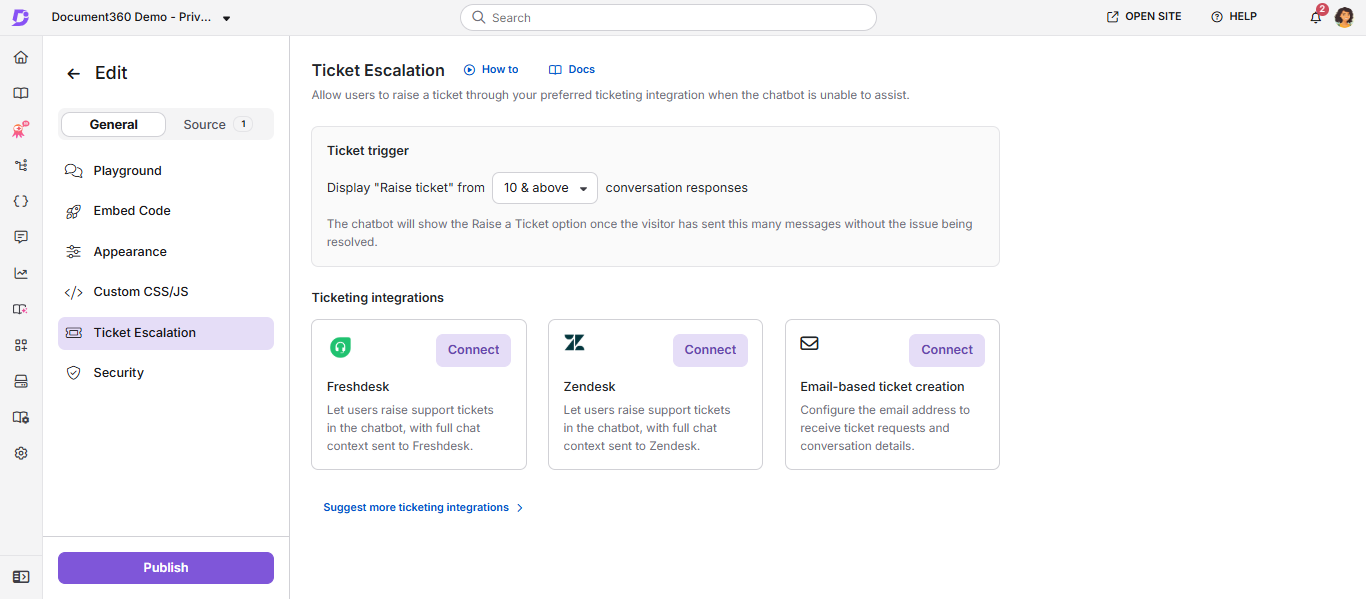
- Click Connect next to the option you want to use: Zendesk, Freshdesk, or Email-based ticket creation.
Only one ticket escalation option can be connected at a time.
-
Enter your connection details:
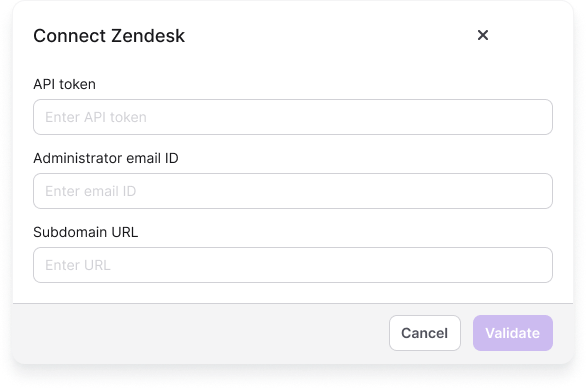
For Zendesk:
- API Token — your ticketing platform's API token for authentication.
- Subdomain URL — your ticketing platform subdomain.
- Administrator Email ID (Zendesk only) — the admin email address for authentication.
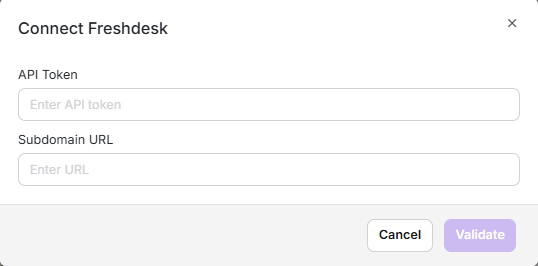
For Freshdesk:
- API Token — your Freshdesk API token for authentication.
- Subdomain URL — your Freshdesk subdomain.
For Email-based ticket creation:
The Custom email integration dialog opens. Enter the following details:
- Email subject prefix (required) — the text added to the start of each notification email subject, for example "New chatbot support request received". Eddy AI adds the rest of the subject based on the chat conversation.
- Send notification email to (required) — the individual or group email addresses that receive the ticket notification. These addresses are added to the To field of the email.
- Additional individual or group email addresses (optional) — any other individual or group email addresses that should receive a copy of the notification. These addresses are added to the CC field of the email.
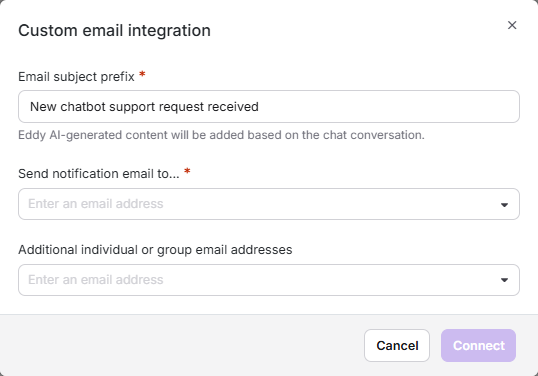
Click Connect.
-
In the Ticket trigger field, enter the number of questions a user must ask before the Raise a ticket? option appears on chatbot answers.
-
Once connected, users can raise a ticket when any of the following occur:
- The user reaches the number of questions set in Ticket trigger, and selects Raise a ticket? on an answer.
- A user asks to raise a ticket, and the chatbot has no answer for their question in its sources.
The chatbot always tries to answer first. If a user asks to raise a ticket but the chatbot finds a relevant answer in its sources, it shows the answer instead of opening the Create ticket dialog. The dialog opens only when no answer is available.
-
When a ticket is triggered, the ticket form is pre-filled with:
- The full chat transcript.
- An AI-generated subject line.
- An AI-generated issue description (editable by the user before submission).
-
Once the user submits the ticket:
- Zendesk or Freshdesk: the chatbot confirms ticket creation in the chat with the ticket ID.
- Email-based ticket creation: the chatbot confirms that the request was sent, and the user receives the ticket details by email.
User experience of ticket escalation
From a chatbot answer
When a user hovers over a chatbot answer, the following options appear:
- Copy - copies the answer.
- Like - marks the answer as helpful.
- Dislike - opens a popup where the user can leave a comment and choose to be notified.
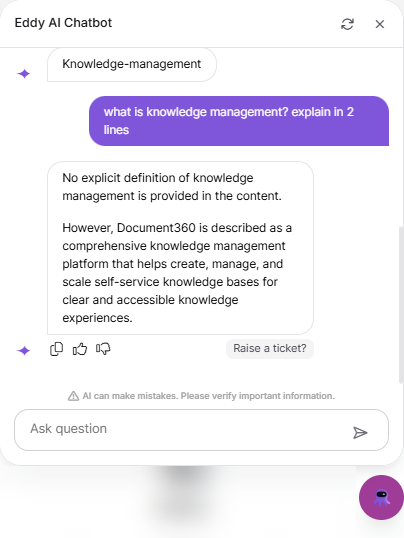
Once the user reaches the number of questions set in the Ticket trigger field, a Raise a ticket? option also appears on that answer and every answer after it. Selecting it opens the Create ticket dialog, even if the chatbot has answered the question.
On the latest answer, these options stay visible. On earlier answers, they appear on hover.
For example, if Ticket trigger is set to 4:
- Answers 1 to 3 show Copy, Like, and Dislike on hover.
- From answer 4 onward, Raise a ticket? also appears.
Submit a ticket
- Click Raise a ticket?.
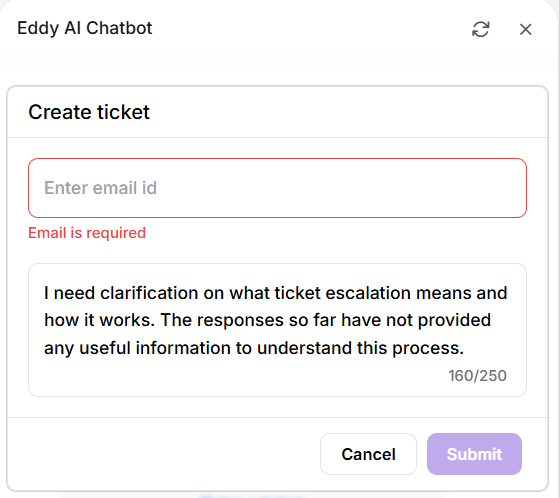
- In the Create ticket dialog, enter an email address in the Enter email id field. This field is required; the ticket cannot be submitted without it.
- Review the issue description. Eddy AI automatically generates it based on the issue discussed in the chat. Edit it if needed. The description has a 250-character limit.
- Click Submit.
Once the user submits the ticket, the chatbot confirms it in the chat.
- Zendesk or Freshdesk: the confirmation includes the generated ticket ID.
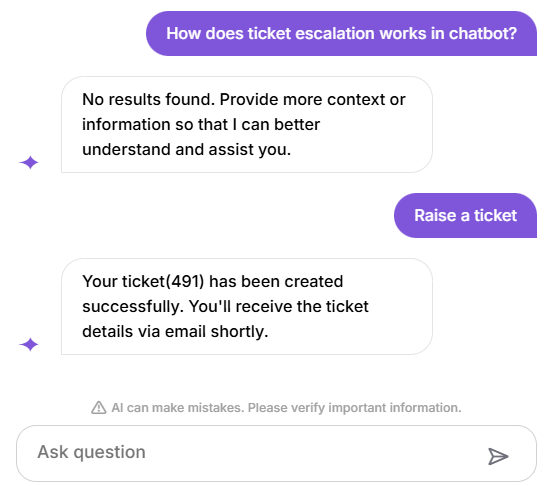
- Email-based ticket creation: the chatbot displays "Your request has been sent successfully. You'll receive the ticket details via email shortly." The ticket details are sent to the email address the user entered.
Agent view of an escalated ticket
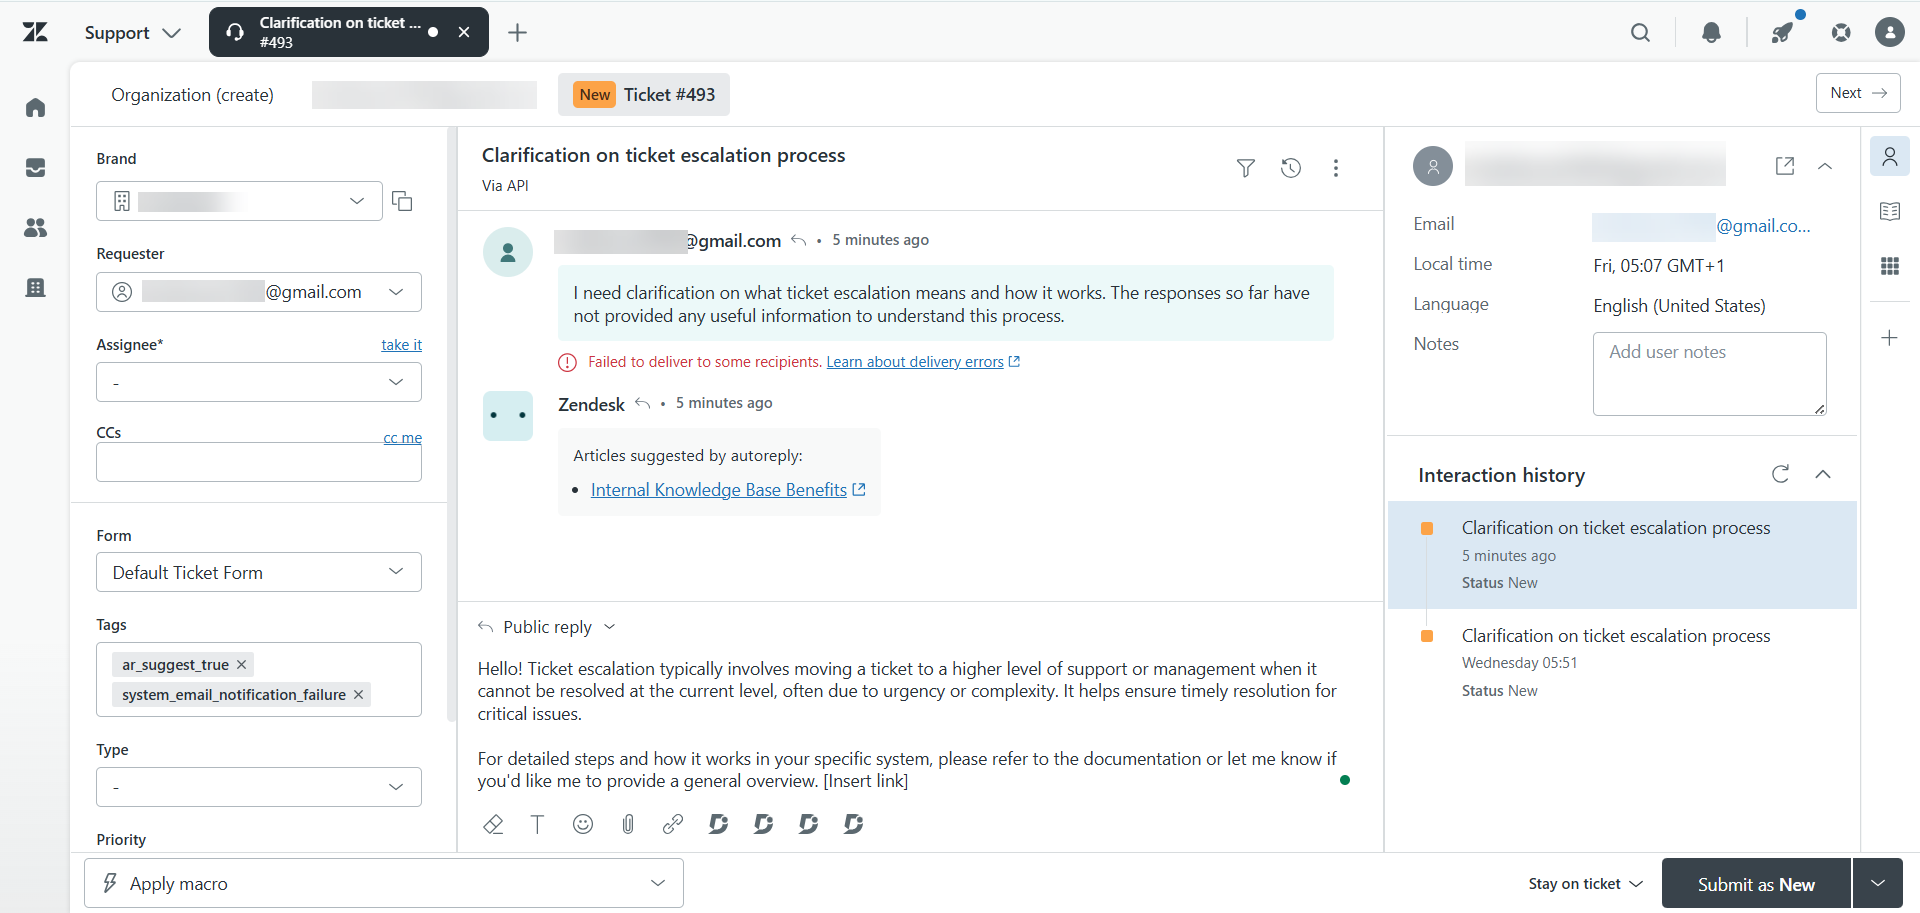
Once a user raises a ticket from the chatbot, it appears in Zendesk or Freshdesk as a standard ticket, created via API.
To view an escalated ticket,
- Log in to the Zendesk or Freshdesk agent dashboard.
- Search for the ticket ID shown in the chatbot's confirmation message, or locate it in the Unassigned tickets or New view.
- Open the ticket to review its details.
The ticket includes the following fields populated from the chatbot conversation:
| Field | Source |
|---|---|
| Subject | AI-generated subject line summarizing the user's question |
| Description | AI-generated (and user-edited, if changed) issue description entered in the chatbot's Create ticket dialog |
| Requester | The email address the user entered in the chatbot's Create ticket dialog |
If you use email-based ticket creation, the ticket details are sent as a notification email to the addresses you added in the Custom email integration dialog.
Ticket escalation walkthrough
Watch the video below to see how ticket escalation works in Eddy AI Chatbot, from the user's request to the agent's view in the ticketing platform.
Suggest a ticketing platform
If you use a ticketing platform that is not listed, you can submit a suggestion to have it added:
- Click Suggest more ticketing platforms.
- Select from the available options:
- Jira
- Intercom
- GitHub
- HubSpot
- Others (enter the platform name and the purpose of integration)
- Submit your suggestion to help us add more integrations.
Best practices
- Connect ticket escalation before going live — setting up ticket escalation at launch ensures users always have a path to human support from day one.
- Test the escalation flow in the Playground — ask as many questions as your Ticket trigger value and verify that the Raise a ticket? option appears on the answer.
- Use Zendesk or Freshdesk as both a source and an escalation target — if you connect Zendesk or Freshdesk as a training source (via the Source tab), the chatbot learns from past tickets. Connecting it for escalation routes new unresolved queries back to your support team, closing the loop.
- Review escalated tickets to improve the chatbot — analyze escalated tickets regularly to identify common questions the chatbot could not answer. Add that content as a Text, FAQ, or File source to reduce future escalations.