Once your recording is uploaded, the Step by step guide editor opens in the Knowledge base portal. Each step is automatically generated based on the captured workflow, with the step title and description pre-filled from the recorded actions.
Each step displays the captured screen on the left and a right-side pane with editing options. This article covers everything you can do to refine and enhance your guide before publishing.
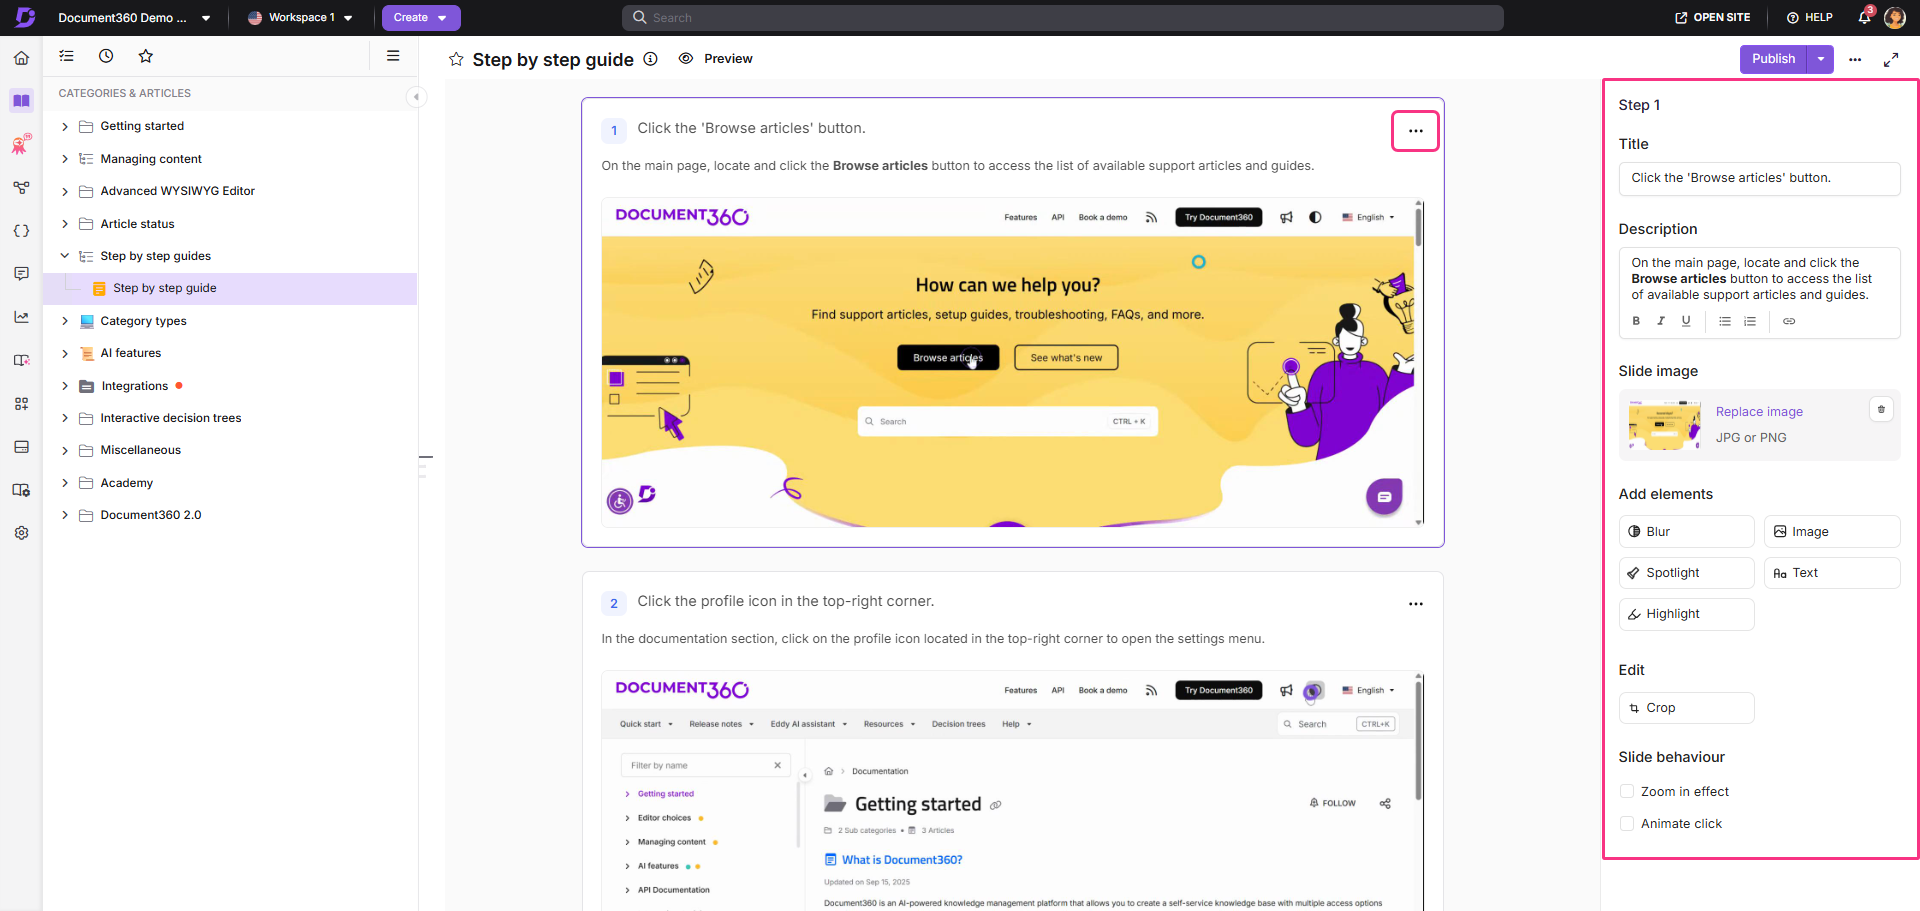
Edit step content
The right pane lets you adjust the core content of each step:
-
Title - Enter the step title. To add a hyperlink to the title, select the text and click the Hyperlink icon.
-
Description - Add instructions or context for the step. Use the rich text toolbar to format with Bold, Italic, Underline, ordered list, unordered list, or Hyperlink.
-
Slide image - Click Replace image to swap the captured screenshot. Choose from one of these sources:
- Select from original - Pick a frame from the recorded video. Use Select exact frame for more precision, or use the Jump to dropdown to navigate to a specific click in the recording.
- My drive - Click Upload to choose a file from your local explorer.
- Background - Pick an image from available background images.
NOTEThe supported formats are JPG and PNG, with a maximum file size of 10 MB, a recommended resolution of 1920×768, and a minimum of 100×100.
-
Click Insert to apply.
The images used in each step are derived from your recorded session. You can choose any frame from the original recording to create a new step or replace an existing image.
Insert a new step
To insert a new step:
- Hover between any two existing steps until the Add step (+) icon appears.
- Click the Add step (+) icon.
- In the right pane, update the default title - "This is a sample title".
- Add a description for the step. Use the rich text toolbar to format with Bold, Italic, Underline, ordered list, unordered list, or Hyperlink.
- Click Add Image/Background to set the step image. Choose from one of these sources:
- Select from original - Pick a frame from the recorded video. Use Select exact frame for more precision, or use the Jump to dropdown to navigate to a specific click in the recording.
- My drive - Click Upload to choose a file from your local explorer.
- Background - Pick an image from available background images.
- Click Insert to apply.
Add visual enhancements
These tools overlay visual enhancements directly onto the step image to make every step clearer and more reader-friendly.
- Blur - Hide sensitive or private information such as passwords, API keys, or customer data directly on a step image.
- Image - Overlay an additional image onto a step, useful for adding diagrams, icon keys, or branded assets alongside your screenshot.
- Spotlight - Dim everything around a specific area to draw readers' attention to exactly where it needs to be.
- Text - Add custom annotations over a step image to call out something that isn't visible in the UI itself.
- Highlight - Mark important areas with a colored overlay without dimming the rest of the screen.
Slide behaviour
Zoom in effect
Apply a zoom-in effect to draw attention to hotspots or key areas within the step image.
Use this to focus the reader on a small or easily missed element — a checkbox, a toggle, a link — without cropping out surrounding context.
Enable Zoom in effect
- Select the desired step.
- In the right pane, go to Slide behaviour.
- Enable Zoom in effect.
- Once enabled, Zoom in (+) and Zoom out (-) options appear on the top-right of the step.
End user experience
- When the zoom-in effect is enabled, the slide image is automatically zoomed in on first view.
- Readers can click the − (zoom out) icon to return to the original view.
- They can use the + (zoom in) icon to zoom in again as needed.
Animate click
Instead of a static image, animate a step by playing a short video clip around the recorded click.
Useful when the result of a click is a dropdown opening or a panel expanding - is important for the reader to see.
Enable Animate click
- Select the desired step.
- In the right pane, go to Slide behaviour.
- Enable Animate click.
- From the Animation duration dropdown, select a duration:
- 3 seconds - Shows 1.5 seconds before and after the click. Best for fast, simple interactions.
- 5 seconds - Balanced; good for most cases where a brief animation is needed.
- 10 seconds - Shows up to 5 seconds on each side; best for slower transitions like page loads or animated UI responses. Duration adjusts based on available footage.
End user experience
The step plays as a mini video, centered on the click point.
Edit step image
Crop
Use Crop to trim away distracting browser chrome, sidebars, or irrelevant screen areas and keep the reader's attention on what actually matters in that step.
For a full walkthrough on how to crop a step image, see Crop.
Managing added elements
To review and manage all enhancements added to a step:
- Expand the Added elements section in the right pane.
- Hover over any element to access available options:
- Click Edit to update it.
- Click Delete to remove it.
Next steps
Once your guide is polished, you can publish, translate, clone, or manage access. See Managing step by step guides for translation, cloning, unpublishing, and settings.
FAQ
How do I configure the SEO title and description for a Step by step guide?
To set up SEO for a Step by step guide:
- Navigate to the desired guide in the Knowledge base portal.
- Click the More () icon and select SEO.
- In the Article settings dialog, update the meta title, slug, and description.
- Click Save to apply the changes. For more information, read the article on Article SEO.
How do I update the title and URL slug?
Click the guide's title at the top of the editor > update the Title, URL slug, and Description > click Update.
How can I enable the Table of Contents for my Step by step guide?
Each step in a guide can appear as part of a Table of Contents on the Knowledge base site. To enable the Table of Contents:
- Navigate to Settings () > Knowledge base portal > Article settings & SEO in the Knowledge base portal.
- In the Article settings tab, expand the Article right accordion.
- Turn on the Show table of contents toggle.