IP restriction adds an extra layer of security to your knowledge base by allowing or restricting access based on user-specified IP addresses.
NOTE
- This is a project-level setting. Once enabled, it applies across all workspaces and languages within that project.
- Document360 supports both IPv4 and IPv6 (Unicast) addresses.
Accessing the IP restriction page
- Navigate to Settings () > Knowledge base site in the left navigation bar in the knowledge base portal.
- In the left navigation pane, navigate to IP restriction.
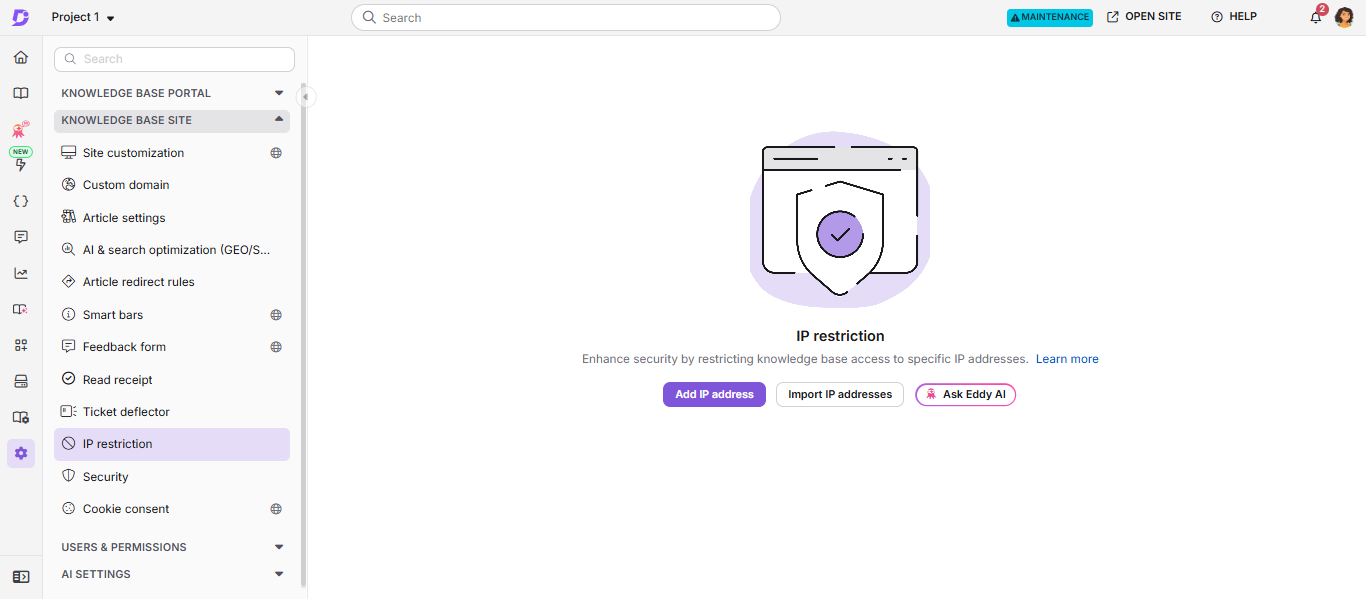
The IP restriction page shows the following:
| Option | Description |
|---|---|
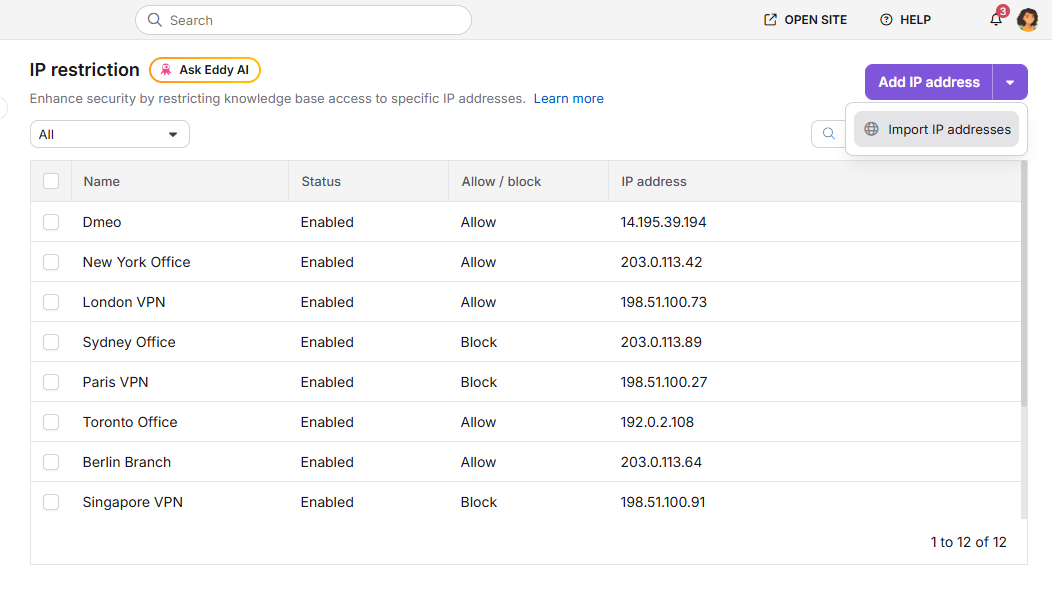
| Add IP address | Opens the Add IP restriction dialog so you can add one IP restriction. To import several at once, click the dropdown arrow next to it and select Import IP addresses. |
| All | Filters the list to show all IP restrictions, or only Allow or Block restrictions. |
| Search | Searches the list of IP restrictions. |
| Checkbox | Select one or more IP restrictions to disable, enable, or delete them together. To select every IP restriction in the list, select the checkbox in the header row. |
| Name | The name that identifies the IP restriction. |
| Status | Whether the IP restriction is Enabled (enforced) or Disabled (paused). |
| Allow / block | Whether the IP address or range is allowed or blocked. |
| IP address | The IP address or range the restriction applies to. |
| Edit () and More () | Appear when you hover over an IP restriction. The More menu has Disable IP address (or Enable IP address) and Delete. |
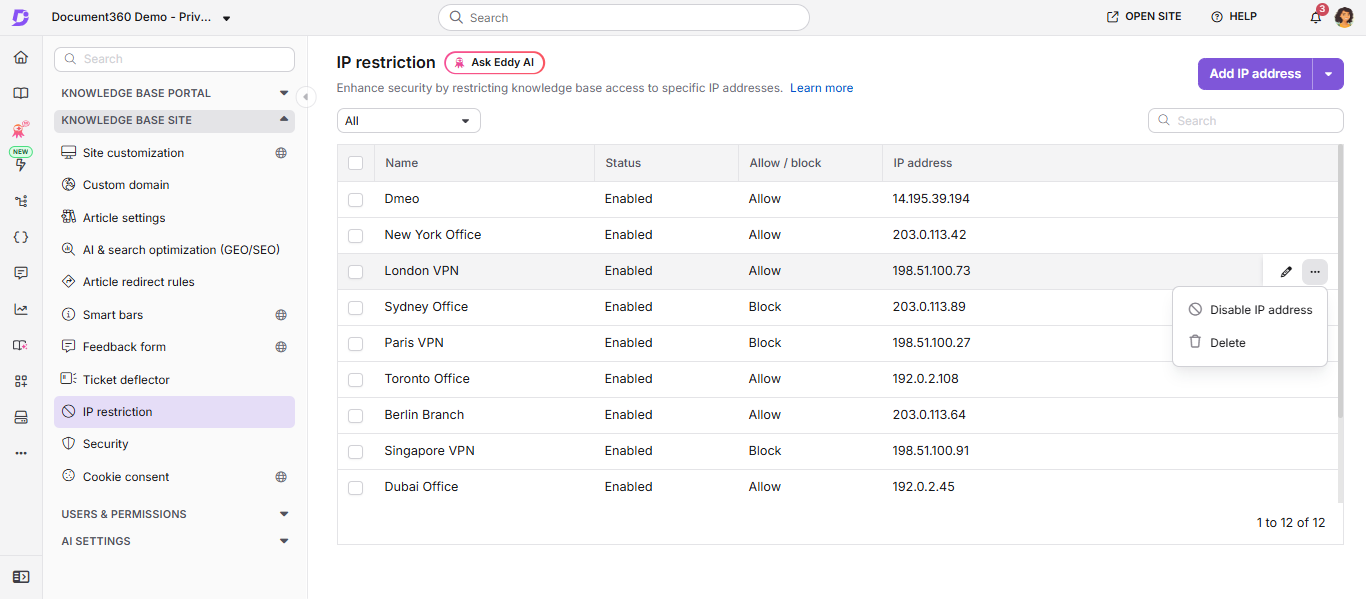
New IP restrictions, whether you add them manually or import them, are enabled by default. A disabled IP restriction stays in the list but isn't enforced on the knowledge base site. For more information, see Disabling or enabling an IP restriction.
A project can have up to 1,000 IP restrictions in total.
Adding an IP restriction
-
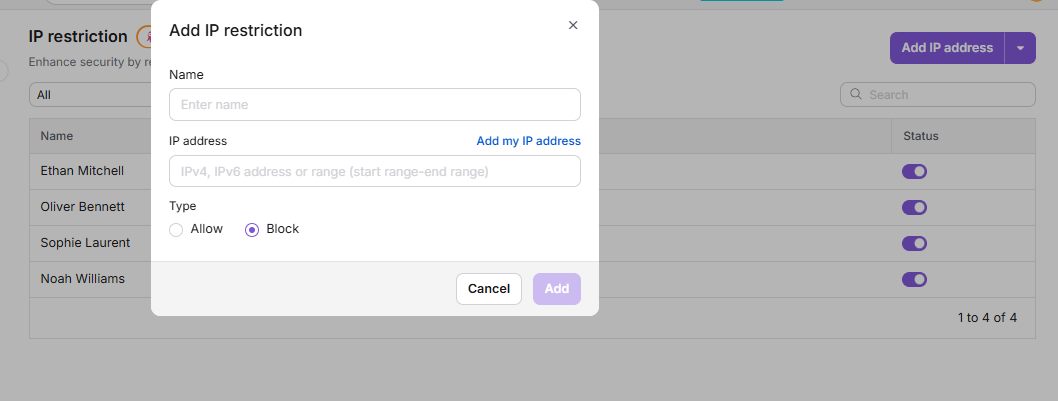
Click Add IP address.
The Add IP restriction dialog appears. -
In the Name field, enter a name to identify the IP restriction.
-
In the IP address field, enter an IPv4 or IPv6 address, or a range.
Example of a range:
79.15.135.189 - 79.15.135.229To use the IP address of the device you're on, click Add my IP address.
-
Under Type, select Allow or Block. Block is selected by default.
-
Click Add.
The IP restriction is added to the list and a confirmation message appears.
If the IP address isn't valid, or the same IP address or range already exists, an error appears below the IP address field. Fix the address to continue.
Importing IP restrictions in bulk
If you have many IP addresses or ranges to allow or block, import them from a CSV file instead of adding them one at a time. You can import up to 500 IP restrictions from one file. A project can have up to 1,000 IP restrictions in total, including the ones you've already added.
Before you begin
- Download the CSV template from the Import IP addresses dialog. Don't change its column headers.
- Fill in one IP restriction per row. All three columns are required:
| Column | What to enter |
|---|---|
| Name | A name to identify the IP restriction |
| IP address range | A single IP address, for example 192.168.0.1, or a range, for example 192.168.0.10 - 192.168.0.17. IPv4 and IPv6 are supported. |
| Allow / Block | Allow or Block (not case-sensitive). You can mix Allow and Block rows in the same file. |
Import the file
-
Navigate to Settings () > Knowledge base site > IP restriction.
-
Open the Import IP addresses dialog:
- If no IP restrictions exist yet, click Import IP addresses.
- Otherwise, click the dropdown arrow next to Add IP address and select Import IP addresses.
-
Click Download template if you don't have the template yet.
-
Upload your CSV file in one of these ways:
- Click Upload from my device and select the file.
- Drag and drop the file into the upload area.
-
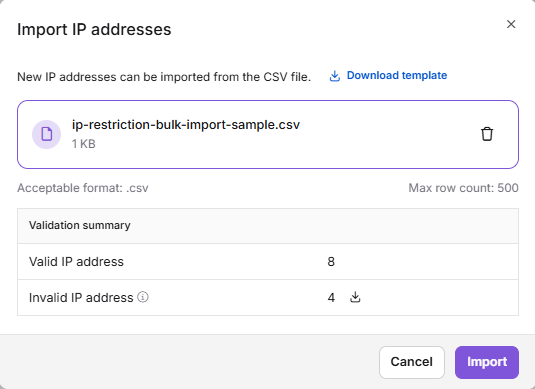
Review the Validation summary:
- Valid IP address: the number of rows that will be imported.
- Invalid IP address: the number of rows that will be skipped. To see which rows have a problem and why, click the Download () icon. The file you download lists the invalid rows with a Reason column.
-
Click Import.
Only the valid rows are added, and they're enabled by default. To add the rows that were skipped, fix them in the downloaded file and import it again.
The import runs in the background, so the new IP restrictions can take a few moments to appear in the list. Refresh the page if you don't see them.
If the import fails, nothing is added and an error message appears.
Each import is recorded in Team auditing.
To stop without importing, click Cancel or the close (X) icon. To use a different file, click the Delete () icon next to the file name.
Import limits
| Item | Detail |
|---|---|
| File format | A single .csv file, using the Document360 template |
| Maximum rows | 500 per file |
| Total IP restrictions | 1,000 per project, including the ones already added |
| Import button | Stays disabled until the file has at least one valid row |
If the file itself can't be used, nothing is checked and one of these messages appears:
| Message | What to do |
|---|---|
| Only a CSV file can be imported. | Save the file as .csv. |
| The column headers don't match the template. Download the template and try again. | Copy your rows into a fresh template. |
| The file has no IP addresses to import. | Add at least one row below the headers. |
| The file has more than 500 rows. Split it into smaller files and import each one. | Split the file into files of 500 rows or fewer. |
Why a row is invalid
IP addresses are checked with the same rules as adding a restriction manually. Spaces before and after values are removed. A row is skipped if it has any of the following:
- A missing Name or IP address range
- An IP address in an invalid format
- A range whose start IP address is higher than its end IP address
- A value other than
AlloworBlockin the Allow / Block column - The same IP address or range as an earlier row in the file
- An IP address or range that already exists in the project
Supported IPv6 formats
| Format | Status |
|---|---|
2001:0db8:85a3:0000:0000:8a2e:0370:7334 |
✅ Valid |
2001:0db8:85a3::8a2e:0370:7334 |
❌ Invalid |
2001:db8:85a3:0:0:8a2e:370:7334 |
✅ Valid |
Allow or block an IP address
For each IP restriction, you can choose one of two options:
- Allow: Grants access to the knowledge base site from the specified IP address or range.
- Block: Restricts access from the specified IP address or range.
NOTE
You can't add the same IP address or range more than once, even with a different type. If it already exists, an error appears below the IP address field.
Effect on search engine crawling and indexing
Enabling IP restriction affects more than just who can view your knowledge base site. The following behavior applies when IP restriction is active:
Article and site content
Readers or crawlers connecting from an IP address outside the allowed range cannot view the knowledge base site or its articles. They will see the IP restriction message instead.
Direct file and Drive links
Direct URLs to files uploaded in Drive are not restricted by this setting, since file access is controlled separately from site access. If your project is otherwise public, direct file links remain reachable even while IP restriction is enabled on the site.
Search engine crawling and indexing
If IP restriction is enabled for the project, the knowledge base site cannot be crawled or indexed by any search engine. This applies uniformly, regardless of your robots.txt configuration.
Sitemap
Your generated sitemap will still list article URLs, but search engines will not be able to access those URLs due to the IP restriction, so the listed pages will not be indexed.
If you need to temporarily make your knowledge base public for testing while limiting exposure, be aware that only the site access itself is affected by IP restriction; plan separately for any direct file links you do not want exposed.
Allow my IP address
To allow access from the device you're using:
- On the IP restriction page, click Add IP address.
- Click Add my IP address above the IP address field.
Your current IP address is filled in. - Enter a Name.
- Under Type, select Allow.
- Click Add.
Editing an IP restriction
-
Hover over the IP restriction and click the Edit () icon.
The Edit IP restriction dialog appears. -
Change the Name, IP address, or Type as needed.
-
Click Update.
A confirmation message appears.
You can edit an IP restriction whether it's enabled or disabled.
WARNING
Be very careful when performing the edit action. Once changed and saved, the IP restriction record will overwrite the existing data.
Disabling or enabling an IP restriction
Disable an IP restriction to pause it without deleting it. A disabled IP restriction stays in the list with the status Disabled and isn't enforced on the knowledge base site until you enable it again.
Disable or enable one IP restriction
-
Hover over the IP restriction and click the More () icon.
-
Select Disable IP address. If the IP restriction is already disabled, select Enable IP address.
The change saves immediately and a confirmation message appears.
Disable or enable several IP restrictions
-
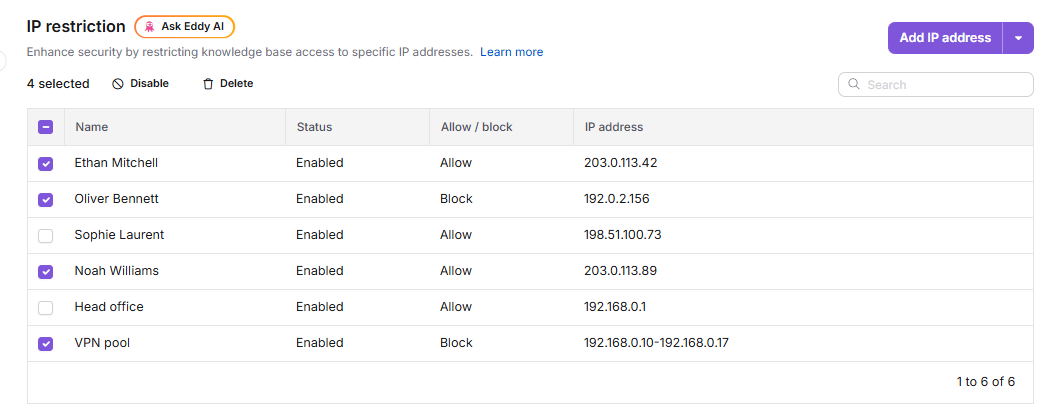
Select the checkbox next to each IP restriction.
-
Above the list, click Disable or Enable.
A confirmation message appears.
Disable appears only when all the selected IP restrictions are enabled, and Enable only when all of them are disabled. If your selection has both, only Delete is available.
Deleting an IP restriction
Delete one IP restriction
-
Hover over the IP restriction and click the More () icon.
-
Select Delete.
-
In the Confirm deletion dialog, click Delete.
A confirmation message appears.
Delete several IP restrictions
-
Select the checkbox next to each IP restriction.
-
Above the list, click Delete.
-
In the Confirm deletion dialog, click Delete.
A confirmation message appears.
NOTE
Deleting an IP restriction is permanent and cannot be undone.
FAQ
What is an IP address?
An IP address (Internet Protocol address) is a unique number that identifies a device on a network and allows it to send or receive data over the internet.
What is an IPv4 format?
An IPv4 address has four groups of numbers (0–255) separated by dots.
Example: 49.206.113.170
What is an IPv6 format?
An IPv6 address uses 128-bit formatting and includes hexadecimal values separated by colons.
Example:
FE38:DCE3:124C:C1A2:BA03:6745:EF1C:683DStart of range:
0000:0000:0000:0000:0000:0000:0000:0000End of range:
ffff:ffff:ffff:ffff:ffff:ffff:ffff:ffff
What is an IPv6 unicast address?
An IPv6 unicast address identifies a single, specific device on a network. When data is sent to this address, it goes directly to that one device, ensuring point-to-point communication. This is different from multicast (one-to-many) or anycast (one-to-nearest) addresses, which are used for broader or optimized delivery.
How many IP restrictions can I import at once?
You can import up to 500 rows from one CSV file. To add more, split them into several files and import each one. A project can have up to 1,000 IP restrictions in total.
Can I allow some IP addresses and block others in the same file?
Yes. Set Allow or Block on each row in the Allow / Block column.
What happens to IP addresses that already exist in my project?
They're marked as invalid and skipped. Existing IP restrictions aren't changed.
Are imported IP restrictions enabled right away?
Yes. Imported IP restrictions are enabled by default. To pause one, hover over it, click the More icon, and select Disable IP address. To pause several, select their checkboxes and click Disable.