Publishing an article makes it live on your knowledge base site and visible to readers. In Document360, publishing is managed through the Workflow button in the editor, the same button that handles workflow status transitions like Review 1 and Review 2. The button label always displays the article's current workflow status.
For more information on managing workflows, read the article on Managing workflow status.
When to publish an article
- New content has been drafted, reviewed, and configured and is ready to be made available to readers.
- An existing article has been edited and you want to push the updated version live.
- Multiple articles need to go live at once as part of a product launch or documentation update.
Publishing methods
Publish a single article
Publish from the article editor using the Workflow button. The Publish confirmation dialog lets you review AI-generated tags, GEO/SEO details, and related articles, and configure search visibility and preferences before going live.
Learn more →Publish multiple articles
Bulk publish from the All articles page by selecting multiple articles at once. Useful for coordinated releases or documentation updates.
Learn more →Publish a single article
- Navigate to the article in the knowledge base portal.
- Ensure the article has passed through all assigned workflow statuses, for example, Review 1 and Review 2.
- Click the Workflow dropdown button in the top-right corner of the editor.
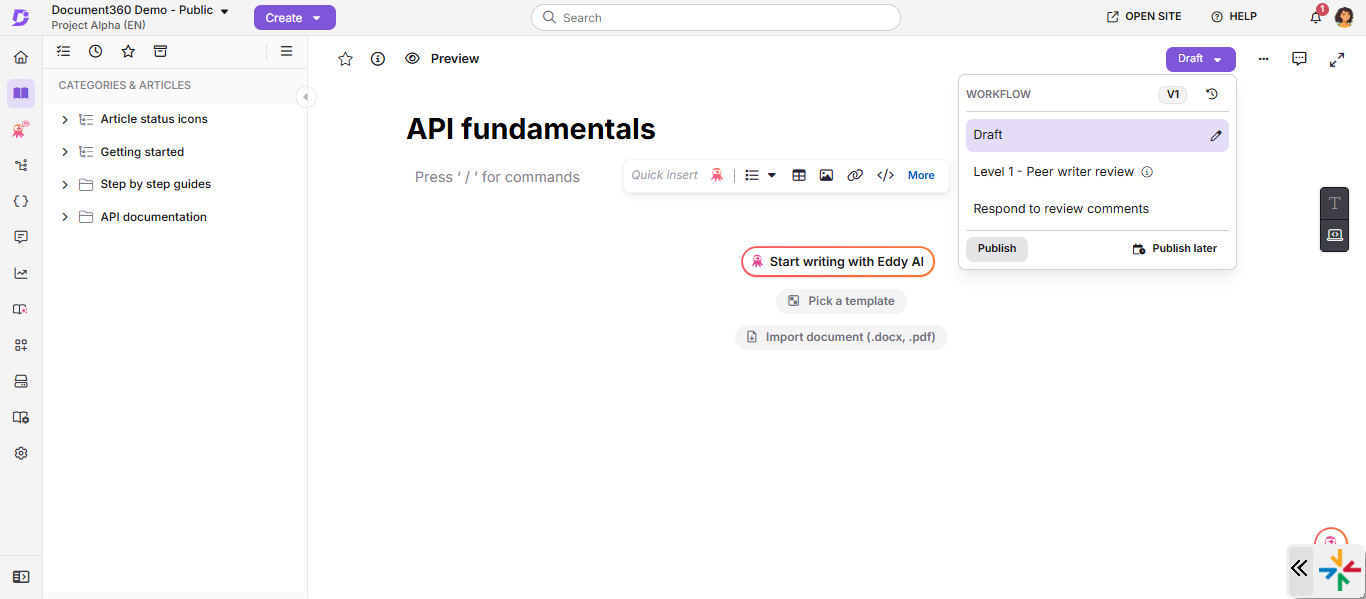
- Click Publish.
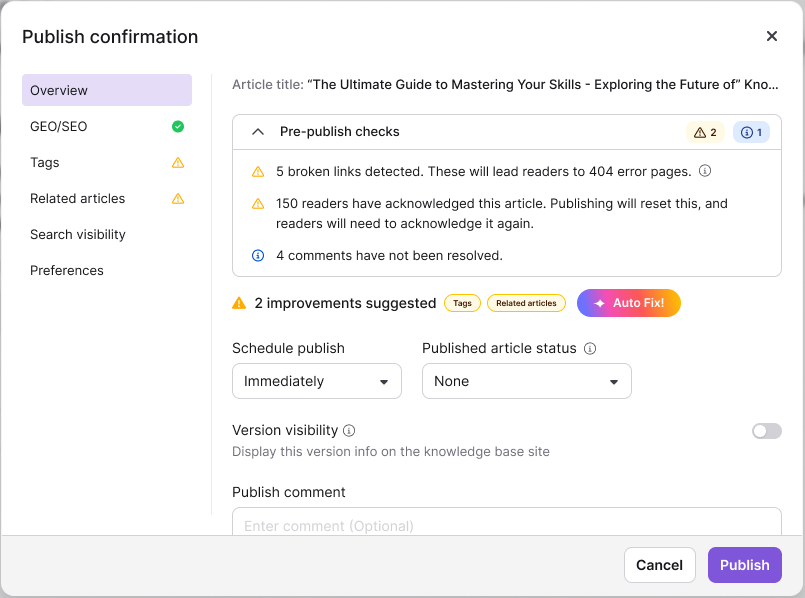
A Publish confirmation dialog appears, opening on the Overview panel.
-
Optionally, review and configure the panels before publishing. The Overview panel opens by default and shows the results of Document360's automatic scan of the article. Use the list on the left to move through the other panels - GEO/SEO, Tags, Related articles, Search visibility, and Preferences. Each panel is described in Publish confirmation dialog panel below.
-
Click Publish (or Schedule, if you set Schedule publish to Later).
- If the article is in a read-only workflow state, you cannot publish it directly. Move it to an editable workflow state first.
- You don't have to complete every panel in the publish dialog to publish. The panels and pre-publish warnings are there to help you optimize the article, but none of them block publishing.
Publishing during collaborative editing
- If two contributors select Publish at nearly the same time, the publishing actions are completed one after another. If the second contributor has made new changes, those changes are published as a new version. If there are no new changes, a new version is not created, but the second contributor is recorded as the publisher.
- When an article is published, everyone editing the article sees an Article published notification.
- After publishing, a new draft is created automatically. The contributor who published the article moves to the new draft, while other contributors remain where they were and can continue editing.
- If you don't have permission to publish the article, the Publish button is disabled. Hover over the button to see why you can’t publish.
Publish confirmation dialog panel
Alongside the Overview panel, the Publish confirmation dialog includes dedicated panels for GEO/SEO, tags, related articles, search visibility, and preferences. A panel's icon in the left-hand list turns into a green check once it has content (added manually or generated by Eddy AI); panels that still need attention show a warning icon.
Overview
This is the default panel shown when the Publish confirmation dialog opens.
Article scan
Document360 scans the article and displays its status at the top of the dialog in a collapsible Pre-publish checks section shown only when the scan finds something to flag. While the scan runs, a progress indicator (for example, 1/3 Scanning article content…) is shown. Once complete, Document360 reports whether it found any broken links, unresolved comments, or pending reader acknowledgments in the article.
Warnings such as broken links, unresolved comments, or pending reader acknowledgments are shown for visibility only and do not block publishing.
Fix with Eddy AI
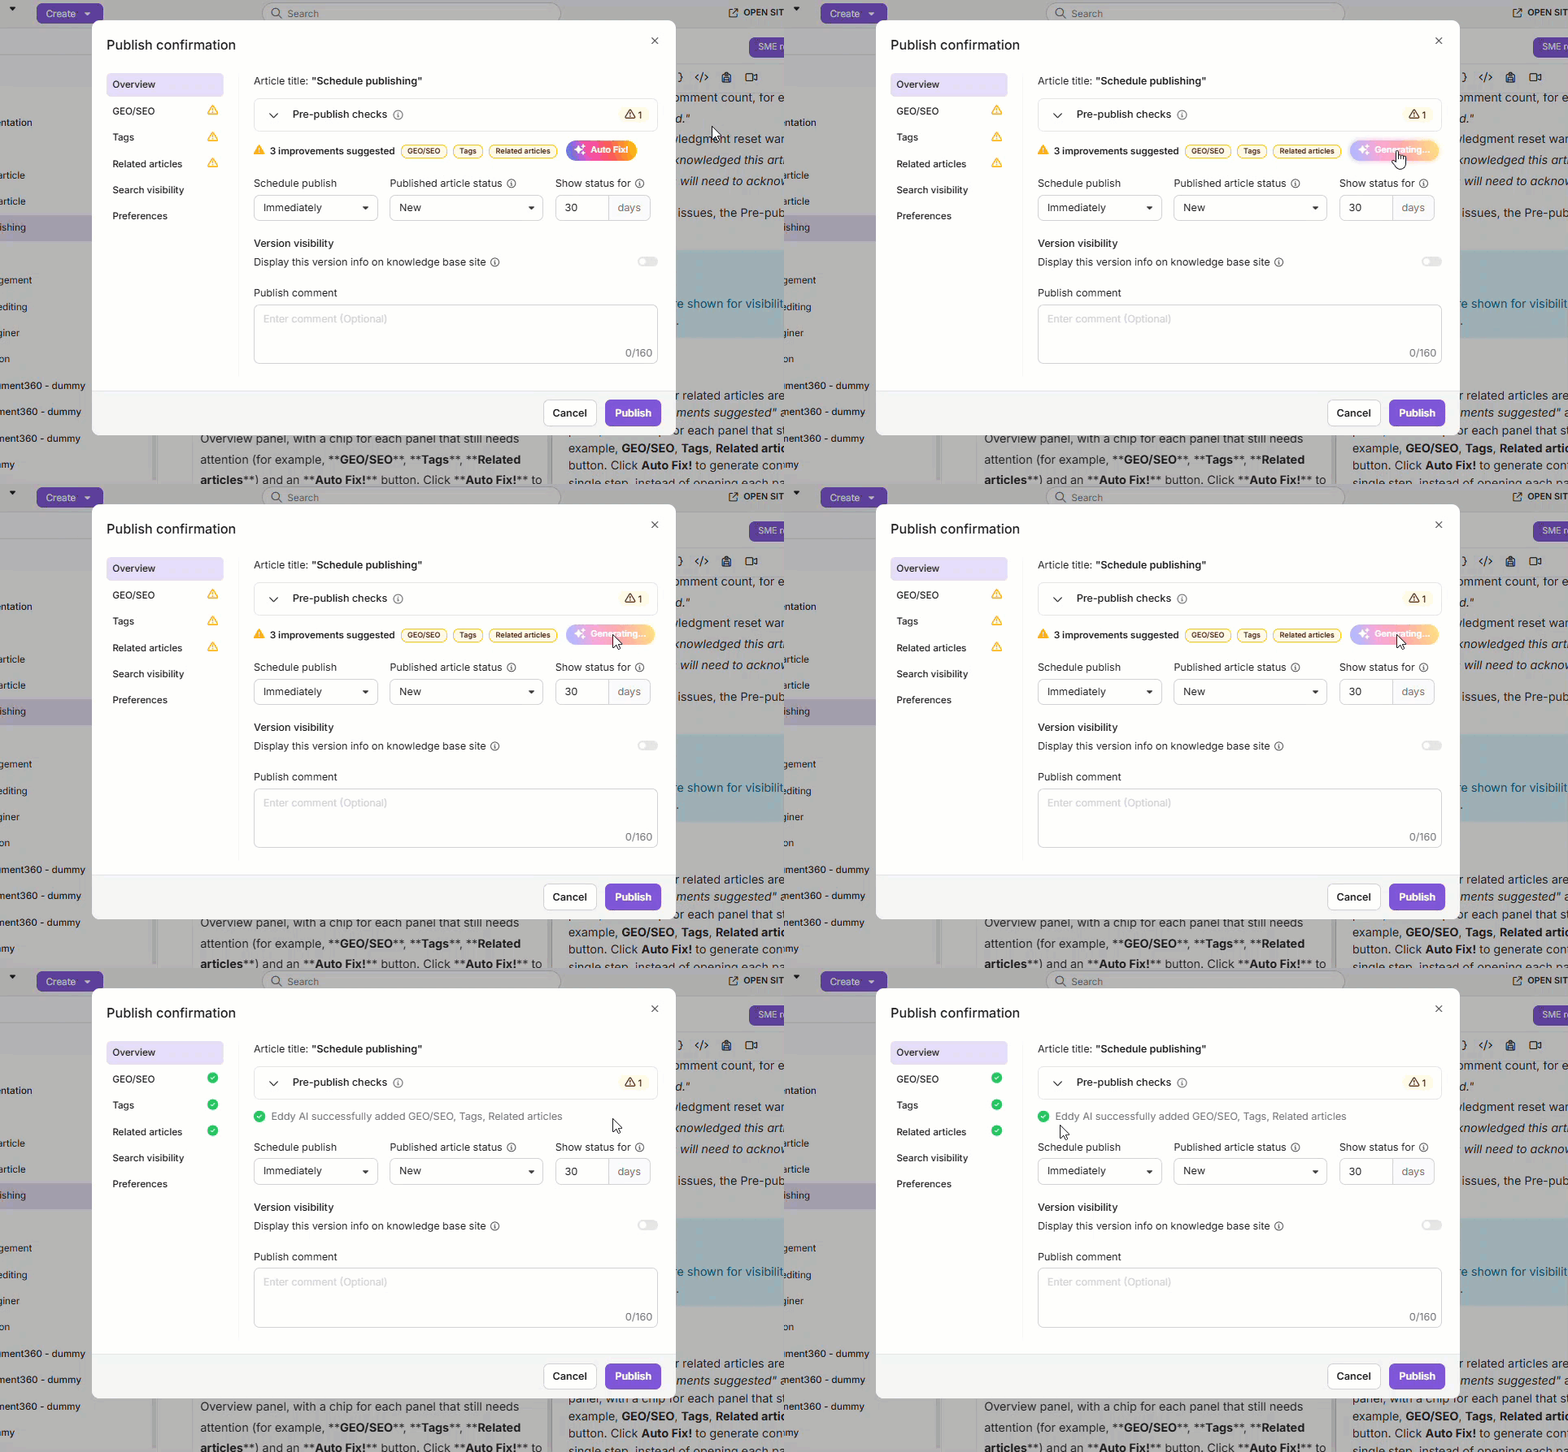
Whenever GEO/SEO, tags, or related articles are missing content, a Fix with Eddy AI card appears within the Overview panel, listing which panels still need attention. Click Auto Fix! to generate content for all of them in a single step, instead of opening each panel and clicking Generate individually. As each panel receives content, it drops off the Fix with Eddy AI list and its icon in the left-hand panel list turns into a green check. Once every panel has content, the Overview panel confirms that Eddy AI has added the missing details. If anything is still missing, it shows a warning instead, letting you know what still needs attention.
Schedule publish
Set to Immediately or Later. Selecting Later reveals inline Timezone, Date, and Time fields, and the confirmation button changes from Publish to Schedule. See Schedule publishing.
Published article status
Set to None, New, Updated, or a custom label configured for your project. Choosing anything other than None reveals a Show status for field where you set how many days the indicator remains visible on the knowledge base site. Set it to 0 to display it indefinitely.
You can automatically set status indicators for new and updated articles by enabling Auto set article status in Settings () > Knowledge base site > Article settings > Category manager.
Version visibility
Toggle on to display the version information on your knowledge base site. This reveals a Customize version number field, pre-filled with the current revision version (for example, V1), which you can edit to use a custom format such as V1.1, 2.0, or Release-3.
- Version numbers can contain letters, numbers, hyphens (-), and underscores (_), with a maximum length of 20 characters. Each version number must be unique within an article.
- Up to 10 versions can be visible on the knowledge base site at a time. When a new version is made visible beyond this limit, the oldest visible version is removed from the visible list but remains available in the article's revision history.
Publish comment
Add a comment in the Publish comment field (up to 160 characters). This comment is saved with the version and may appear in the version history on the knowledge base site and in PDF exports, depending on your project settings. After publishing, only you can edit this comment from Revision history. Other team members can view it but can't change it.
If the Make comment mandatory toggle is on for this workflow status, you must enter a comment before the article can be published. If the toggle is off, the comment field is optional.
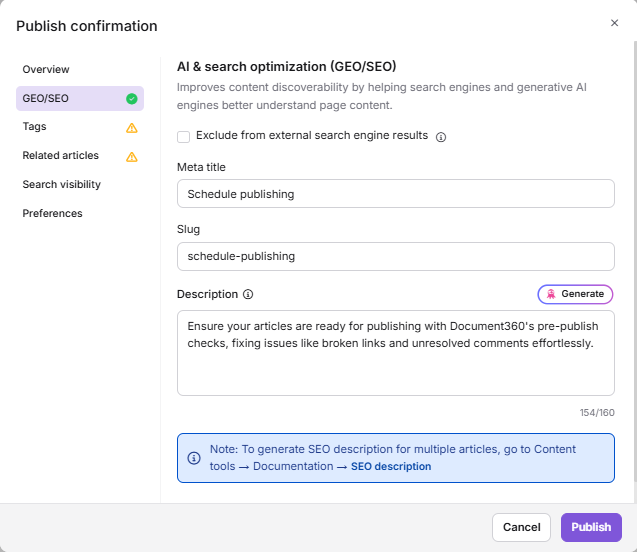
AI & search optimization (GEO/SEO)
This panel controls how your article appears in traditional search engines and AI-powered search and answer engines (Generative Engine Optimization, or GEO).
- Select Exclude from external search engine results if the article should not be indexed by public search engines such as Google.
- Meta title: Pre-filled with the article title. Edit it to customize how the title appears in search results.
- Slug: Pre-filled with a URL-friendly version of the article title. Edit it to customize the article's URL path.
- Description: Enter a custom GEO/SEO description manually, or click Generate to have Eddy AI create one based on the article content. Requires a minimum of 200 words.
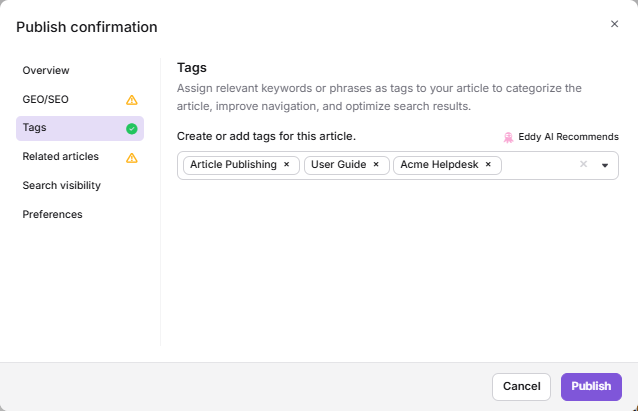
Tags
Tags improve article discoverability within your knowledge base search.
- Click Generate to have Eddy AI recommend tags based on the article content. Requires a minimum of 50 words. Suggested tags are labeled Eddy AI Recommends.
- Select from existing tags or enter them manually.
- Remove tags by clicking the x icon next to them.
Related articles
Related articles surface relevant content at the end of an article to keep readers engaged.
- Turn on Auto relate this article to all related articles to create a two-way link automatically: if this article is added as a related article on another article, that other article automatically appears in this article's related articles list too, and vice versa. This removes the need to add the relationship from both sides manually.
- Click Generate for suggestions from your knowledge base. Requires a minimum of 200 words.
- Manually search and add related articles using the search field. Added articles appear under Added articles, where you can drag to reorder them or remove one with the x icon.
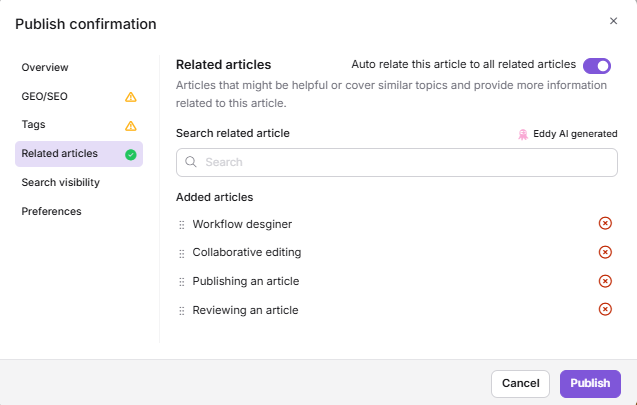
Auto relate this article to all related articles (bidirectional linking between specific articles) is a different setting from the project-wide Dynamic related article recommendation setting, where Eddy AI suggests related articles to readers on the knowledge base site in real time. The two can be used independently or together.
Search visibility
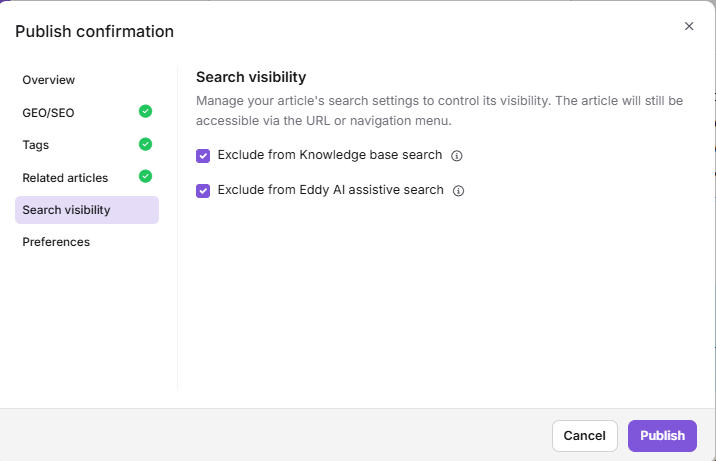
This panel manages the article's search settings. The article remains accessible via its direct URL or the navigation menu even when excluded from search.
- Exclude from Knowledge base search: Prevents the article from appearing in on-site knowledge base search results.
- Exclude from Eddy AI assistive search: Prevents Eddy AI from surfacing the article in AI-assisted search results.
Preferences
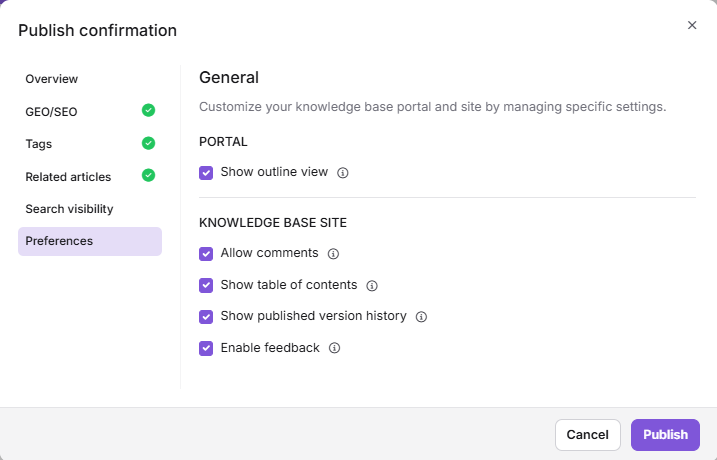
This panel lets you manage portal and knowledge base site settings for the article.
- Portal
- Show outline view: Display the outline view in the editor to visualize the article structure for better organization and navigation while drafting.
- Knowledge base site
- Allow comments: Allow reader engagement by enabling readers to comment on the article via Disqus.
- Show table of contents: Display a table of contents to help readers navigate to key sections within the article.
- Show published version history: Display the article's version history on the knowledge base site so readers can view previously published versions.
- Enable feedback: Allow reader feedback on the article to improve article quality, foster engagement, and prioritize user needs.
These preferences are also available outside the Publish confirmation dialog. In the article editor, click the More () icon and select More article options, then open the Preferences tab. For a full breakdown of each option, see Preferences.
Publish multiple articles
- Navigate to Documentation () in the left navigation bar.
- Click All articles () in the left navigation pane.
- Select the checkboxes next to the articles you want to publish.
- Click Publish () from the bulk actions bar.
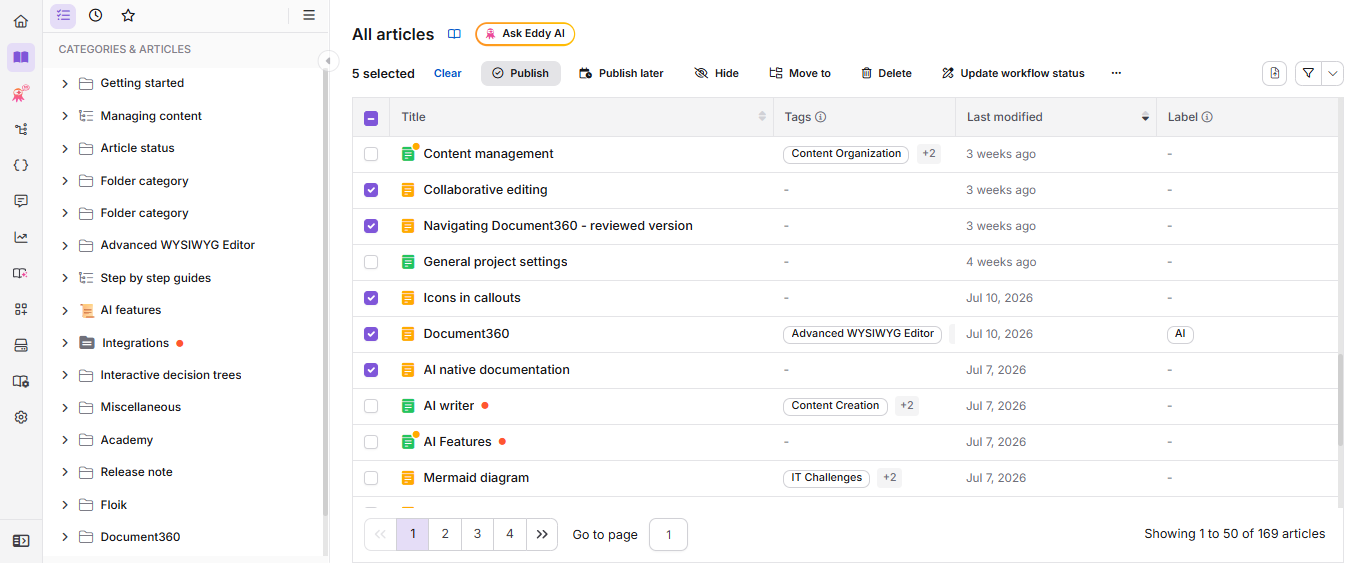
The Publish button appears only when all selected articles are unpublished. If even one selected article is already published, the button will not be displayed. Use the Filter option to narrow the list to unpublished articles before selecting. You can also bulk publish articles within specific categories from a Folder or Index category page.
What happens when you publish an article
- The article becomes visible on the knowledge base site to readers.
- The article's status changes from Draft to Published in the portal.
- If you are republishing an edited article, the updated version replaces the previously published version immediately.
- Any tags, GEO/SEO details, related articles, search visibility, and preference settings configured in the Publish confirmation dialog are saved with the version.
- Published articles are indexed by search engines unless excluded in the GEO/SEO or Search visibility panels.
Unarchiving a previously published article does not require republishing. The article returns with its last known status, and a Published article becomes available on the knowledge base site again straight away. See Archive articles.
Best practices
- Complete workflow reviews before publishing. If your project uses custom workflow statuses, ensure the article has passed through all required review stages before publishing.
- Use Auto Fix before going live. Click Auto Fix! in the Publish confirmation dialog to generate tags, a GEO/SEO description, and related articles in one step rather than adding them after the fact.
- Use status indicators for launches. Apply the New or Updated indicator when publishing significant content so readers can quickly spot what has changed.
- Filter before bulk publishing. On the All articles page, use the Status filter to isolate Draft or New articles before selecting them for bulk publish. This avoids accidentally including already-published articles, which will cause the Publish button to disappear.
FAQ
Where is the Publish button in Document360?
The Publish option is part of the Workflow button in the top-right corner of the editor. Click the Workflow button and select Publish from the dropdown.
Why am I unable to publish an article?
There are a few common reasons the Publish option may be unavailable. You may not have the required permissions under Roles and content access settings. If you copied a published version to the draft using Copy to draft, the Publish button will remain inactive until you make changes to the draft. On the All articles page, if any selected article is already published, the Publish button will not appear — deselect published articles and try again.
I published an article but it is not appearing on the knowledge base site. What should I do?
Check the following: ensure the article is not set to Hidden in the portal; verify no access restrictions have been applied to the article; check for any redirect rules associated with the article; and confirm the workspace is set to Public. If the article is visible on the site but not appearing in search results, check the Search visibility panel in the Publish confirmation dialog, or contact Document360 support to request a search re-indexing.
Why is the Generate button inactive when adding tags, a GEO/SEO description, or related articles?
Eddy AI tag suggestions require a minimum article length of 50 words. GEO/SEO description and related article suggestions require a minimum of 200 words. Ensure the article meets the word count threshold before using Generate, or the Auto Fix! option, for these panels.
What's the difference between hiding an article and excluding it from search?
Hiding an article removes it entirely from the knowledge base site, including navigation and search. Excluding an article using the Search visibility panel's Exclude from Knowledge base search or Exclude from Eddy AI assistive search options only removes it from the respective search results — the article remains published and accessible via its direct URL or the navigation menu.
If an article is hidden, will it be indexed by search engines?
No. Hidden articles are not indexed by search engines from your Knowledge base site and will not appear in external search results.