The All articles page lets you filter your entire article list by status, contributor, category, date, tags, and more. Filters help you quickly locate specific articles without scrolling through the full list, and you can save frequently used filter combinations as custom filters for reuse.
When to filter articles
- Filter by status to find all Draft, Unpublished, or Deprecated articles across your workspace during a content audit.
- Filter by Review reminder to find Stale articles that need attention.
- Filter by Contributor to see all articles associated with a specific team member.
- Apply filters to narrow down the list before performing bulk actions such as Publish, Hide, or Delete.
Apply a filter
- Navigate to Documentation () in the left navigation bar.
- Click All articles () in the left navigation pane.
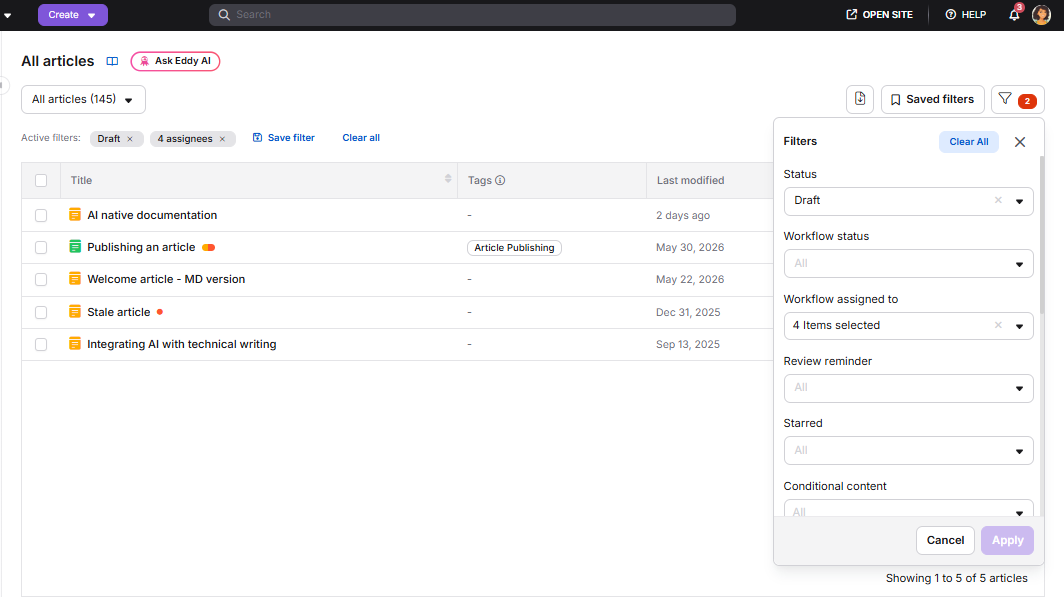
- Use the All articles dropdown at the top to filter by status, or click the Filter () button to access all filter options.
- Select the filters you want to apply and click Apply.
Applied filters appear as tags at the top of the article list so you can see at a glance what is active.
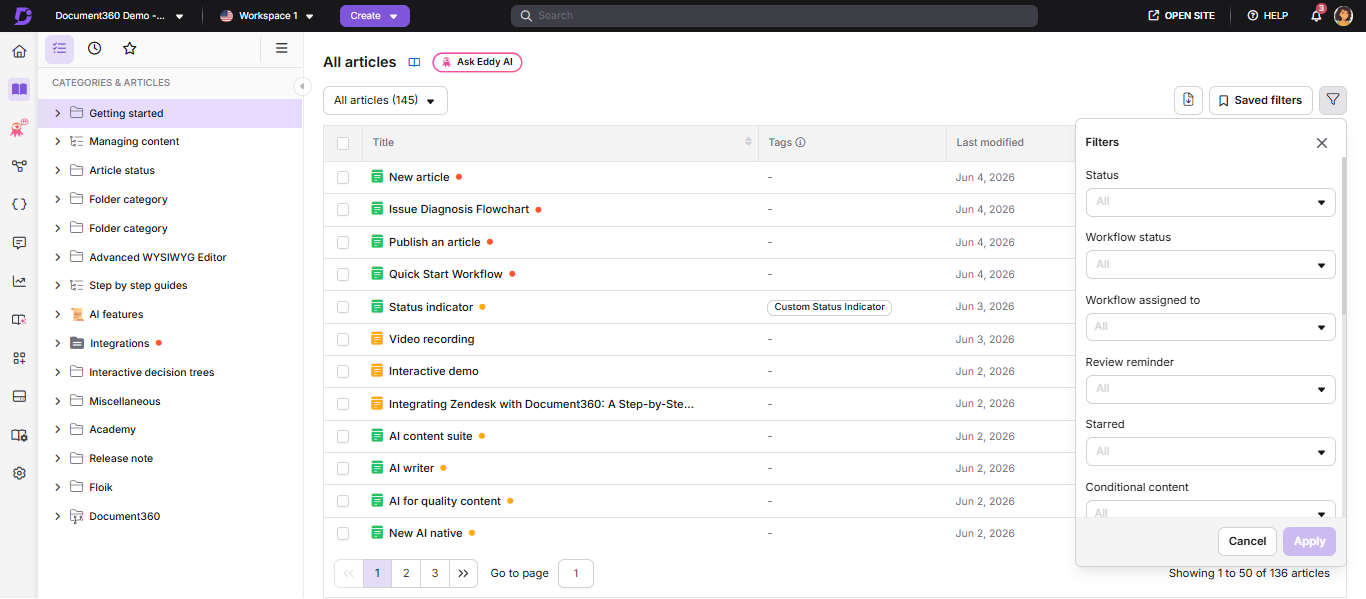
Available filters
Status
Filters articles by their current editorial state.
| Option | What it shows |
|---|---|
| All | All articles regardless of status. |
| Published | Articles with Published status. |
| Unpublished | Articles with Unpublished status. |
| Scheduled | Articles scheduled for publishing. |
| Draft | Articles with Draft status. |
| Broken links | Articles that have broken links based on the most recent link validation. |
| Deprecated | Articles marked as Deprecated on the knowledge base site. |
To find published articles within a specific time period, apply the Published Status filter and Date filters. However, the results will include both newly published and updated & republished articles. To differentiate between newly published and republished, hover over an article and click the info icon to view its Created by date and Status (published date).
Workflow status
Filters articles by their current workflow stage. The available options reflect the workflow statuses configured in your project's Workflow Designer. Select All to display articles regardless of workflow status.
Workflow assigned to
Filters articles by the user or user group they are currently assigned to in the workflow.
| Option | What it shows |
|---|---|
| All | All articles regardless of assignment. |
| Unassigned | Articles with no assigned users or user groups. |
| All users | Articles assigned to any user in the project. |
| Specific users | Articles assigned to one or more selected users. |
Review reminder
Filters articles by their review reminder status.
| Option | What it shows |
|---|---|
| All | All articles regardless of review status. |
| Fresh | Articles that have not reached their review reminder date. |
| Stale | Articles that have reached their review reminder date and require review. |
The Review reminder filter is available only on Private projects.
Starred
Filters articles by whether they have been starred.
| Option | What it shows |
|---|---|
| All | All articles regardless of starred status. |
| Starred | Articles that have been starred. |
| Not starred | Articles that have not been starred. |
Conditional content
Filters articles by the type of conditional content parameters used within them. Select one or more rule types to narrow the list to articles that contain at least one matching conditional content block.
| Option | What it shows |
|---|---|
| Country | Articles containing a conditional content block with a Country parameter. |
| Date | Articles containing a conditional content block with a Date parameter. |
| Device type | Articles containing a conditional content block with a Device type parameter. |
| Workspace | Articles containing a conditional content block with a Workspace parameter. |
| Reader groups | Articles containing a conditional content block with a Reader groups parameter. |
| IP address | Articles containing a conditional content block with an IP address parameter. |
Visibility
Filters articles by their visibility on the knowledge base site.
| Option | What it shows |
|---|---|
| All | All articles regardless of visibility. |
| Visible | All articles except hidden ones. |
| Hidden | Articles marked as hidden, shown with a strikethrough in the portal. |
Read receipt
Filters articles by whether Read receipt is enabled.
| Option | What it shows |
|---|---|
| All | All articles regardless of read receipt status. |
| Enabled | Articles with Read receipt enabled. |
| Disabled | Articles with Read receipt disabled. |
The Read receipt feature is available only for Private and Mixed projects. Learn more →
Contributor
Search for and select one or more contributors to filter articles associated with them. The default selection shows articles for all contributors.
Category
Filter articles by category or subcategory. Select one or more categories from the list. Expand a root-level category to access subcategories.
Selecting a category shows only articles directly under that category. To include articles from a subcategory, select the subcategory manually.
Date
Filter articles by their last updated date. Applies to articles in Published, New, Draft, and Deprecated status.
| Option | Range |
|---|---|
| All | No date restriction. |
| 7 days | Last 7 days. |
| 30 days | Last 30 days. |
| 3 months | Last 3 months. |
| 1 year | Last 1 year. |
| Custom date | Specify a custom date range. |
Tags
Search for and select one or more tags to filter articles associated with them. The default selection includes All tags and None (articles with no tags).
Labels
Search for and select one or more labels to filter articles by internal label. The default selection includes All labels and None (articles with no labels).
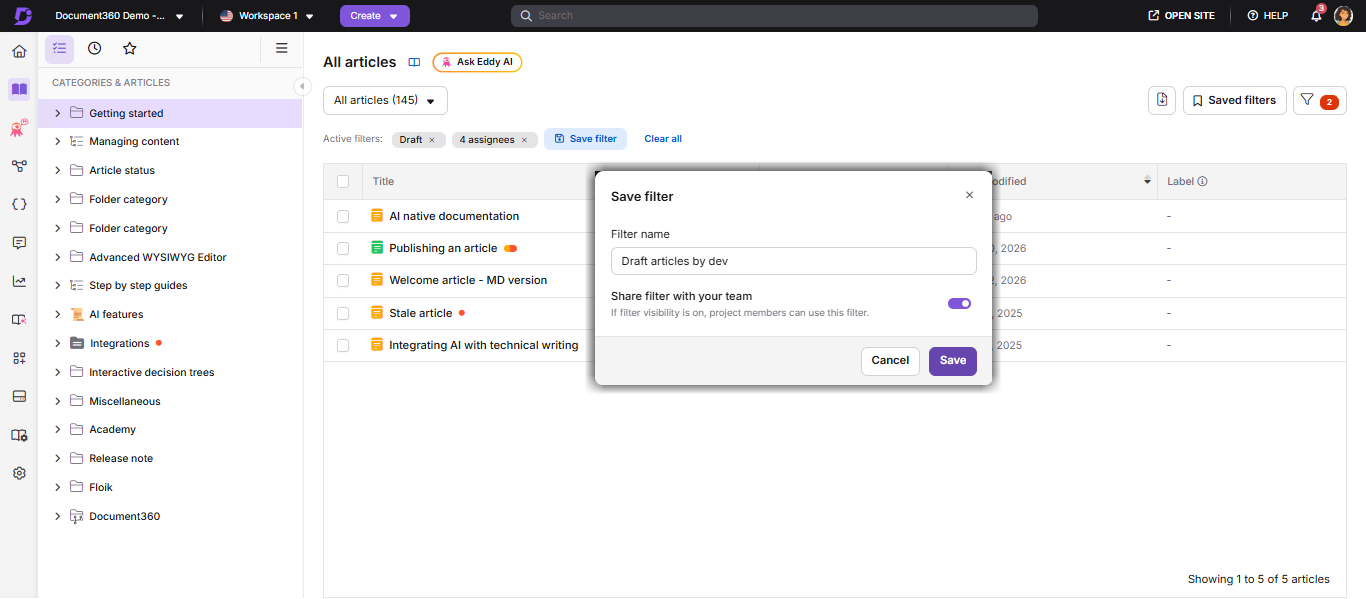
Save a custom filter
You can save a combination of filters as a custom filter to reuse later. Saved custom filters are accessible via the expand arrow to the right of the Filter button.
- Navigate to Documentation () > All articles ().
- Apply the filters you want to save and click Apply.
- Click Save filter.
- In the Save filter panel, enter a Filter name of up to 30 characters.
- Enable the Share filter with team members toggle if you want the filter to be available to other users. If left off, the filter is visible only to you.
- Click Save.
Delete a custom filter
- Click the expand arrow () next to the Filter button.
- Hover over the custom filter and click the Delete () icon.
- Click Yes in the confirmation prompt.
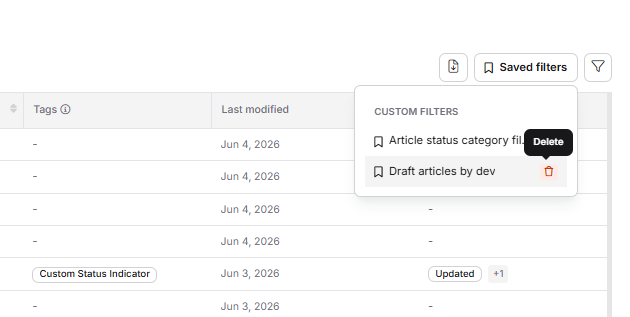
Custom filters cannot be edited after saving. Delete and recreate the filter if changes are needed. Only the user who created a custom filter can delete it, even if it has been shared with the team.
Clear filters
To remove applied filters:
- Click Clear all at the top of the panel to remove all active filters at once.
- Click Clear All inside the Filter dropdown to reset filter selections.
- Click the X next to an individual filter tag above the article list to remove that filter only.
Best practices
- Filter before bulk actions. Always apply the relevant filters before selecting articles for bulk publish, hide, delete, or move to avoid acting on the wrong set of articles.
- Save filters for recurring tasks. If you regularly audit articles by a specific contributor, status, or date range, save those combinations as custom filters so you do not have to rebuild them each time.
- Share filters with your team. Use the Share filter toggle when saving filters that your whole team will use, for example, a filter for all Stale articles assigned to a specific workflow stage.
- Combine Date and Status filters. Using the Date filter together with Draft or New status is a quick way to find articles that were created recently but not yet published.
- Use the Conditional content filter to audit articles using specific rule types. If you are reviewing or updating conditional content rules across your knowledge base, this filter helps you quickly identify which articles are affected.
FAQ
Can I save a custom filter for future use?
Yes. After applying your filters, click Save filter, give it a name, and optionally share it with your team. Saved filters are accessible via the expand arrow next to the Filter button.
Can I edit a saved custom filter?
No. Custom filters cannot be edited after saving. To update a custom filter, delete it and create a new one with the updated settings.
Can other users delete a shared custom filter?
No. Only the user who created the custom filter can delete it, even if it has been shared with the team.
Why is the Read receipt filter not available in my project?
The Read receipt feature and its corresponding filter are available only for Private and Mixed projects in KB site 2.0.