The Advanced WYSIWYG editor gives you a complete set of building blocks for creating structured, engaging content — without writing a single line of code. Whether you're organizing a long article, displaying code for developers, or embedding a video walkthrough, editor elements let you control exactly how your content looks and behaves for every reader.
Use this section to understand the foundational concepts of the editor, then navigate to the specific element articles you need.
Content blocks
In the Advanced WYSIWYG editor, a block is a section of content that ends with a line break. The next piece of content that starts on a new line is considered a new block. Content blocks are a foundational content management capability of the editor. They give you control over how your article is organized and who can see each part of it.
Content blocks support the following capabilities:
-
Movable content blocks let you rearrange sections of your article by clicking arrows or dragging and dropping, no copy-pasting required. Use movable blocks when you need to restructure content after a product update, or to ensure a warning or note appears immediately before the step it applies to.
-
Conditional content blocks let you show or hide specific sections based on conditions such as country, device type, date, and workspace. In private projects and private content, you can also use reader group and IP address conditions.
Content inside a conditional block is not indexed by Eddy AI or general search. Avoid placing information there that readers might need to find through search.
Together, these two block types help you keep a single article relevant to multiple audiences and easier to maintain over time, without duplicating content across separate articles.
Movable content blocks
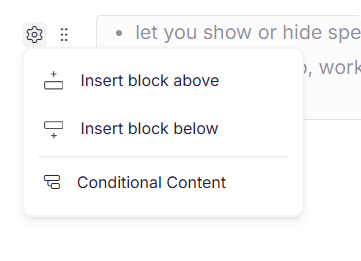
Hover over any block in the Advanced WYSIWYG editor to reveal two icons on the left: the Settings icon and the ellipsis icon.
.png)
To move a block using arrows:
- Navigate to the desired article in the Advanced WYSIWYG editor.
- Hover over the block you want to move.
- Click the ellipsis icon on the left side of the block.
- Use the controls that appear:
- Up / Down arrows: move the block one position at a time.
- Delete icon: removes the block; the next block moves up automatically.
To drag a block to a specific position:
Hold the ellipsis icon of the block and drag it to your desired location within the editor.
To insert a new block:
Hover over an existing block, click the Settings icon, then select Insert block above or Insert block below.
- Dividers cannot be moved using movable blocks.
- The entire FAQ section is treated as a single block. Individual FAQs within an Eddy AI-generated FAQ section cannot be moved independently.
- To undo a deletion, press
Ctrl + Z.
Conditional content blocks
Conditional content blocks allow you to control the visibility of specific sections based on predefined conditions.
Content inside a conditional block is not indexed by Eddy AI or general search.
To set up a conditional content block:
- Navigate to the desired article in the Advanced WYSIWYG editor.
- Hover over the content block and click the Settings icon on the left.
- Select Conditional Content. The Conditional content panel appears.
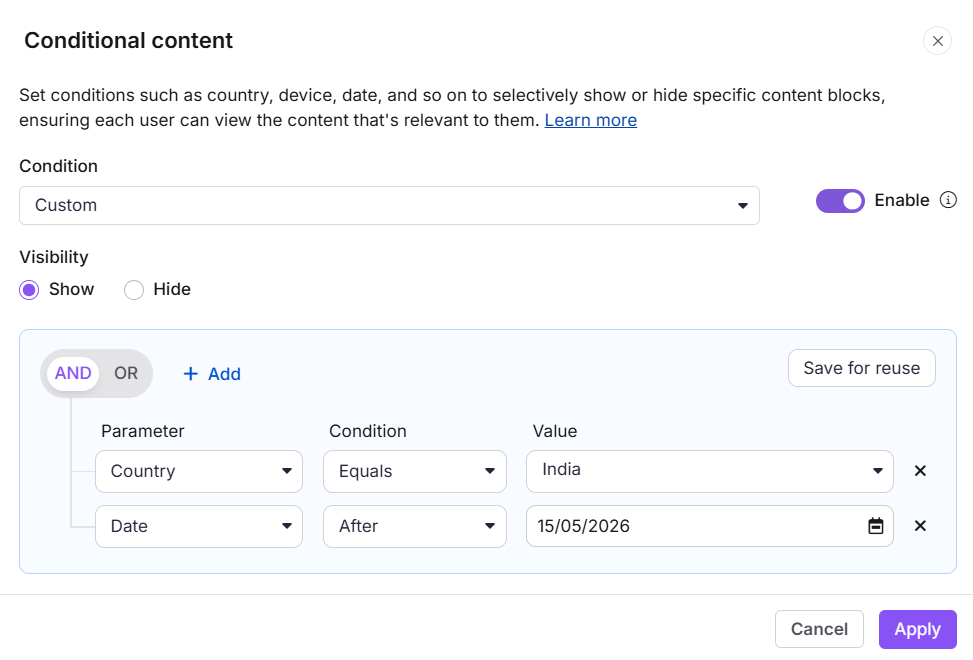
- Turn on the Enable toggle to activate the conditional content.
- In the Visibility section, choose:
- Show — displays the block only when the condition is met.
- Hide — hides the block when the condition is met.
- Select the operator:
- AND — all conditions must be met.
- OR — any single condition triggers the visibility rule.
- Click + Add to create a new condition.
- In the Parameter dropdown, select the desired parameter and set the condition and value. You can filter articles by conditional content rule type from the All Articles page.
| Parameter | Conditions | Example | Availability |
|---|---|---|---|
| Country | Equals, Not equals, In, Not in | Equals + India → only readers from India see the content. Not in + USA → all countries except USA see the content. | All projects |
| Date | After, Before, Between | Before + Oct 1, 2024 → only readers accessing before that date see the content. Between + Sep 1–Oct 1, 2024 → content visible during that period only. | All projects |
| Device | Equals, Not equals, In, Not in | Equals + Mobile → only mobile users see the content. Not in + Desktop → content hidden from desktop users. | All projects |
| Workspace | Equals, Not equals, In, Not in | Equals + Marketing workspace → only that workspace's content is visible. Not in + Sales workspace → content hidden from the Sales workspace. | All projects |
| Reader groups | Equals, Not equals, In, Not in | Equals + Admins → only the Admin group sees the content. Not in + Editors → hidden from editors, visible to other groups. | Private projects and private content only |
| IP address | Equals, Not equals, Range, In, Not in | Equals + 192.168.1.1 → only that IP sees the content. Range + 192.168.1.1–192.168.1.100 → visible to users within that IP range. | Private projects and private content only |
-
Reader groups and IP address are only available in private projects and private content. They do not appear in public projects, workspaces, categories, or articles. In mixed projects, these parameters are available only in the private sections.
-
The Workspace parameter appears only if you have multiple workspaces.
-
For In or Not in conditions, you can select multiple values from the dropdown.
-
If you switch content from private to public, any Reader group or IP address conditions on that content are automatically removed. This cannot be undone, and the conditions will not be restored if you switch back to private.
- To reuse the condition across articles, click Save for reuse, enter a name, and save it.
- Click Save to apply the condition to the block, or Save as to save it for future use.
- To remove a condition, click Remove Condition within the selected block, then click Apply.
Copying conditional content
- Conditional blocks are mapped to the article ID where they were created. If you copy and paste a conditional block into a different article, the condition is removed on refresh; the IDs no longer match the new article.
- Never rely on copy-paste to move conditional blocks between articles. The conditional formatting will be stripped after refresh, navigation, or publish.
- If you copy a conditional block from a private article into a public article, any Reader group or IP address conditions are removed automatically.
Recommended approach when reusing conditional content across articles:
- Copy the content without relying on the existing conditional formatting.
- Reapply the conditional content block in the new article.
- Alternatively, use Save for reuse to quickly apply the same condition across articles without recreating it each time.
Editor elements
Within each content block, you can use a wide range of editor elements to present your content clearly — from text and formatting controls to tables, callouts, media, code blocks, and more. Explore the articles below to learn about each element and when to use it.