Connect Active Directory Federation Services (ADFS) to Document360 with SAML so your users and readers sign in to Document360 with their existing Active Directory credentials instead of a separate password. You create a relying party trust in ADFS, add claim rules, and then complete the SSO configuration in Document360. ADFS has no built-in SCIM support, so automatic provisioning needs a third-party tool or a custom integration.
Only users with the Owner or Admin project role can configure SSO in Document360.
When to use ADFS with SAML SSO
Use this setup when:
- Your organization manages identities in an on-premises Active Directory and uses ADFS for federation.
- You want users to sign in to the knowledge base portal and readers to sign in to the knowledge base site with the same Active Directory account.
- You want people to open Document360 directly from ADFS (IdP-initiated sign-in).
- You manage several Document360 projects and want a new project to inherit SCIM settings from an SSO configuration in a parent project.
| Capability | Supported |
|---|---|
| User (knowledge base portal) authentication | Yes |
| Reader (knowledge base site) authentication | Yes |
| IdP-initiated sign-in | Yes |
| SCIM provisioning | Yes (via third-party tools or custom integrations only) |
| SSO configuration inheritance (parent-child projects) | Yes |
Before you begin
- You need the Owner or Admin role in your Document360 project.
- You need administrator access to your ADFS server.
- Keep Document360 open in your browser and the ADFS Management console open on your ADFS server. You switch between them during setup.
- When you export the X.509 certificate from ADFS, you must select Base-64 encoded (.CER). Document360 does not accept the default DER encoded format.
- If you plan to use SCIM, set up your third-party provisioning tool or custom integration first, and have a secure place ready, such as a password manager, to store the SCIM secret tokens.
How to set up SAML SSO with ADFS
Step 1: Start the SSO configuration in Document360
- Go to Settings () > Users & Permissions > Enterprise SSO.
- Select Create SSO.
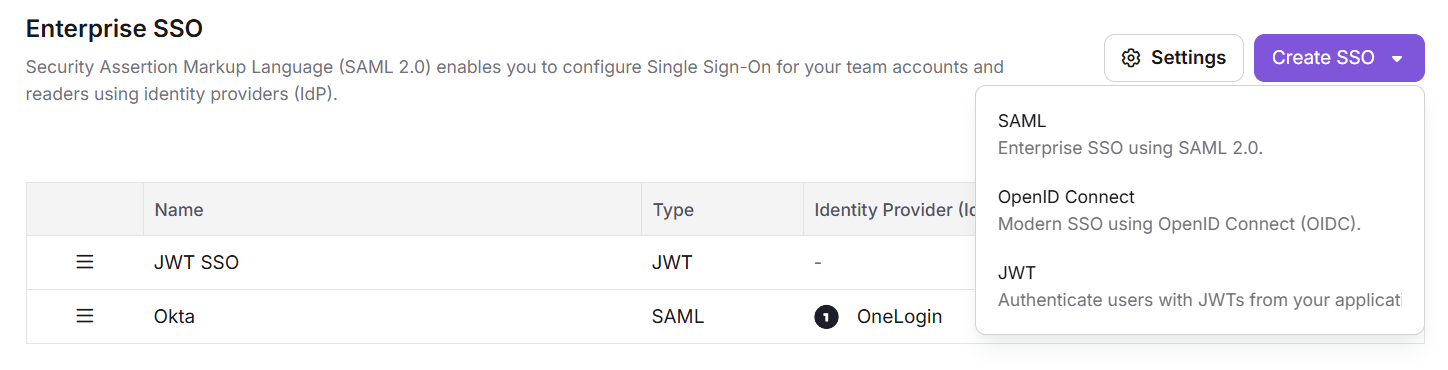
- Select SAML (Enterprise SSO using SAML 2.0).
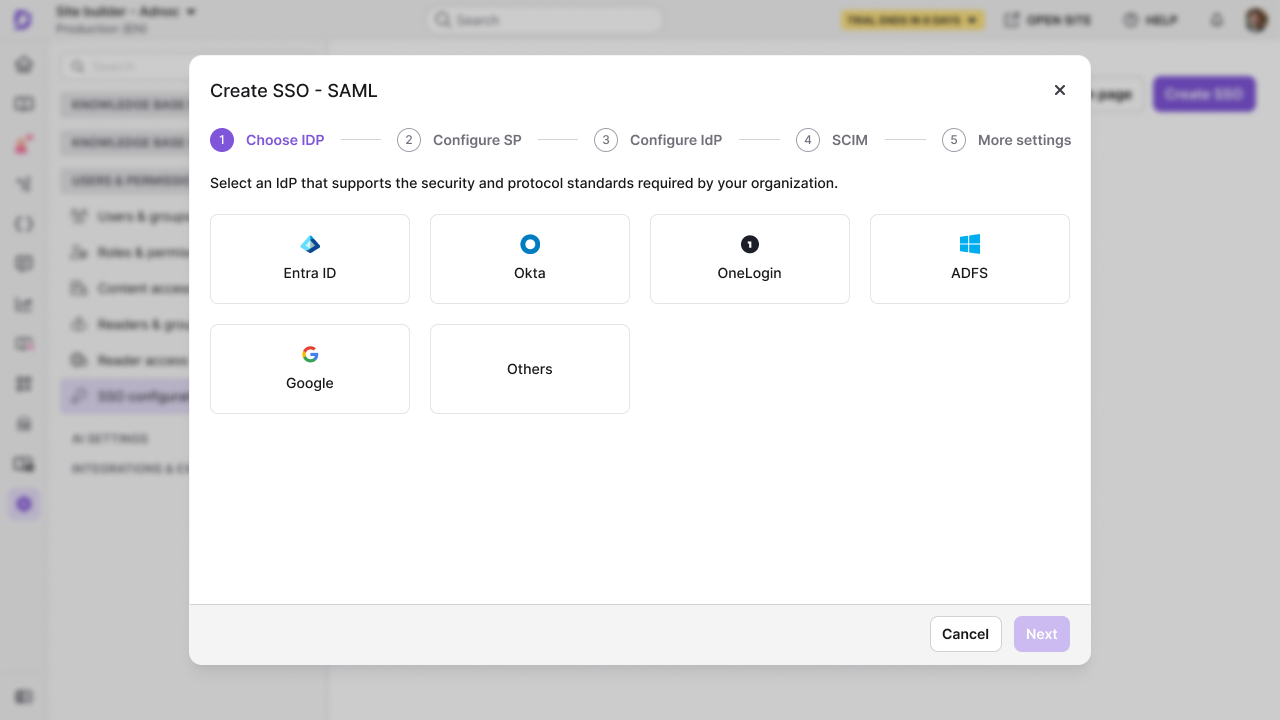
- Select ADFS as your identity provider.
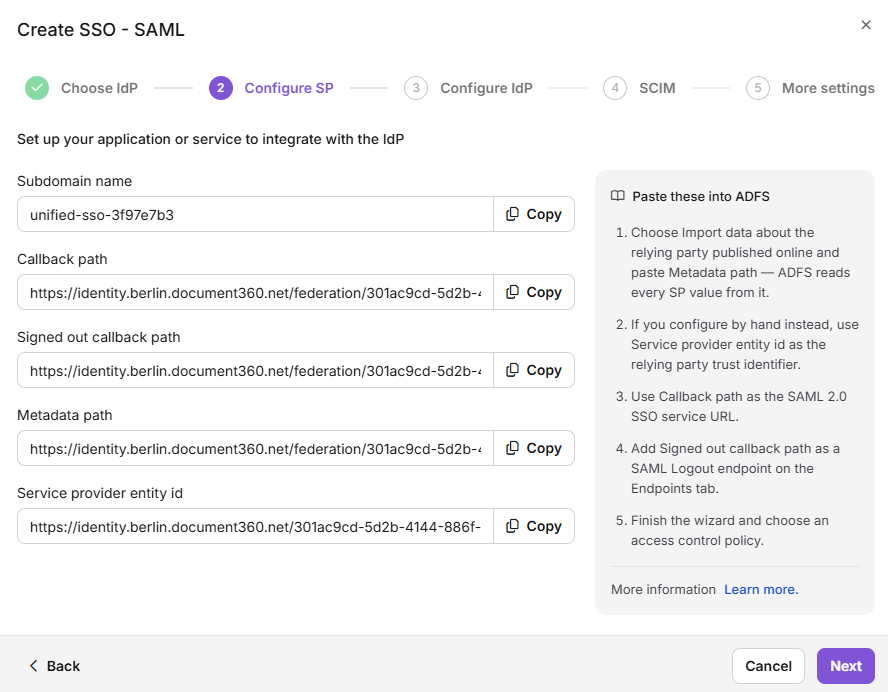
The Configure SP step opens and shows the Document360 values you enter in ADFS: Service provider entity ID, Callback path, Signed out callback path, Subdomain name, and Metadata path. Keep this tab open.
Step 2: Create a relying party trust in ADFS
-
Log in to the ADFS Management console on your ADFS server.
-
Go to Relying Party Trusts.
-
Right-click Relying Party Trusts and select Add Relying Party Trust.
-
In the Add Relying Party Trust Wizard, choose Claims aware and click Start.
-
Select Enter data about the relying party manually and click Next.
-
Enter a display name, such as Document360 SAML SSO, and click Next.
-
In the Configure Certificate step, click Next. Skip this step unless you use a token encryption certificate.
-
Under Configure URL, select Enable support for the SAML 2.0 Web SSO protocol.
-
In the Configure URL and Identifiers steps, enter the values from the Document360 Configure SP step:
ADFS Document360 Relying Party Identifier Service provider entity ID Sign-On URL Callback path Sign-Out URL Signed out callback path Relying Party Trust Identifier Subdomain name Metadata URL Metadata path -
Click Next and complete the remaining steps in the wizard, such as setting up multi-factor authentication if your organization requires it and permitting all users to access the application.
-
Review your settings and click Next to add the relying party trust.
-
On the final screen, select Open the Edit Claim Rules dialog and click Close.
The relying party trust appears under Relying Party Trusts, and the Edit Claim Rules dialog opens.
Step 3: Add claim rules in ADFS
Claim rules tell ADFS which user details to send to Document360.
- In the Edit Claim Rules dialog, click Add Rule.
- Select Send LDAP Attributes as Claims as the rule template and click Next.
- Enter a name for the claim rule, such as Send LDAP Attributes.
- Configure the rule:
- Attribute Store: Select Active Directory.
- Mapping:
- LDAP Attribute: User-Principal-Name | Outgoing Claim Type: Name ID
- LDAP Attribute: E-Mail-Addresses | Outgoing Claim Type: Email-Addresses
- LDAP Attribute: Display-Name | Outgoing Claim Type: Name
- Click Finish to add the rule.
- Click Apply to save your changes and close the dialog.
Step 4: Enter the ADFS details in Document360
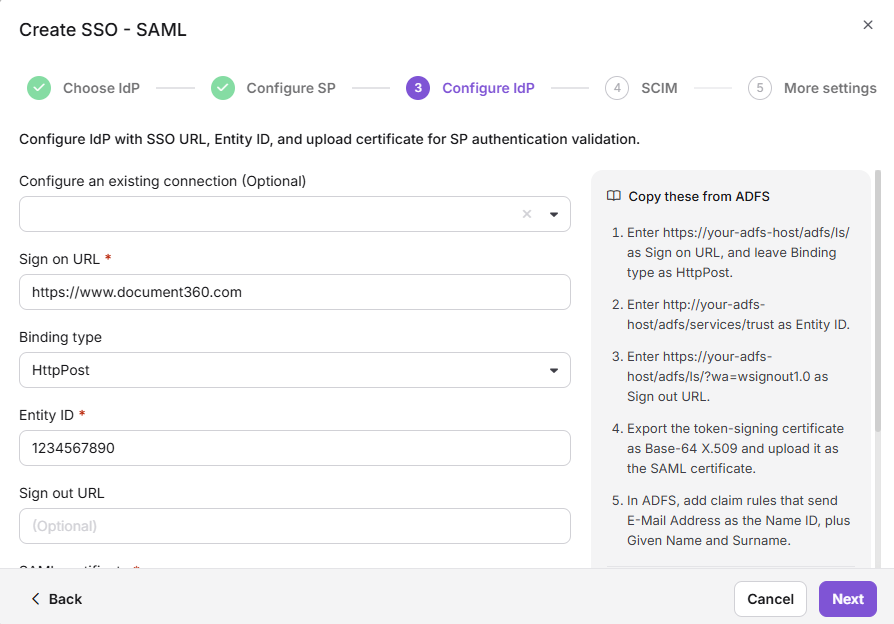
- Switch to the Document360 tab and click Next to go to the Configure IdP step.
-
(Optional) To reuse SCIM settings from a parent project, select an SSO configuration that already has SCIM turned on in Configure an existing connection. This configuration becomes the child and inherits the SCIM settings from the parent project.
-
Enter the values from your ADFS configuration:
ADFS Document360 SAML Sign-On URL Sign on URL Identifier (Entity ID) Entity ID X.509 Certificate SAML certificate -
Export the X.509 certificate from ADFS in Base-64 encoded (.CER) format and upload it in SAML certificate.
The default DER encoded format is not supported for Document360 SAML configuration.
- To let people open Document360 from ADFS without visiting the Document360 login page first, turn on Allow IdP initiated sign in.
- Click Next. The SCIM step opens.
Step 5: (Optional) Set up SCIM provisioning
SCIM keeps users and readers in sync between your directory and Document360. Because ADFS does not support SCIM natively, you need a third-party tool or a custom-built integration to send SCIM requests to Document360.
If you don't need SCIM, leave Enable SCIM provisioning off, click Next, and go to Step 6.
Document360 displays the SCIM secret tokens only once, at the time of creation. Copy them and store them securely before you create the configuration.
- Turn on Enable SCIM provisioning.
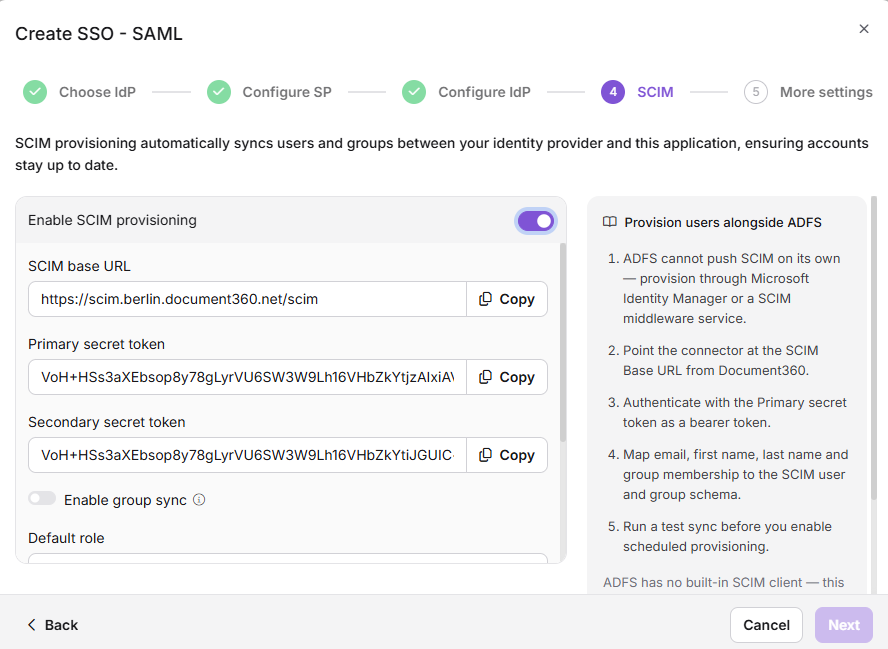
- In the confirmation dialog, review the terms, select the checkbox, and click Agree. The SCIM base URL and the primary and secondary secret tokens appear.
- Enter the SCIM base URL and the primary secret token in your third-party tool or custom integration.
- In Default role, keep Contributor or select another role. The default role applies to users only.
- In User groups and Reader groups, select the groups to add new people to. Users in the selected user groups get the default role. Readers in the selected reader groups always get read-only access.
- Click Next.
Step 6: Name the configuration and create it
- In SSO name, enter a name for the SSO configuration.
- In Login button text, enter the text for the sign-in button. The default text is Login with SSO.
- (Optional) To sign out users after a period of inactivity, turn on Idle session SSO timeout and set the Timeout duration (HH:MM).
- (Optional) To switch existing accounts to this SSO configuration, turn on Convert existing team and reader accounts to SSO. Then, under Send invite to, select All users or Selected users. Each existing account is converted to SSO; Document360 does not create a second account.
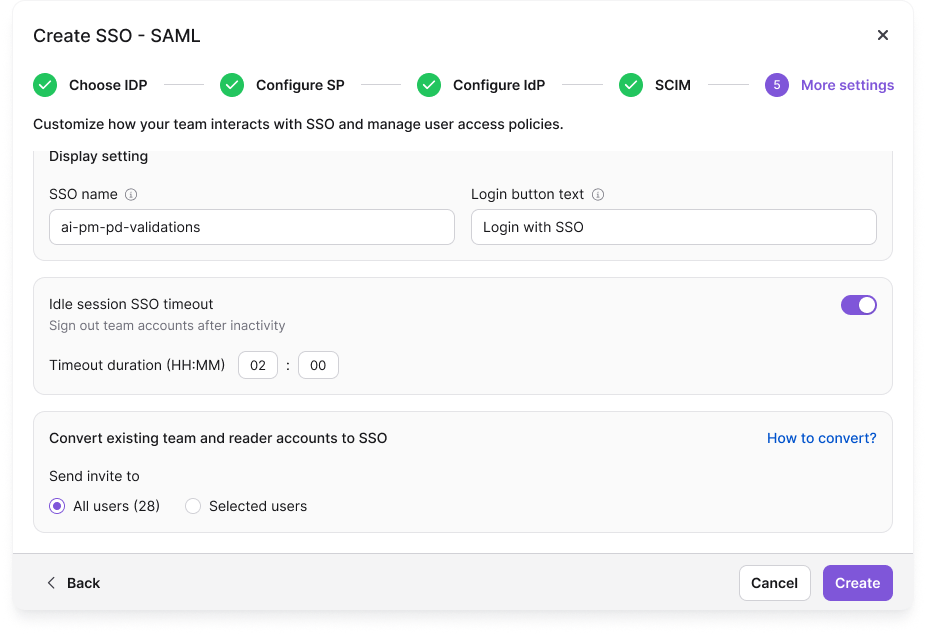
- Click Create.
The configuration appears in the Enterprise SSO list.
Auto assign reader group appears only when you edit an existing SSO configuration. It is hidden while you create a new one. To learn more, read Managing SSO readers and reader groups.
Step 7: Test the sign-in
- Open the Document360 login page in a private browser window.
- Enter your email address or subdomain and click Login with SSO (or the button text you set in Step 6).
- Sign in with an Active Directory account that ADFS permits to access the relying party trust.
You're signed in to Document360. If sign-in fails, read SAML SSO issues and SSO login issues.
View and manage SSO readers in Document360
To find readers who sign in through ADFS and manage their content access:
- Go to Settings () > Users & Permissions > Readers & groups.
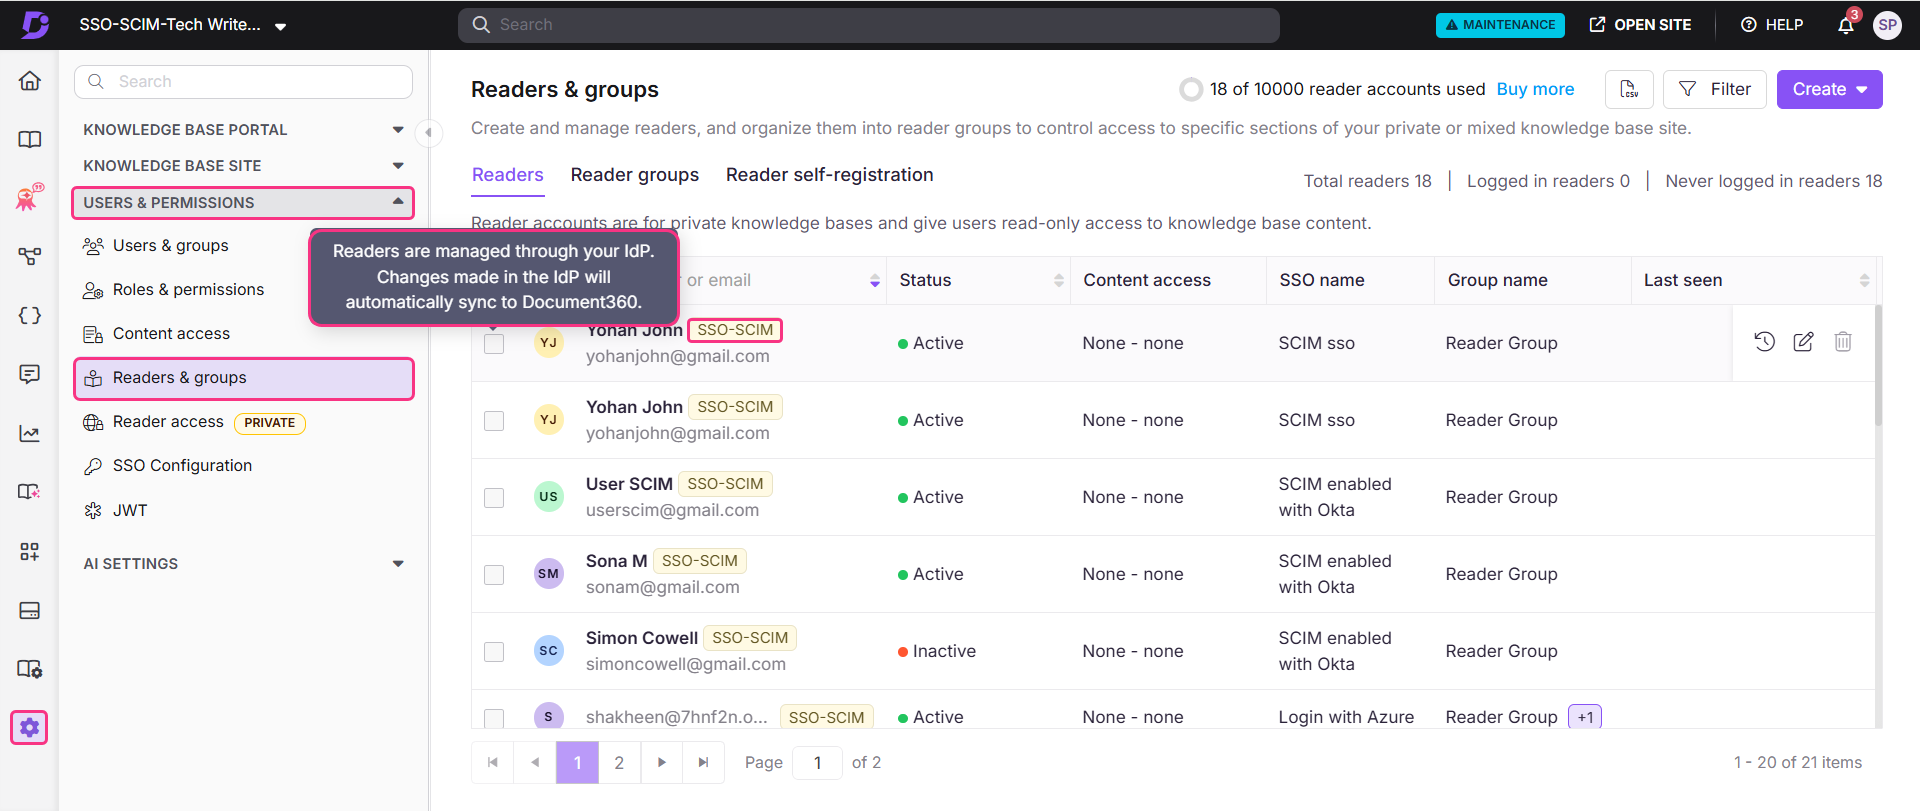
- Select a reader to open their reader profile. Readers provisioned through SCIM show an SSO-SCIM badge next to their name.
- Click Manage Content Access.
- Choose the access level from the dropdown and click Update.
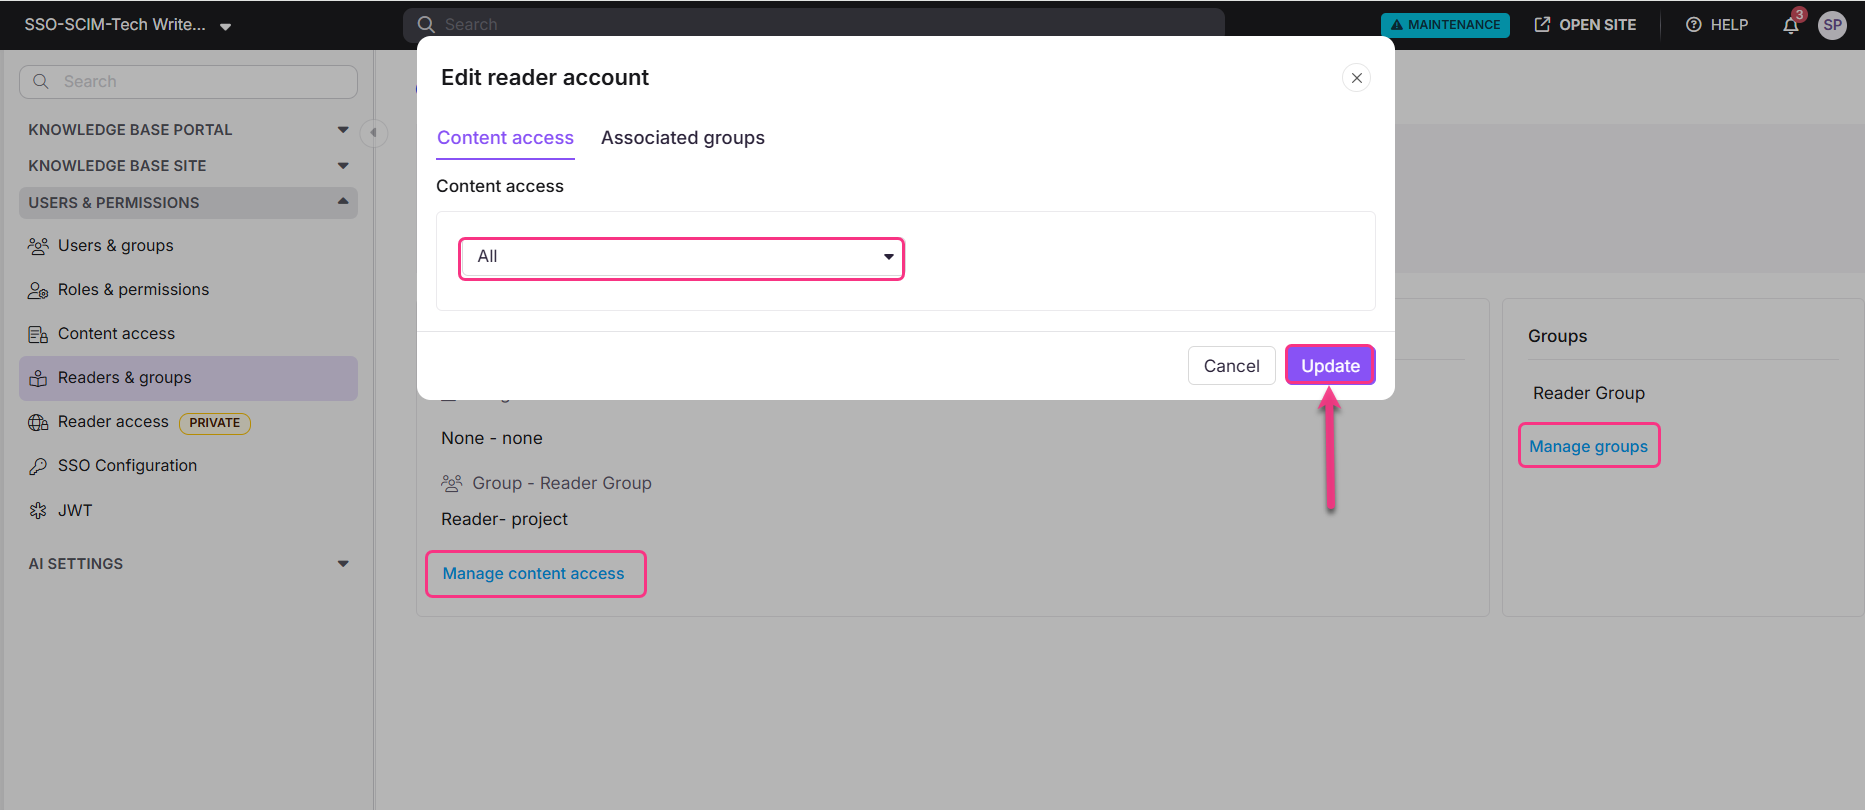
Content access permissions are set to None by default, and you can change them at any time. To manage a reader's groups, click Manage groups under the Reader Group section.
Limits and limitations
| Limitation | Details |
|---|---|
| SCIM provisioning | ADFS does not support SCIM natively. SCIM works only through third-party tools or custom-built integrations. |
| Certificate format | Upload the X.509 certificate in Base-64 encoded (.CER) format. The DER encoded format is not supported. |
| People managed through SCIM | When SCIM is on, you can't change roles and permissions, edit a user's name, or delete a user in Document360. You can manage only content access. |
| Deleting people in your directory | Deleting a profile in your IdP does not remove it from Document360. The profile stays with an Inactive status. |
| Auto assign reader group | Available only on existing SSO configurations. Hidden when you create a new configuration. |
| Last active configuration | If this is the only active SSO or JWT configuration and the default login page is disabled, Document360 blocks you from turning it off or deleting it, with the message: "This is the only active SSO or JWT configuration and the default login page is disabled, so turning it off or deleting it would lock everyone out. Enable another configuration, or turn the default login page back on, first." |
Best practices
- Export the certificate in Base-64 encoded (.CER) format. Always select Base-64 encoding when you export the X.509 certificate from ADFS.
- Plan provisioning before you turn on SCIM. Choose and set up your third-party tool or custom integration first, because ADFS can't send SCIM requests on its own.
- Check all three claim mappings. Missing or incorrect Name ID, Email-Addresses, or Name claims cause sign-in failures.
- Test with one user first. Before you roll out SSO to everyone, sign in with a single test account to confirm that the claim rules, certificate, and URLs work.
- Store SCIM secret tokens like passwords. Keep them in a password manager or secrets vault, never in plain text files or code repositories.
FAQ
Why is SCIM not natively supported in ADFS?
ADFS is an on-premises federation service built on SAML and WS-Federation protocols. It does not include a built-in SCIM endpoint. To use SCIM with ADFS in Document360, you need a third-party provisioning tool or a custom integration that bridges ADFS with the SCIM protocol.
What certificate format does Document360 require for ADFS?
Document360 requires the X.509 certificate in Base-64 encoded (.CER) format. When you export the certificate from ADFS, select this format. The default DER encoded format is not supported.
What happens to a user's profile in Document360 if I delete them in ADFS?
Deleting a user profile in your IdP does not remove it from Document360. The profile stays in Document360 with an Inactive status.
What happens to existing Document360 accounts when I set up ADFS SSO?
Nothing, unless you turn on Convert existing team and reader accounts to SSO in Step 6. If you do, the existing accounts you select are converted to SSO; Document360 does not create a second account. To convert accounts later, read Convert user to SSO and Convert reader to SSO.