Connect any identity provider (IdP) that supports SAML 2.0, such as PingIdentity, Shibboleth, JumpCloud, or Centrify, to Document360 so your users and readers sign in with it, even when the IdP is not listed in Document360. You create a SAML application in your IdP, exchange values between the two systems, and then complete the SSO configuration in Document360. If your IdP supports SCIM, you can also keep users and readers in sync automatically.
Only users with the Owner or Admin project role can configure SSO in Document360.
When to use other configurations with SAML SSO
Use this setup when:
- Your identity provider supports SAML 2.0 but is not one of the listed providers (Okta, Entra, Google, OneLogin, or ADFS). For a listed provider, use its dedicated guide instead.
- You want users to sign in to the knowledge base portal and readers to sign in to the knowledge base site with their existing IdP accounts.
- You want people to open Document360 directly from your IdP dashboard (IdP-initiated sign-in).
- Your IdP supports SCIM and you want users and readers provisioned automatically, or you want to inherit SCIM settings from a parent project.
| Capability | Supported |
|---|---|
| User (knowledge base portal) authentication | Yes |
| Reader (knowledge base site) authentication | Yes |
| IdP-initiated sign-in | Yes |
| SCIM provisioning | Yes (if supported by your IdP) |
| SSO configuration inheritance (parent-child projects) | Yes |
Before you begin
- You need the Owner or Admin role in your Document360 project.
- You need administrator access to your identity provider.
- Your identity provider must support SAML 2.0.
- Open Document360 and your identity provider in two browser tabs. You switch between them during setup.
- If you plan to use SCIM, have a secure place ready, such as a password manager, to store the SCIM secret tokens.
How to set up SAML SSO with another identity provider
Step 1: Start the SSO configuration in Document360
- Go to Settings () > Users & Permissions > Enterprise SSO.
- Select Create SSO.
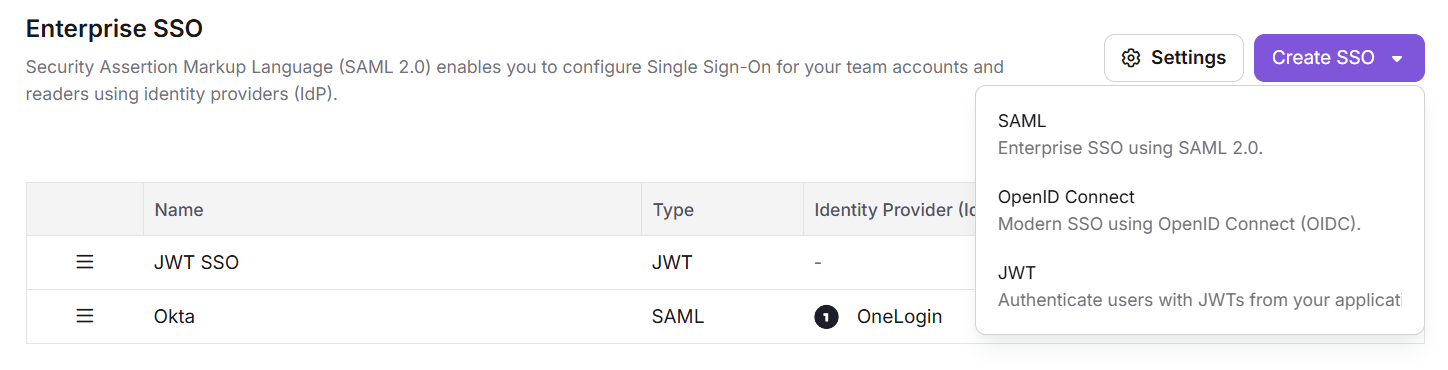
- Select SAML (Enterprise SSO using SAML 2.0).
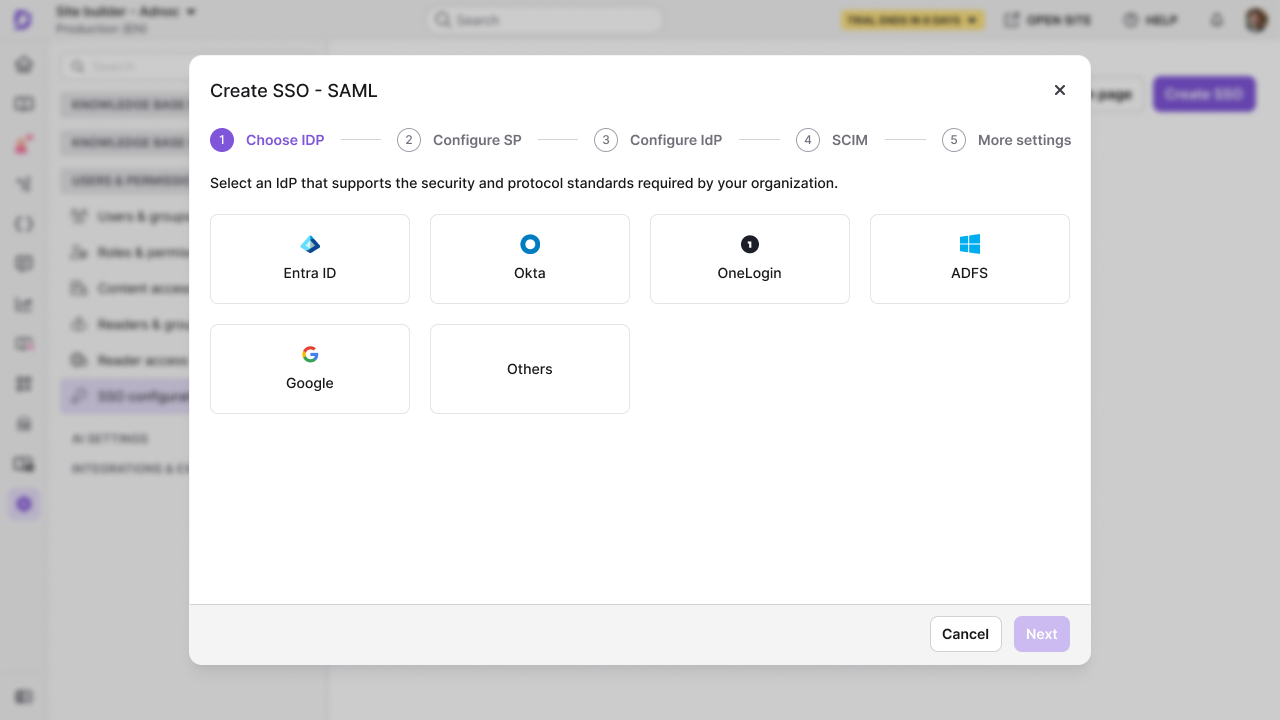
- Select Others as your identity provider.
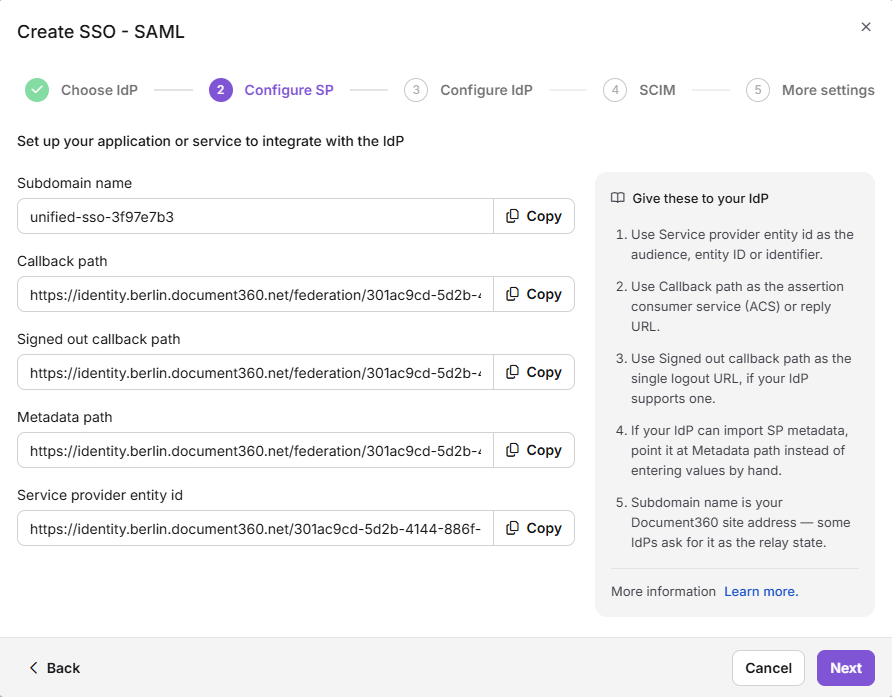
The Configure SP step opens and shows the Document360 values you enter in your IdP, including the Callback path and Service provider entity ID. Keep this tab open.
Step 2: Create a SAML application in your identity provider
Add the application
- Log in to your identity provider's admin console.
- Go to the section where you create or manage applications. It is often labeled Applications, Enterprise Applications, or similar.
- Select the option to create a new application.
- Configure the basic settings:
- Application Name: Enter a name, such as Document360 SSO.
- Application Type: Select SAML 2.0 as the sign-in method.
- Save the application.
Enter the Document360 parameters
In your IdP's SAML configuration, enter the values from the Document360 Configure SP step:
| Your IdP | Document360 |
|---|---|
| Single Sign-On URL | Callback path |
| Entity ID | Service provider entity ID |
| Audience URI | Service provider entity ID or Single Sign-On URL |
Add attribute mappings
Add these attribute statements in your IdP:
| Attribute name | Value |
|---|---|
| NameID | user.email or user ID |
| user.email | |
| name | user.name |
Attribute names are case sensitive. Enter email and name exactly as shown.
Save the SAML configuration
- If your IdP requires other settings for a SAML application, complete them.
- Review your settings and save the SAML configuration.
Note the single sign-on URL and identity provider issuer from your IdP, and download its X.509 certificate. You enter them in Document360 in Step 3.
Step 3: Enter the IdP details in Document360
-
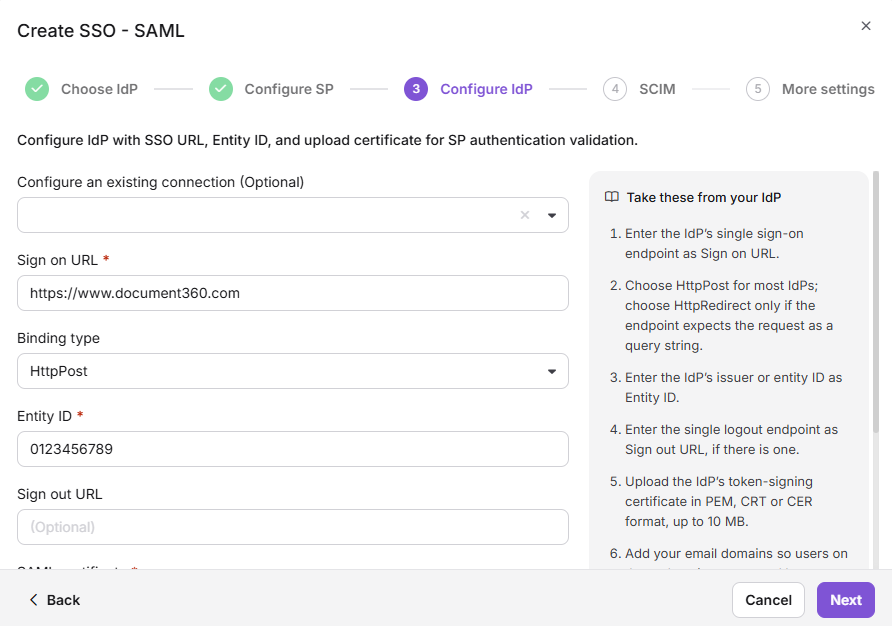
Switch to the Document360 tab and click Next to go to the Configure IdP step.
-
(Optional) To reuse SCIM settings from a parent project, select an existing SSO configuration in Configure an existing connection. This configuration becomes the child. To learn more, read Inherit from another application.
-
Enter the values from your identity provider:
Identity Provider Document360 Single Sign-On URL Sign on URL Identity Provider Issuer Entity ID SAML Certificate (X.509) SAML certificate -
Upload the X.509 certificate from your identity provider in SAML certificate.
-
To let people open Document360 from your IdP dashboard without visiting the Document360 login page first, turn on Allow IdP initiated sign in.
- Click Next. The SCIM step opens.
Step 4: (Optional) Set up SCIM provisioning
SCIM keeps users and readers in sync between your identity provider and Document360. You can use it only if your IdP supports SCIM.
If you don't need SCIM, leave Enable SCIM provisioning off, click Next, and go to Step 5.
Document360 displays the SCIM secret tokens only once, at the time of creation. Copy them and store them securely before you create the configuration.
- Turn on Enable SCIM provisioning.
- In the confirmation dialog, review the terms, select the checkbox, and click Agree. The SCIM base URL and the primary and secondary secret tokens appear.
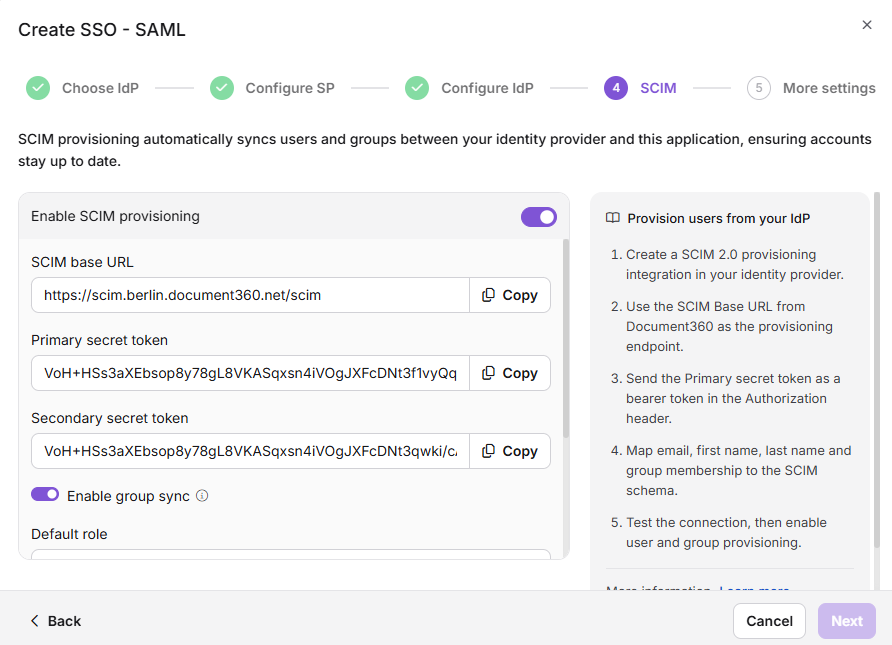
- Enter the SCIM base URL and the primary secret token in your IdP's SCIM settings.
- (Optional) To assign users and readers based on your IdP group mappings, turn on Enable group sync.
- In Default role, keep Contributor or select another role. The default role applies to users only.
- In User groups and Reader groups, select the groups to add new people to. Users in the selected user groups get the default role. Readers in the selected reader groups always get read-only access.
- Click Next.
Step 5: Name the configuration and create it
- In SSO name, enter a name for the SSO configuration.
- In Login button text, enter the text for the sign-in button. The default text is Login with SSO.
- (Optional) To sign out users after a period of inactivity, turn on Idle session SSO timeout and set the Timeout duration (HH:MM).
- (Optional) To switch existing accounts to this SSO configuration, turn on Convert existing team and reader accounts to SSO. Then, under Send invite to, select All users or Selected users. Each existing account is converted to SSO; Document360 does not create a second account.
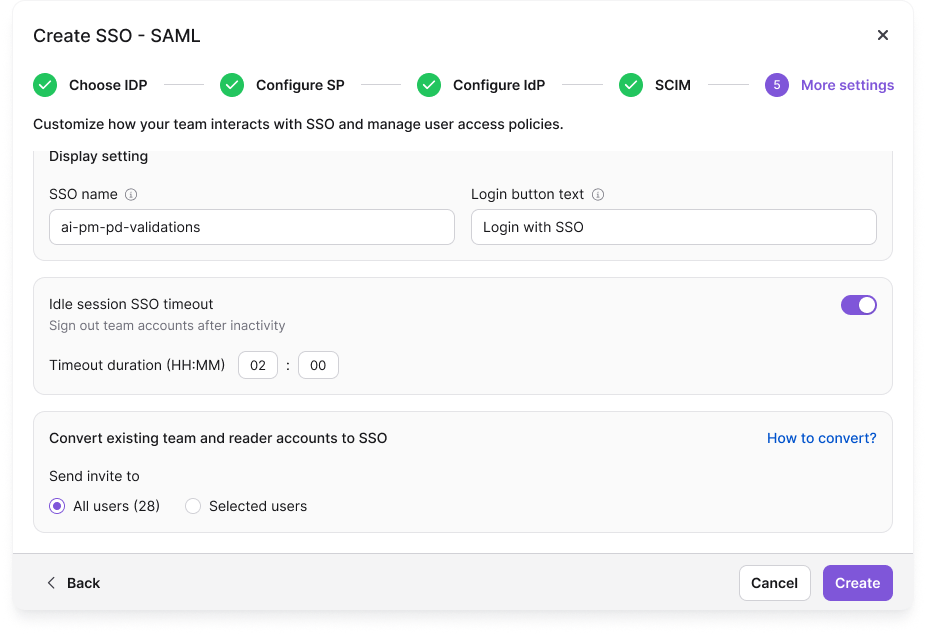
- Click Create.
The configuration appears in the Enterprise SSO list.
Auto assign reader group appears only when you edit an existing SSO configuration. It is hidden while you create a new one. To learn more, read Managing SSO readers and reader groups.
Step 6: Test the sign-in
- Open the Document360 login page in a private browser window.
- Enter your email address or subdomain and click Login with SSO (or the button text you set in Step 5).
- Sign in with an account that your identity provider allows to use the Document360 application.
You're signed in to Document360. If sign-in fails, read SAML SSO issues and SSO login issues.
Manage people provisioned through SCIM
If you turned on SCIM, manage people in your identity provider:
- When SCIM is on, you can't change roles and permissions, edit a user's name, or delete a user in Document360. You can manage only content access from Document360.
- Deleting a profile in your IdP does not remove it from Document360. The profile stays with an Inactive status.
Inherit from another application
If you already have an SSO configuration with SCIM in another project, you can inherit its SCIM settings instead of setting them up again.
Child inherited SSO configuration
On the Configure IdP step, select the parent SSO configuration that has SCIM turned on in Configure an existing connection. The current project becomes the child project and inherits the relevant properties from the parent.
Once the SSO configuration is created, the SCIM provisioning settings are inherited from the parent application and cannot be modified in the child application.
Parent inherited SSO configuration
The parent application displays a list of all projects that have inherited its configuration. Any changes you make to the parent application are automatically reflected in the child application.
- If you turn on SCIM in the parent project after child projects have inherited its configuration, users and groups are automatically provisioned to all child projects in the background.
- With inheritance, you control the SSO configurations of several projects from one parent application instead of managing each one separately.
Limits and limitations
| Limitation | Details |
|---|---|
| Protocol | Your IdP must support SAML 2.0. Document360 does not support SAML 1.x or proprietary SSO protocols. |
| Attribute names | The email and name attribute names are case sensitive. |
| SCIM provisioning | Available only if your IdP supports SCIM. |
| People managed through SCIM | When SCIM is on, you can't change roles and permissions, edit a user's name, or delete a user in Document360. You can manage only content access. |
| Auto assign reader group | Available only on existing SSO configurations. Hidden when you create a new configuration. |
| Last active configuration | If this is the only active SSO or JWT configuration and the default login page is disabled, Document360 blocks you from turning it off or deleting it, with the message: "This is the only active SSO or JWT configuration and the default login page is disabled, so turning it off or deleting it would lock everyone out. Enable another configuration, or turn the default login page back on, first." |
Best practices
- Verify SAML 2.0 support before you start. Confirm that your identity provider supports the SAML 2.0 protocol.
- Check attribute name casing. Enter
emailandnameexactly as shown in the attribute mapping table. - Download and store the X.509 certificate before you complete setup. You upload this file to Document360. Keep a copy in a secure location in case you need to reconfigure.
- Test with a single user first. Before you roll out SSO to everyone, sign in with one test account to confirm that attribute mapping, certificates, and URLs work.
- Store SCIM secret tokens like passwords. Keep them in a password manager or secrets vault, never in plain text files or code repositories.
FAQ
Which Identity Providers can I use with the "Other configurations" option?
You can use any Identity Provider that supports the SAML 2.0 protocol. This includes providers like PingIdentity, Shibboleth, JumpCloud, Centrify, and others not listed explicitly in Document360's IdP selector. If your provider is listed explicitly (Okta, Entra, Google, OneLogin, ADFS), use that dedicated article instead for provider-specific guidance.
What happens to a user's profile in Document360 if I delete them in my IdP?
Deleting a user profile in your IdP does not remove it from Document360. The profile stays in Document360 with an Inactive status. You can only manage content access directly from Document360.
Can I use SCIM provisioning with any Identity Provider?
SCIM provisioning is available if your Identity Provider natively supports the SCIM 2.0 protocol. If your IdP does not support SCIM natively, you may be able to enable it through a third-party provisioning tool or a custom integration.
What happens to existing Document360 accounts when I set up SSO?
Nothing, unless you turn on Convert existing team and reader accounts to SSO in Step 5. If you do, the existing accounts you select are converted to SSO; Document360 does not create a second account. To convert accounts later, read Convert user to SSO and Convert reader to SSO.