Connect OneLogin to Document360 with SAML so your users sign in to the knowledge base portal, and your readers to the knowledge base site, with their OneLogin credentials instead of a Document360 password. You can also turn on SCIM so that OneLogin adds readers to Document360 for you. OneLogin SCIM provisions readers only.
When to use OneLogin with SAML SSO
Use this setup when:
- You manage identities in OneLogin and want users to sign in to the knowledge base portal, and readers to the knowledge base site, with their OneLogin credentials.
- You want people to open Document360 directly from the OneLogin portal (IdP-initiated sign-in).
- You want OneLogin to add readers to Document360 through SCIM. OneLogin SCIM provisions readers only.
- You manage several Document360 projects and want a new project to inherit SCIM settings from an SSO configuration in a parent project.
| What you can set up with OneLogin | Supported |
|---|---|
| User (knowledge base portal) sign-in | Yes |
| Reader (knowledge base site) sign-in | Yes |
| Sign-in from the OneLogin portal (IdP-initiated sign-in) | Yes |
| SCIM user provisioning | No |
| SCIM reader provisioning | Yes |
| SCIM group sync | No (group mapping isn't supported) |
| Reuse SCIM settings from a parent project | Yes |
Before you begin
- You need a OneLogin account with administrator access.
- You need the Owner or Admin role in your Document360 project.
- Open Document360 and the OneLogin Admin Portal in two browser tabs. You switch between them during setup.
- If you plan to set up SCIM, have a secure place ready, such as a password manager, to store two secret tokens.
Two choices in this setup can't be undone:
- Identity provider: You can't change the IdP after you create the configuration.
- Convert existing accounts to SSO: Converted users and readers lose password sign-in right away and must sign in through OneLogin. Each of them receives an email about the change.
How to set up SAML SSO with OneLogin
Step 1: Start the SSO configuration in Document360
-
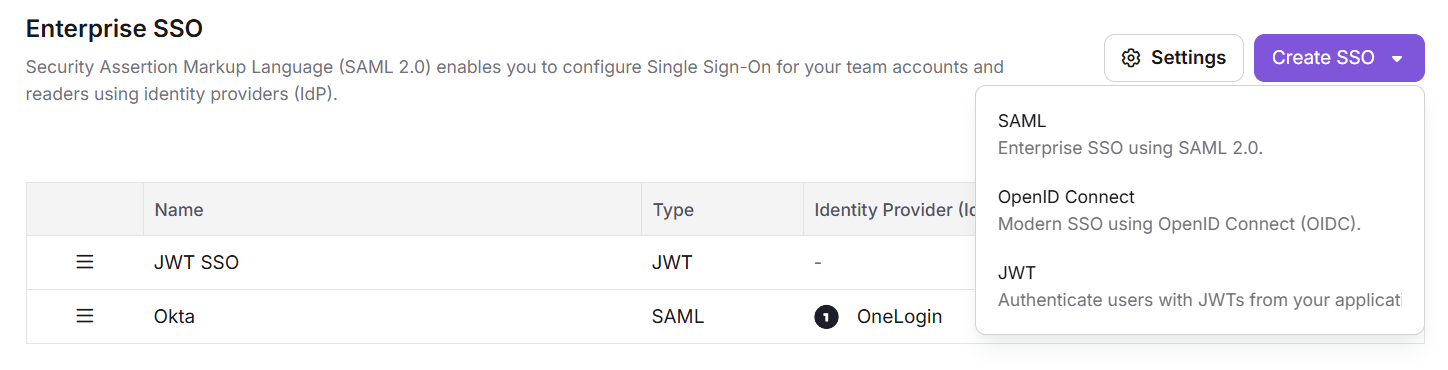
Go to Settings () > Users & Permissions > Enterprise SSO.
-
Select Create SSO, and then select SAML.
-
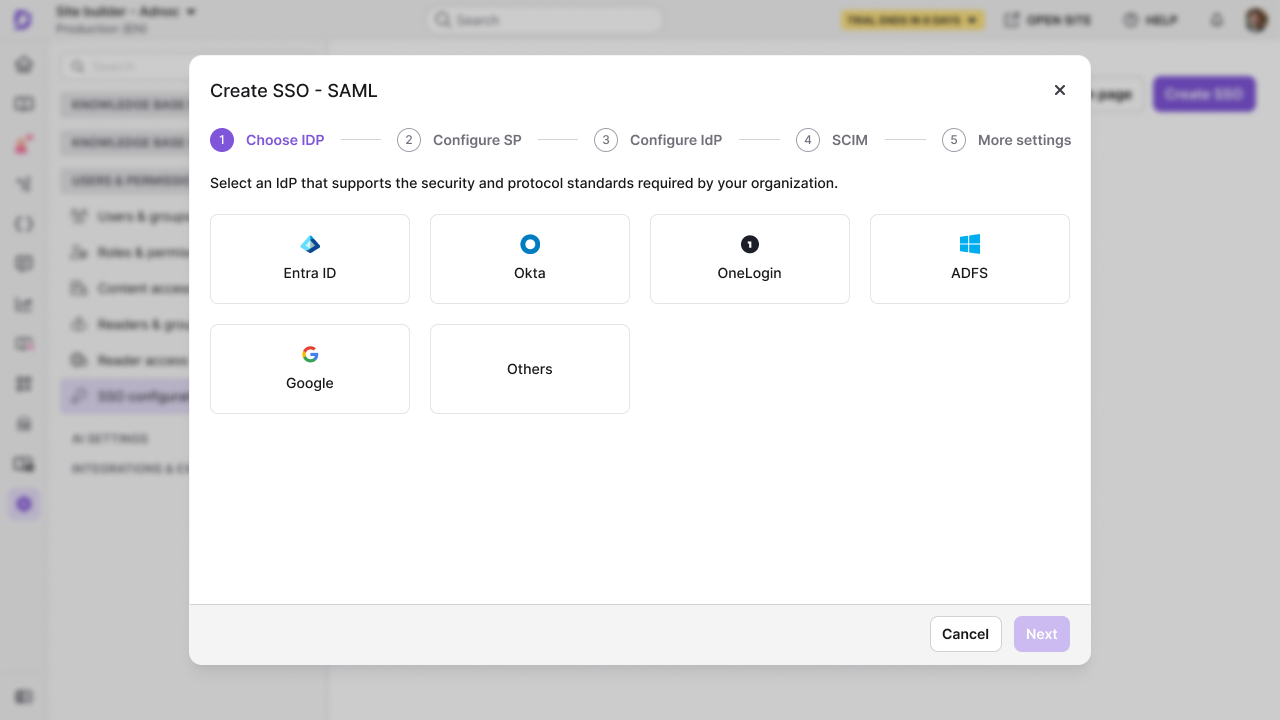
Select OneLogin as your identity provider.
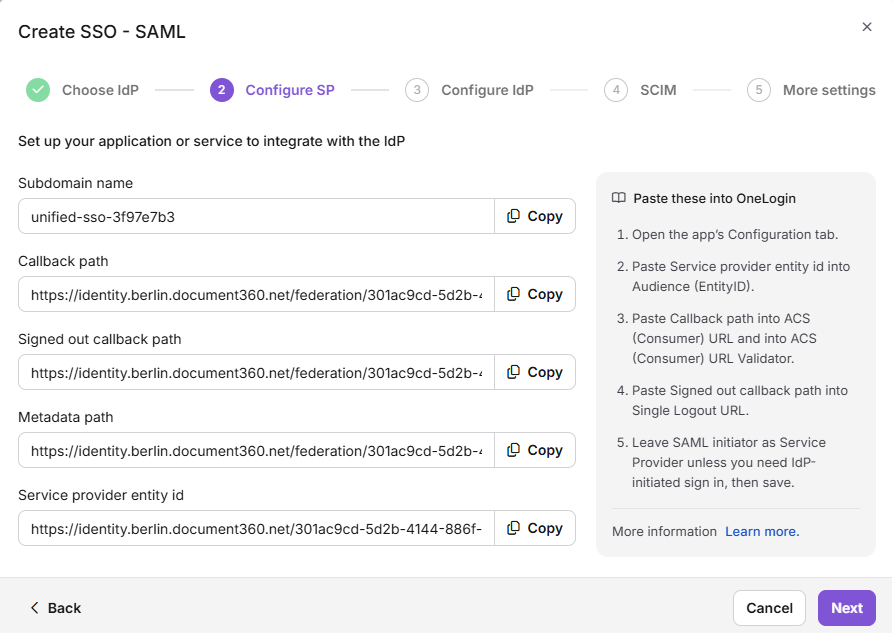
The Configure SP step opens and shows the values you enter in OneLogin: Callback path and Service provider entity ID. Keep this tab open.
Step 2: Create the SAML app in OneLogin
Add the SCIM Provisioner with SAML app
-
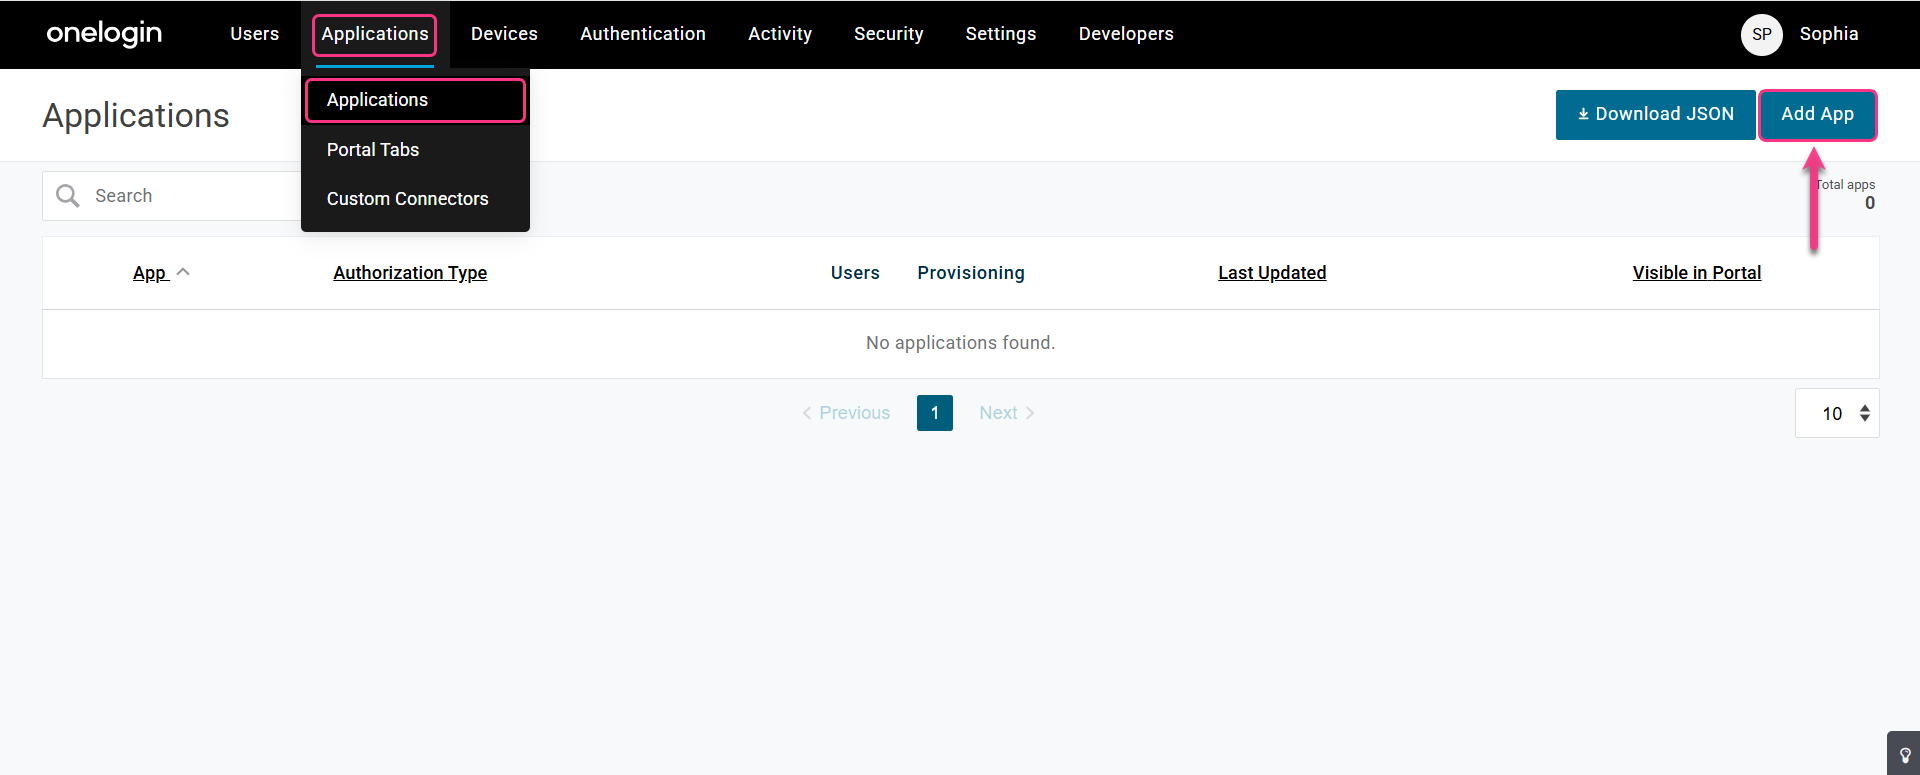
Sign in to the OneLogin Admin Portal.
-
In the top menu, select Applications.
-
Select Add App.
-
In the search bar, enter
SCIM, select SCIM Provisioner with SAML (SCIM v2 Enterprise, SCIM2 PATCH for Groups), and then select Save.
OneLogin creates the app and opens it.
Enter the Document360 values
-
In the app, select the Configuration tab.
-
Copy these values from the Document360 Configure SP step:
Copy from Document360 Paste into OneLogin Service provider entity ID SAML Audience URL Callback path SAML Consumer URL .png)
Step 3: Enter the OneLogin details in Document360
Get the setup values from OneLogin
-
In the app, select the SSO tab. It shows the Issuer URL and SAML 2.0 Endpoint (HTTP).
.png)
-
Under the X.509 certificate, select View Details, and then download the certificate.
.png)
Complete the Configure IdP step
-
Switch to the Document360 tab, and then select Next. The Configure IdP step opens.
-
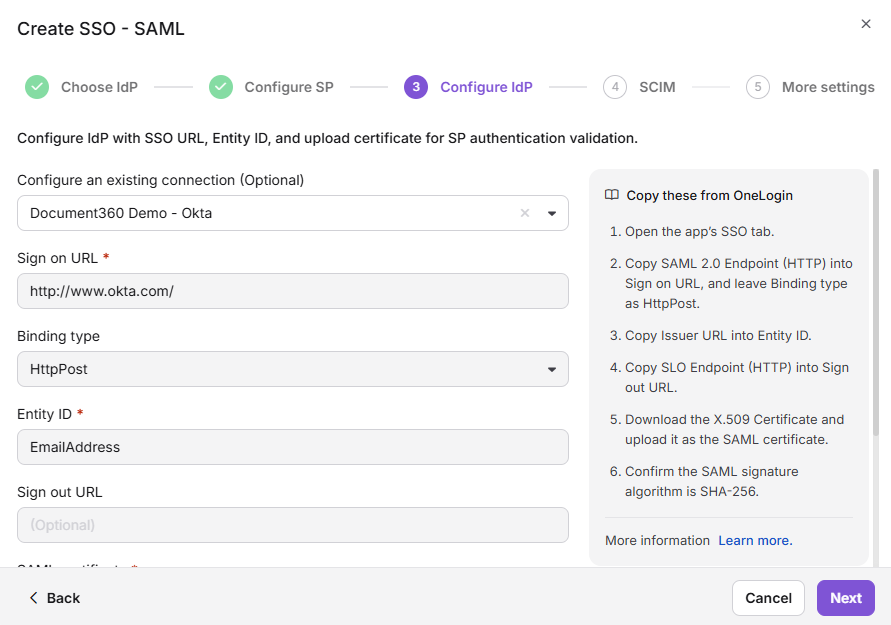
(Optional) To reuse SCIM settings from a parent project, select that project's SSO configuration in Configure an existing connection. Only configurations with SCIM turned on appear. Your new configuration becomes a child configuration: it inherits the parent's SCIM settings, and you can't change them in the child. The parent configuration lists every project that inherits from it, and changes you make in the parent apply to its children. Otherwise, leave this field empty.
-
Copy these values from OneLogin:
Copy from OneLogin Paste into Document360 Issuer URL Entity ID SAML 2.0 Endpoint (HTTP) Sign on URL -
Upload the X.509 certificate you downloaded in SAML certificate. You can upload a PEM, CRT, or CER file of up to 10 MB.
-
To let people open Document360 from the OneLogin portal, turn on Allow IdP initiated sign in. To learn more, read Let people sign in from your IdP dashboard. To send people to your knowledge base site instead of the portal after they sign in from the OneLogin portal, set RelayState on the Configuration tab of the OneLogin app. To learn how, read Send people to the knowledge base site instead of the portal.
-
Select Next. The SCIM step opens.
Step 4: (Optional) Set up SCIM provisioning
With SCIM, the readers you add and approve in OneLogin are added to Document360, and readers you delete in OneLogin become inactive in Document360. OneLogin SCIM doesn't support user attributes or group mapping, so you can't add users or groups from OneLogin.
If you don't need SCIM, leave Enable SCIM provisioning off, select Next, and go to Step 5.
You see the primary and secondary secret tokens only once. Copy both and store them securely before you create the configuration. After that, they're masked and can't be retrieved. If you regenerate a token, the old one stops working, and you must update it in OneLogin to keep syncing.
Turn on SCIM in Document360
-
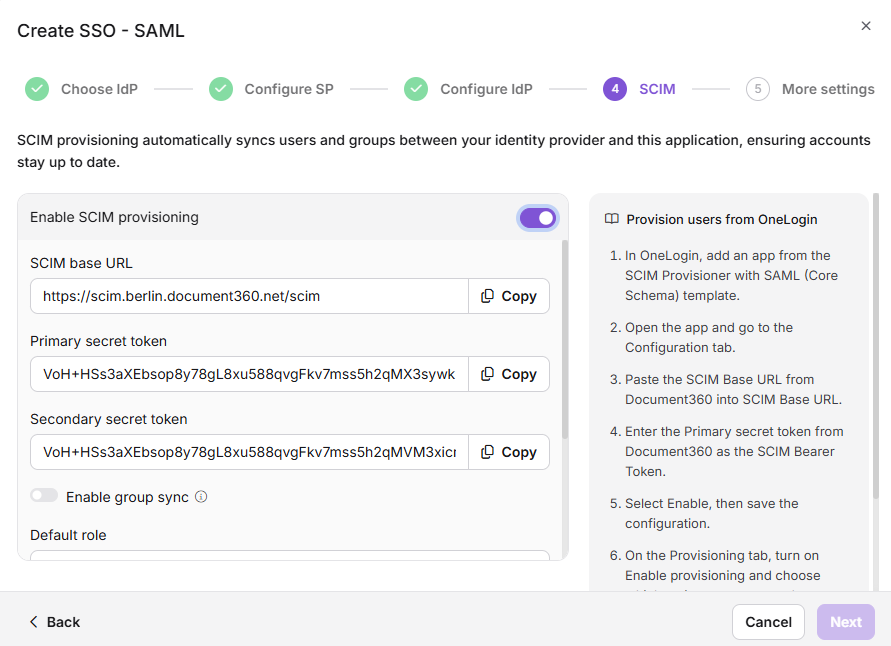
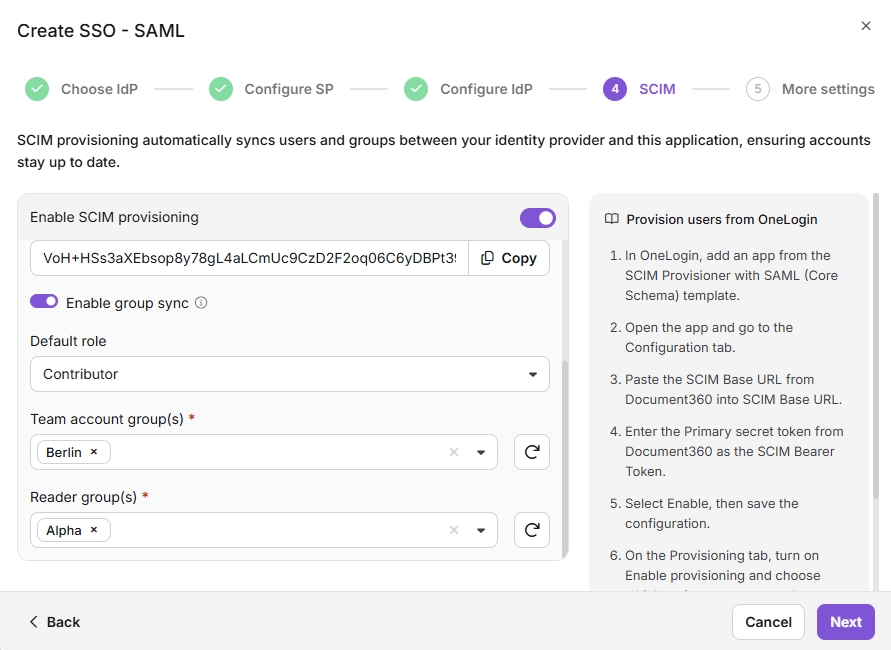
On the SCIM step, turn on Enable SCIM provisioning.
-
In the confirmation dialog, review the terms, select the checkbox, and then select Agree. The SCIM base URL and the primary and secondary secret tokens appear.
-
Copy both secret tokens and store them securely.
Connect OneLogin to Document360
-
In the OneLogin app, select the Configuration tab, and then scroll to the API Connection section.
-
Copy these values from the Document360 SCIM step:
Copy from Document360 Paste into OneLogin SCIM base URL SCIM Base URL Primary secret token SCIM Bearer Token 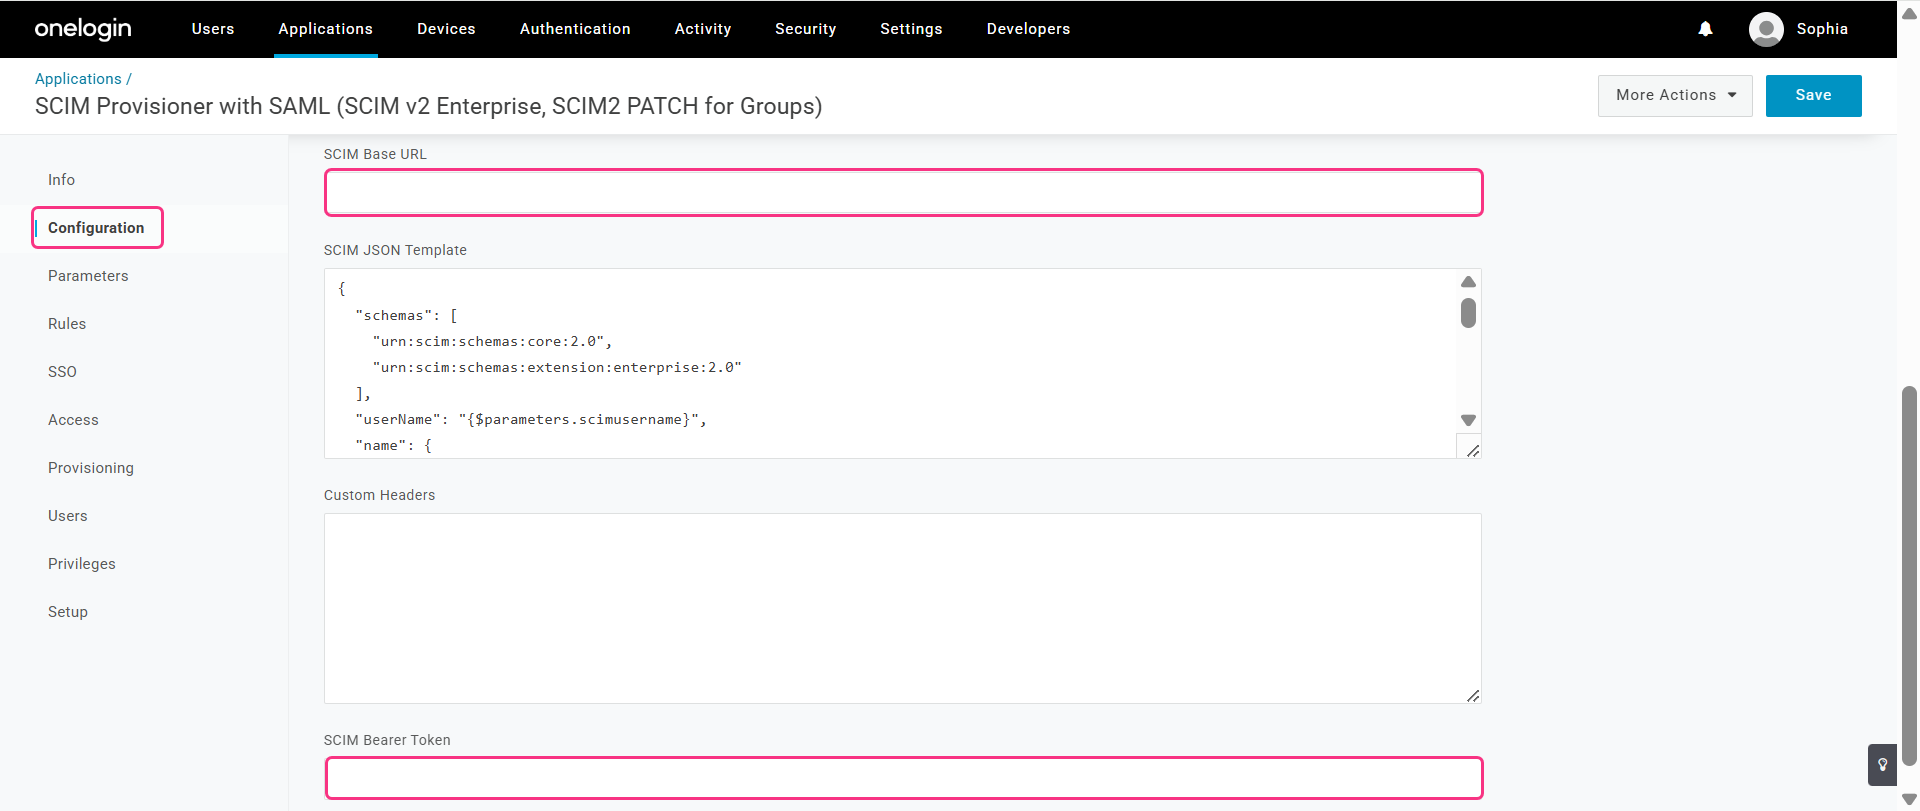
-
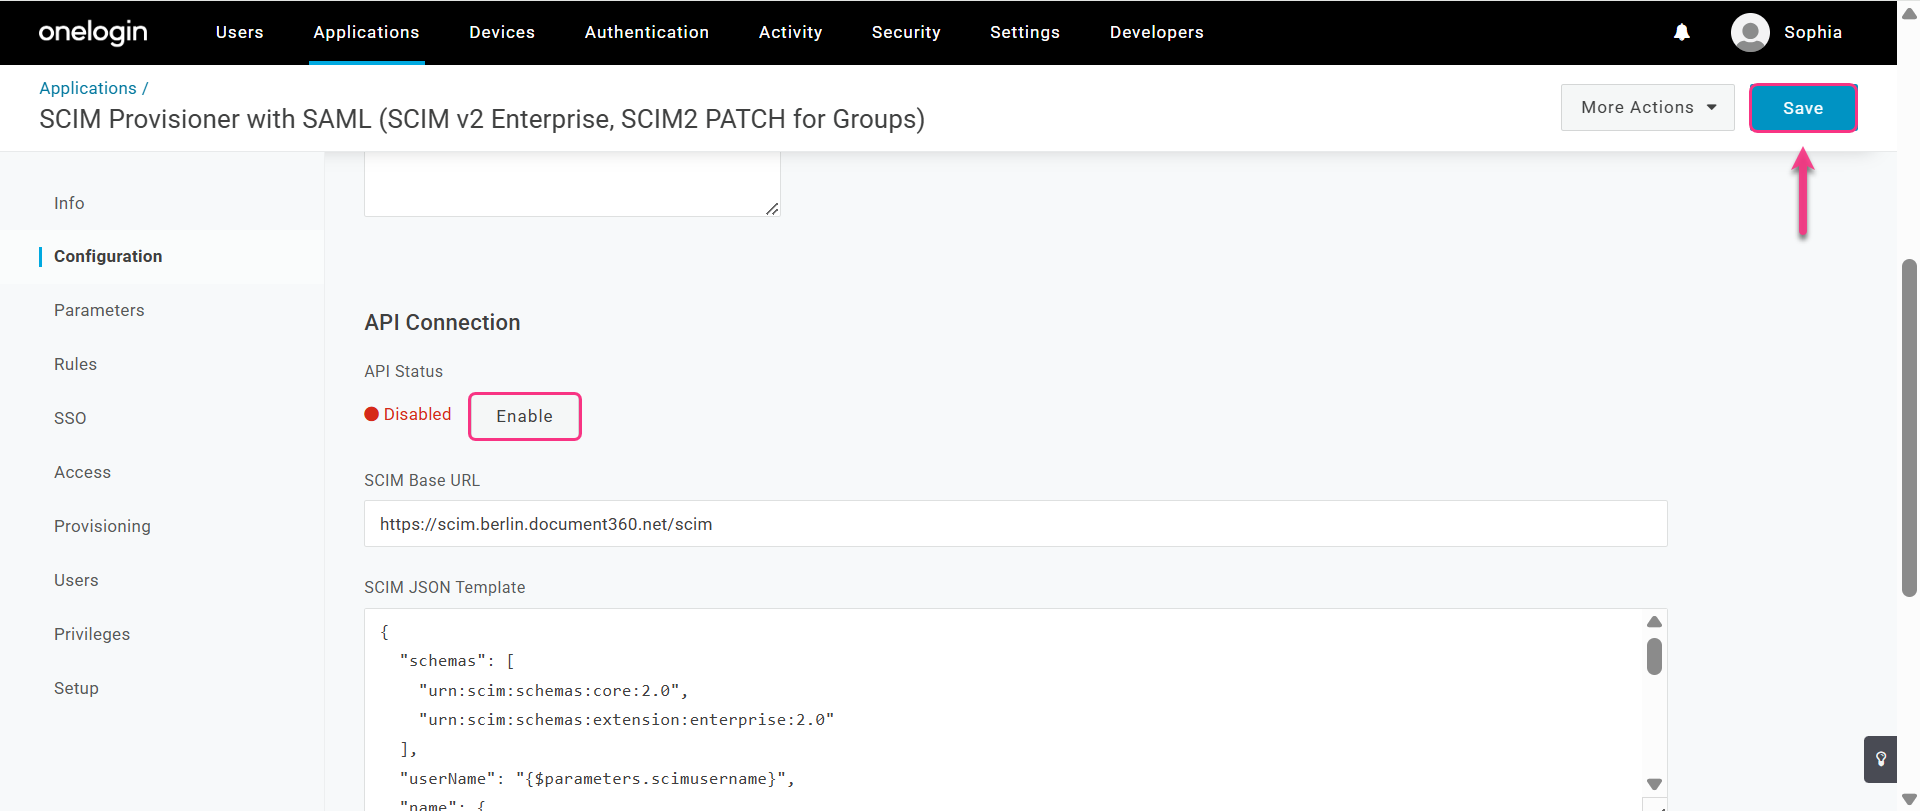
Select Enable, and then select Save.
Turn on provisioning in OneLogin
-
In the OneLogin app, select the Provisioning tab.
-
Select the Enable provisioning checkbox, and then select Save.
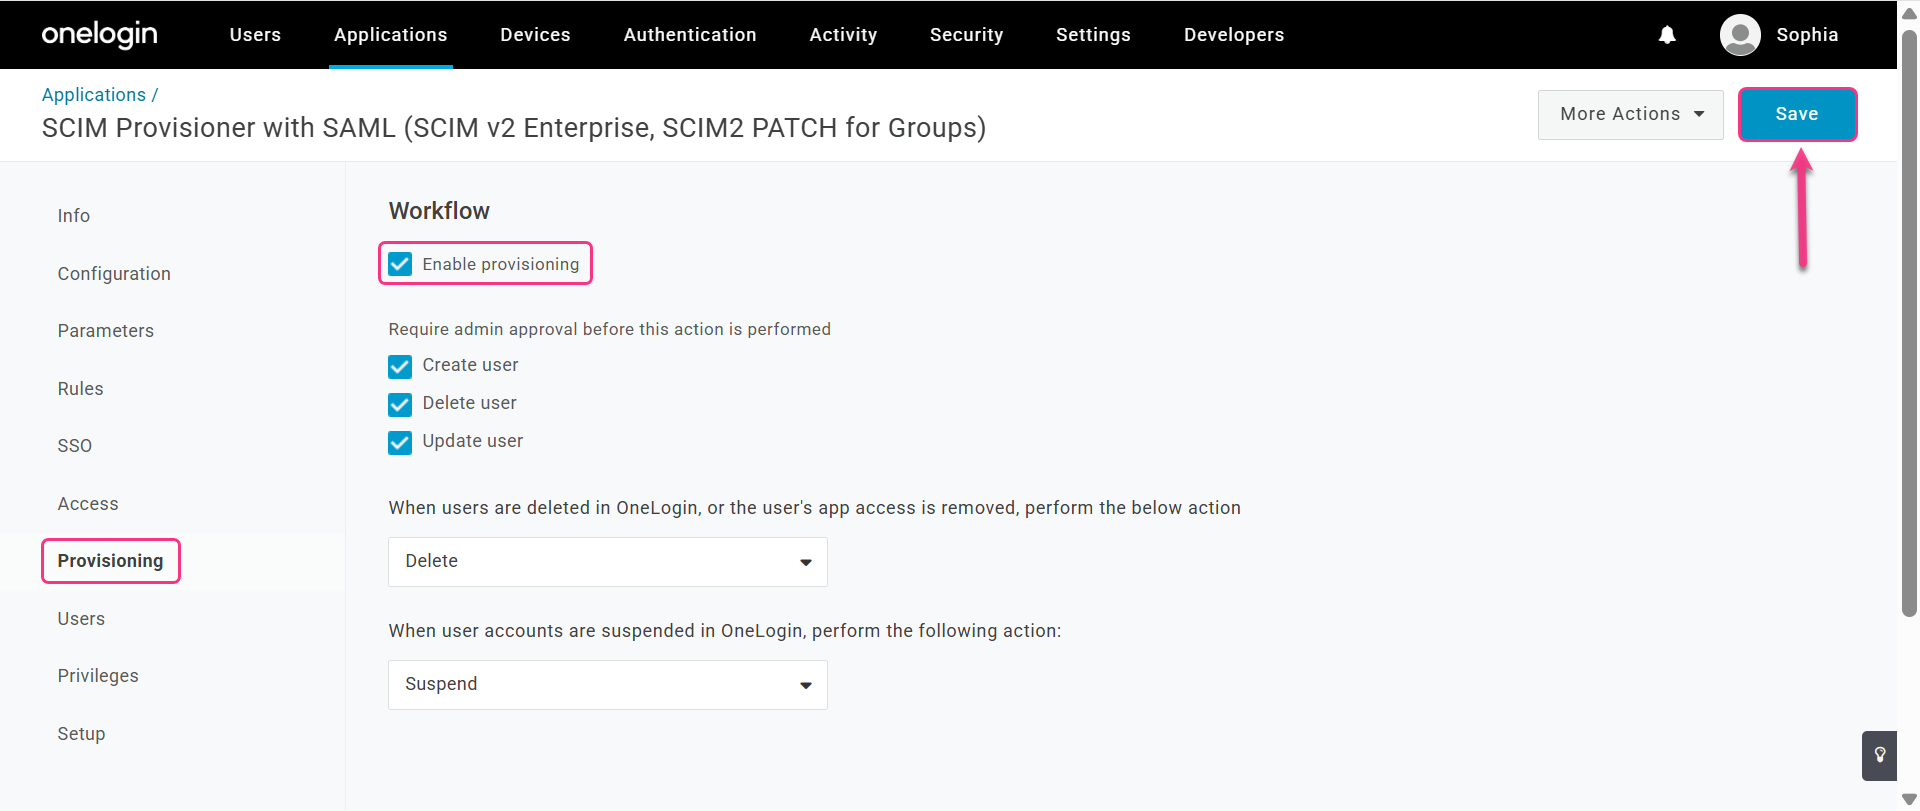
On the Provisioning tab, you also choose the actions OneLogin performs: Create user, Delete user, and Update user. Use the dropdowns next to each action to customize them.
Set the default role and groups in Document360
-
Switch to the Document360 tab. In Default role, keep Contributor or select another role.
-
In User groups and Reader groups, select the groups to add new people to. Users in the selected user groups get the default role. Readers in the selected reader groups always get read-only access.
-
Select Next. The More settings step opens.
Step 5: Name the configuration and create it
-
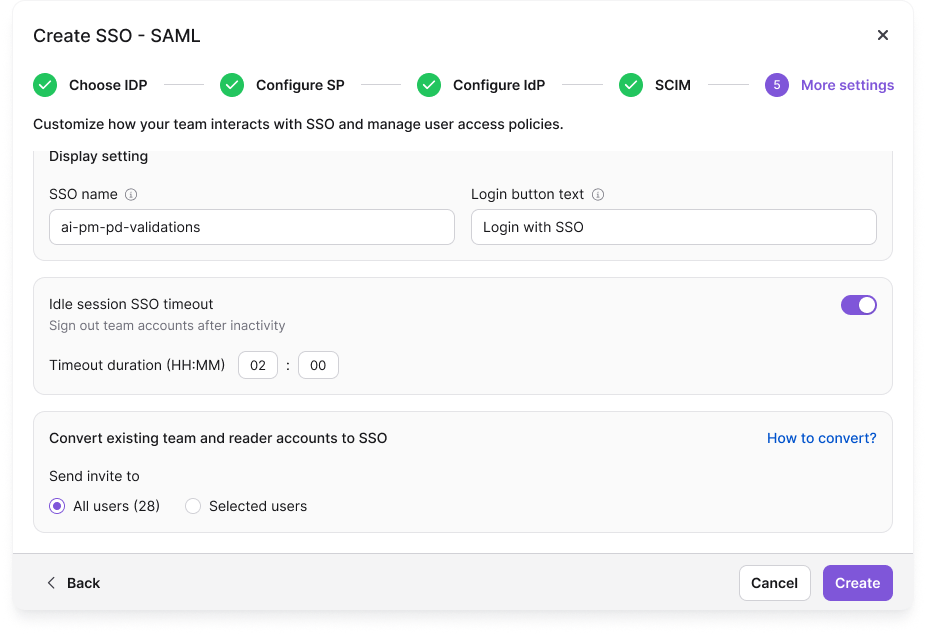
In SSO name, enter a name for this configuration.
-
In Login button text, enter the text people see on the SSO sign-in button. By default, the button reads Login with SSO.
-
(Optional) To sign out SSO users after a period of inactivity, turn on Idle session SSO timeout, and then set the Timeout duration (HH:MM). To learn more, read Sign out idle SSO user.
-
(Optional) To switch existing Document360 users and readers to OneLogin sign-in now, turn on Convert existing team and reader accounts to SSO. Then, under Send invite to, select All users or Selected users. Their existing accounts are converted to SSO accounts; no second account is created. Review the warning in Before you begin first. You can also convert accounts later. To learn how, read Convert user to SSO and Convert reader to SSO.
-
Select Create.
The configuration appears in the Enterprise SSO list.
The Auto assign reader group toggle doesn't appear while you create a configuration. It appears only when you edit an existing configuration. To learn more, read Managing SSO readers and reader groups.
Step 6: (Optional) Finish SCIM setup in OneLogin
Skip this step if you didn't set up SCIM in Step 4. OneLogin sends a reader to Document360 after you add the reader, assign the app to them, and approve them.
Add a reader in OneLogin
-
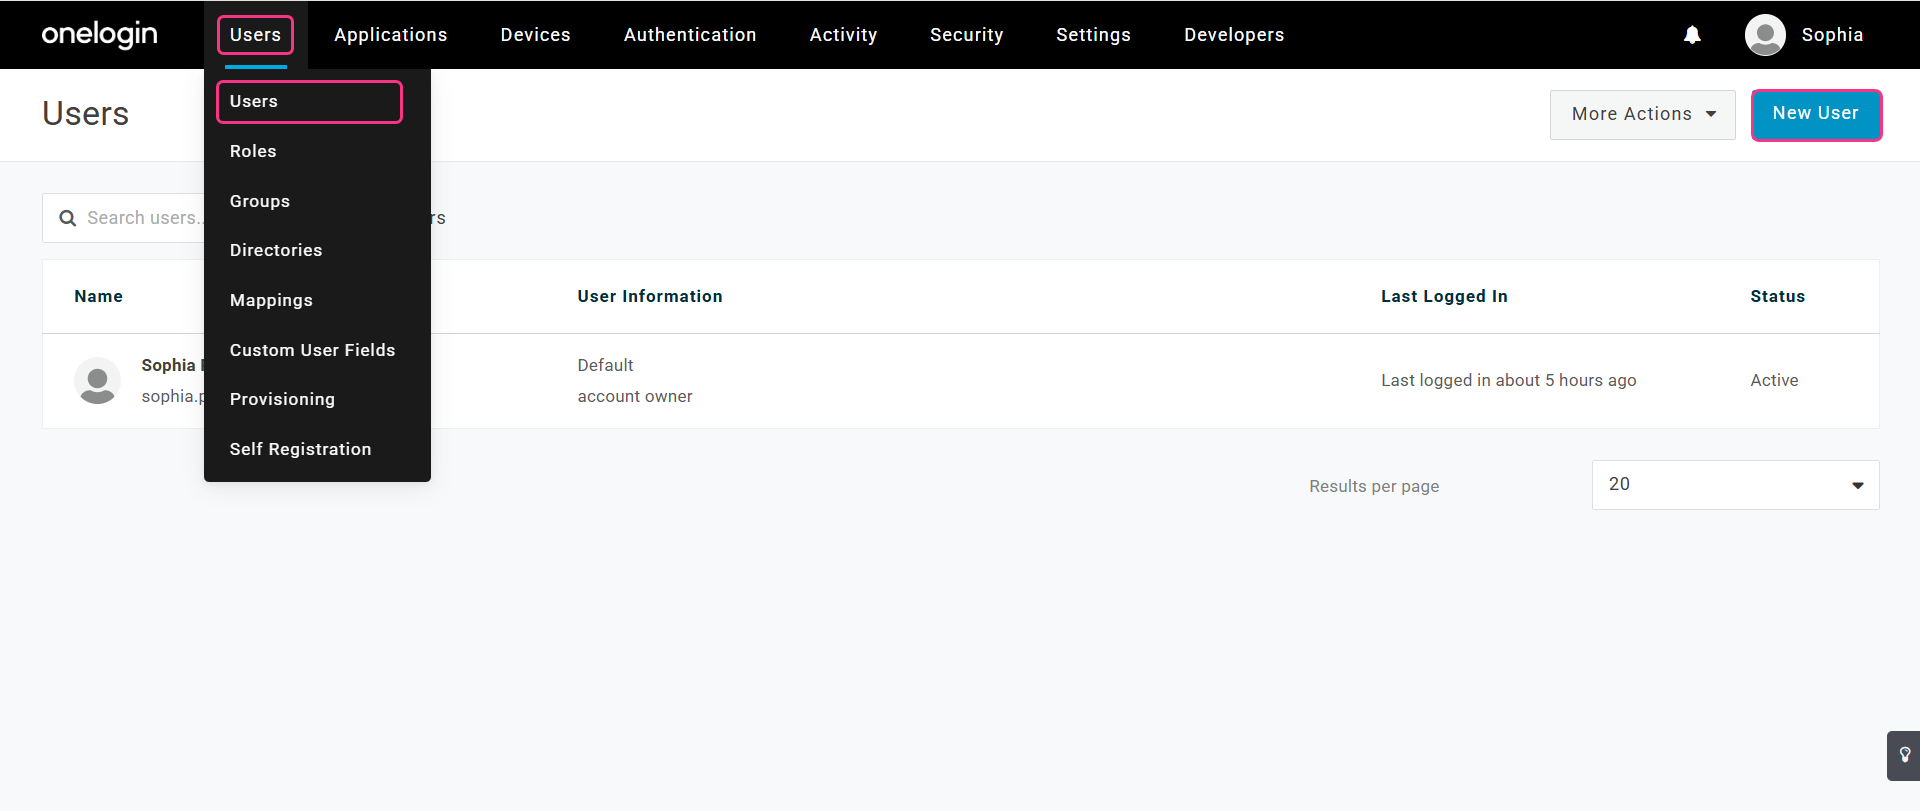
In the OneLogin top menu, expand Users, and then select Users.
-
Select New User, enter the reader's details, and then select Save.
Assign the app to the reader
-
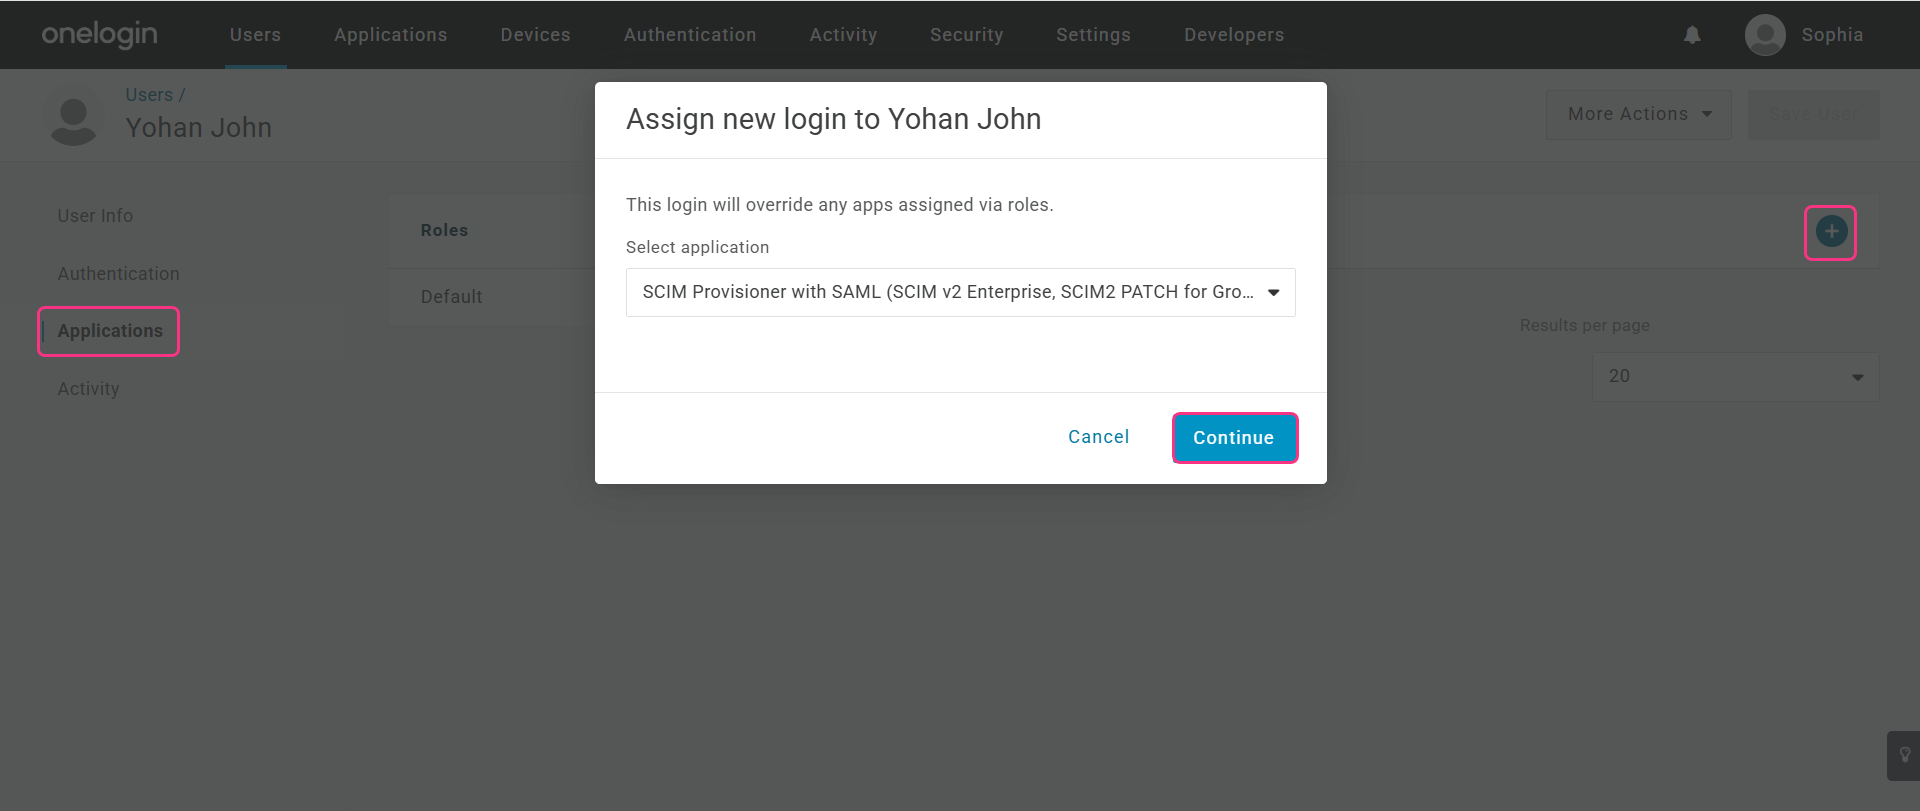
In the reader's profile, select Applications in the left menu.
-
Select the + icon in the top-right corner.
-
Select your SCIM Provisioner with SAML app, and then select Continue.
-
In SCIM username, enter the reader's email address, and then select Save.
Approve the reader
-
In the OneLogin top menu, select Applications > Applications.
-
Open your SCIM Provisioner with SAML app, and then select the Users tab. The new reader's status shows Pending.
-
Select the status, and then select Approve in the confirmation dialog.
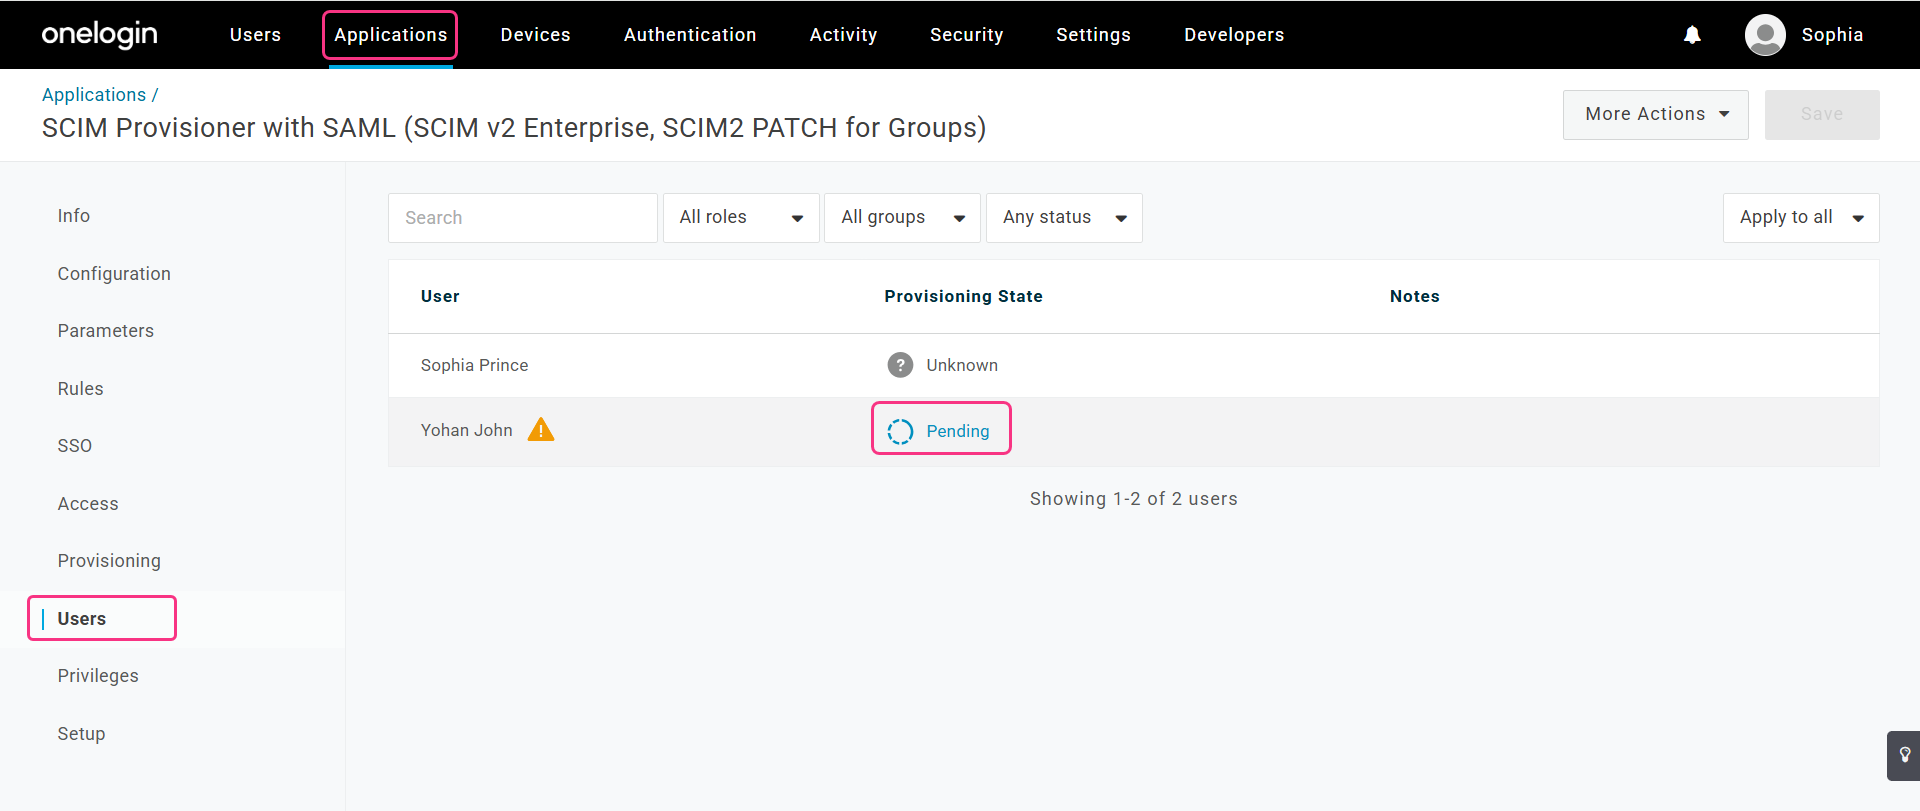
OneLogin sends the reader to Document360.
Check the reader in Document360
Go to Settings () > Users & Permissions > Readers & groups. The reader appears with an SSO-SCIM badge next to their name.
.png)
Step 7: Assign people and test sign-in
Only people who have the app assigned in OneLogin can sign in to Document360 through OneLogin. Readers you provisioned in Step 6 already have it. To give other people access, assign the app to them in the same way.
OneLogin SCIM doesn't create users, so each user needs an SSO account in Document360: convert their existing account (Step 5) or invite or add them as SSO users. Readers you don't provision through SCIM need an SSO account in the same way.
To test sign-in:
- In a private browser window, open the Document360 login page.
- Enter the email address or subdomain of an SSO account that has the app assigned, and then select Login with SSO, or the text you set in Login button text.
- Sign in on the OneLogin page.
You land in the knowledge base portal. To learn more about how people sign in, read Log in using SSO - Knowledge base portal. If sign-in fails, read SSO login issues and SAML SSO issues.
Manage users and readers with SCIM
With SCIM on, you manage readers in OneLogin, not in Document360. In Document360, you can't edit a SCIM reader's name or delete them. You can only manage their content access.
.png)
Manage content access
-
Go to Settings () > Users & Permissions > Readers & groups.
-
Select the reader, and then select Manage content access.
-
Select the Content access level, and then select Update.
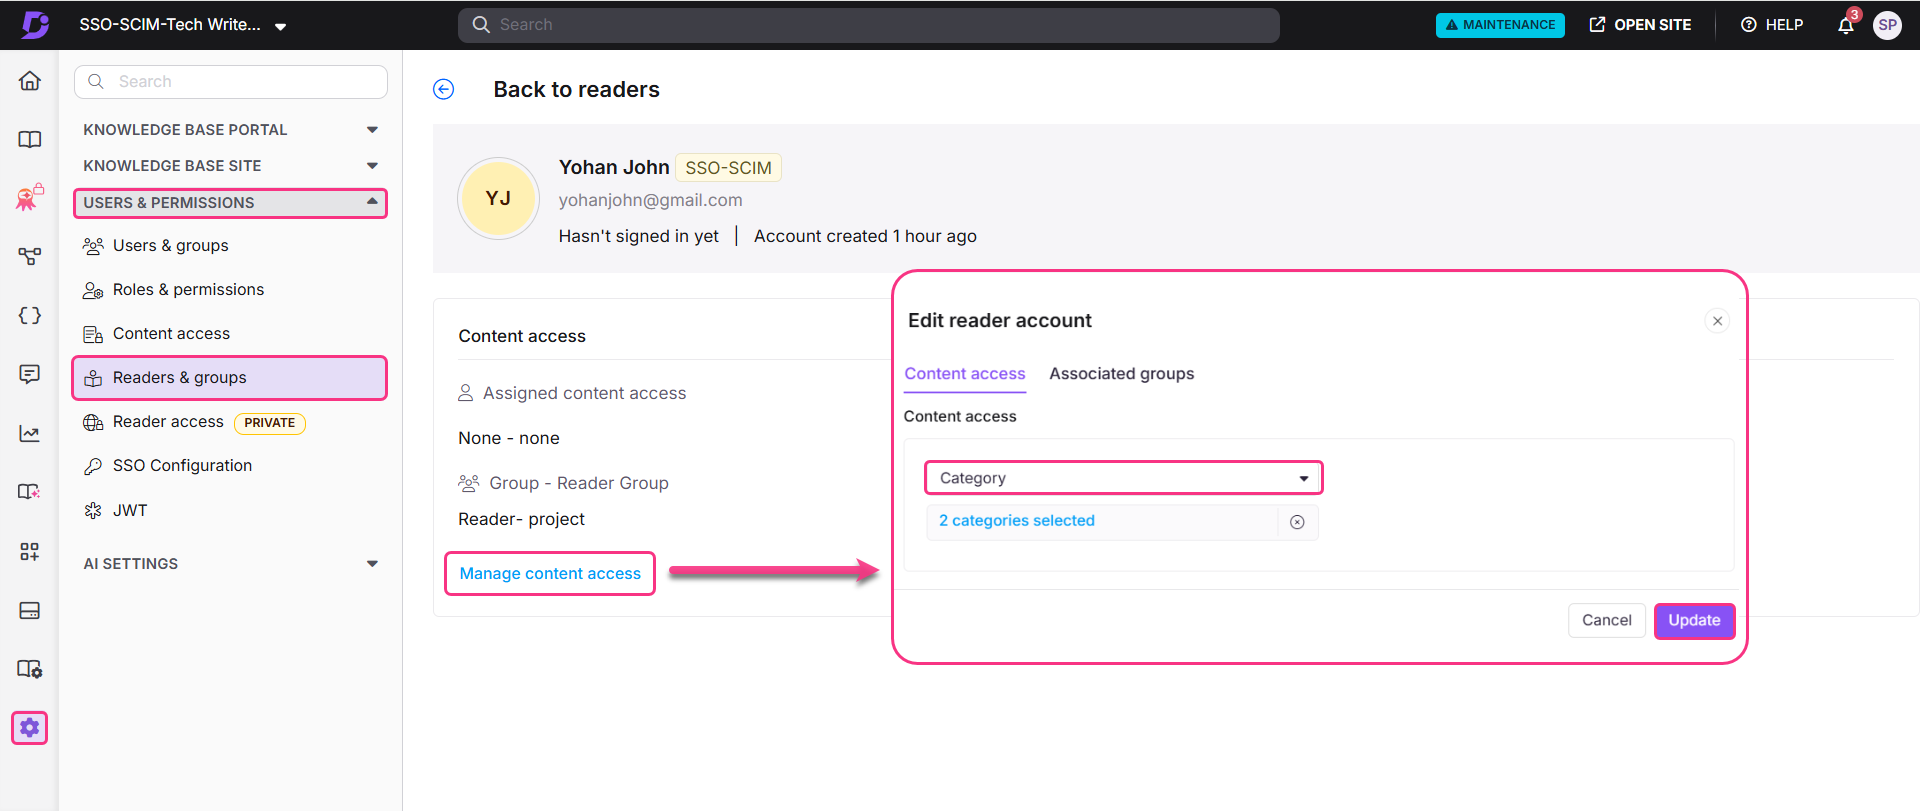
The reader's content access is updated.
Delete a reader
-
In the OneLogin top menu, select Users, and then select the reader.
-
Expand More Actions, and then select Delete.
.png)
-
In the confirmation dialog, select Delete.
OneLogin deletes the reader. In Document360, the reader isn't removed: their status changes from Active to Inactive.
Limits and limitations
| Item | Limit |
|---|---|
| Identity provider | You can't change the IdP after you create the configuration. |
| SAML and OpenID Connect | SAML and OpenID Connect configurations can't both be active in the same project. |
| SCIM with OneLogin | OneLogin SCIM provisions readers only. User attributes and group mapping aren't supported, so you can't add users or groups from OneLogin. |
| People managed through SCIM | You can't edit their names, delete them, or change their roles and permissions in Document360. You can only manage their content access. |
| Deleting people in OneLogin | Document360 doesn't remove the profile. Its status changes from Active to Inactive. |
| Child configurations | A configuration that inherits SCIM settings from a parent project can't change those settings. |
| Last active configuration | If this is the only active SSO or JWT configuration and the default login page is disabled, you can't turn it off or delete it. Document360 shows: "This is the only active SSO or JWT configuration and the default login page is disabled, so turning it off or deleting it would lock everyone out. Enable another configuration, or turn the default login page back on, first." |
Best practices
- Use the right OneLogin app. Select SCIM Provisioner with SAML (SCIM v2 Enterprise, SCIM2 PATCH for Groups). Other apps don't work with Document360.
- Approve new readers promptly. New readers show Pending on the app's Users tab in OneLogin. They reach Document360 only after you approve them.
- Store both secret tokens like passwords. Keep them in a password manager or secrets vault, never in plain text files or code repositories.
- Use inheritance for several projects. If several Document360 projects use the same OneLogin setup, inherit SCIM settings from one parent configuration so you manage them in one place.
- Renew the SAML certificate before it expires. When the certificate expires, SSO sign-in stops working. To learn more, read Managing SSO certificates.
FAQ
Why can't I add users and groups from OneLogin?
OneLogin's SCIM integration with Document360 doesn't support user attributes or group mapping, so it provisions readers only. If you need to manage users and groups through SCIM, use Okta or Microsoft Entra ID as your identity provider.
What happens when I delete a reader in OneLogin?
Document360 doesn't remove the reader. Their status changes from Active to Inactive.
What happens to existing Document360 users and readers when I set up SSO?
Nothing changes for them unless you turn on Convert existing team and reader accounts to SSO in Step 5, or convert them later. Conversion switches their existing account to SSO; it doesn't create a second account. After conversion, they sign in through OneLogin instead of with a password. To learn more, read Convert user to SSO and Convert reader to SSO.
Can I reuse SCIM settings from another project?
Yes. In Configure an existing connection on the Configure IdP step, select an SSO configuration that has SCIM turned on. To do this, you need the Owner or Admin role in both projects, and the same non-SSO account in all the projects involved. The new configuration inherits the parent's SCIM settings, and you can't change them in the child. If you turn on SCIM in the parent after child projects inherit from it, the people SCIM manages are provisioned to all child projects in the background.
Why are there two SCIM secret tokens?
Two tokens let you replace one without breaking the sync. If the primary token is exposed, switch OneLogin to the secondary token first, and then regenerate the primary token. Provisioning keeps running while you replace it.